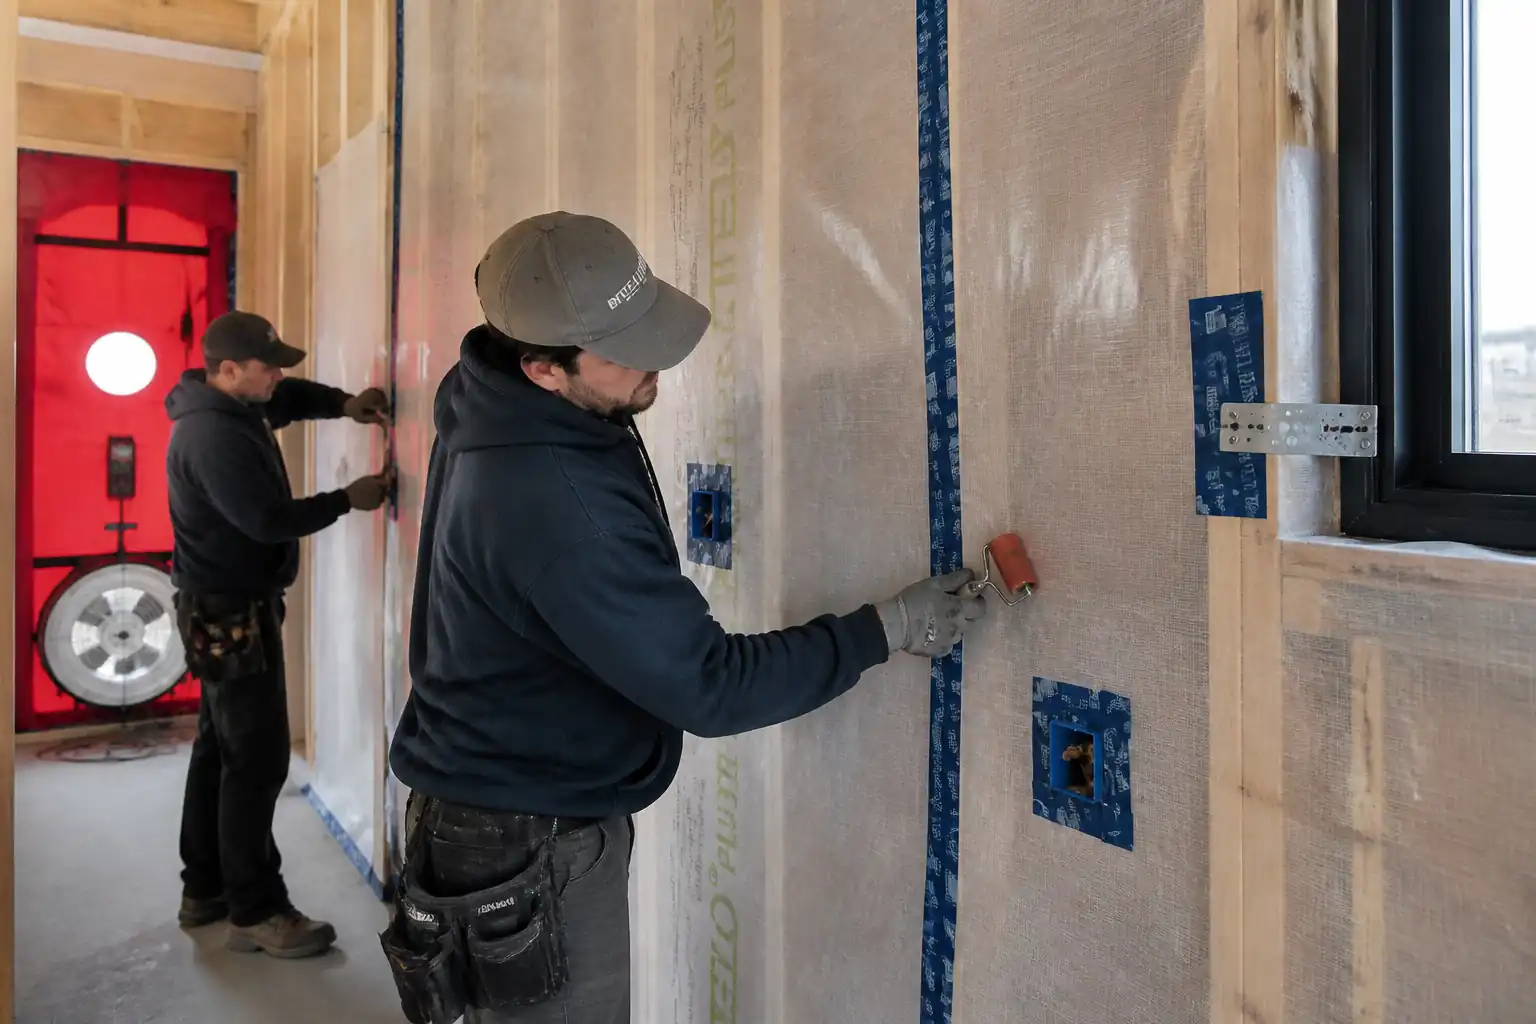
Method Statement: Installation of Rigid PIR Insulation Boards in Masonry Cavity Walls (Partial-Fill) – Method Statement
AI-assisted method statement with matching ITP, PDF download, and Excel export.
More than a static template
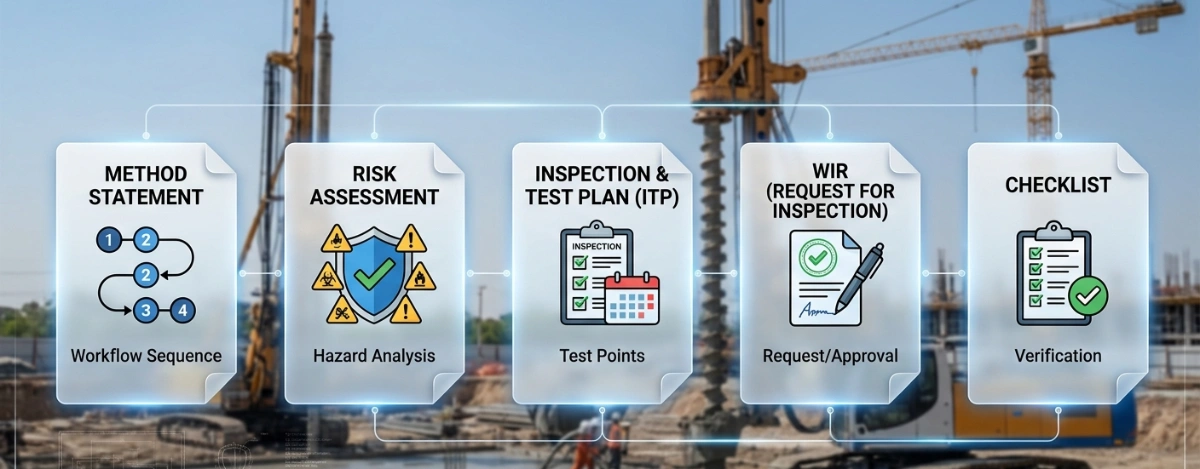
Unlike a downloadable Word or PDF template, this method statement is an AI-assisted editable starting point connected directly to a matching Inspection and Test Plan. Every section is structured, project-adaptable, and ready to export.
- AI-assisted drafting — Customize every section with AI for your specific project scope.
- Linked ITP — A matching inspection and test plan is generated alongside the method statement.
- Multiple export formats — Download as a formatted PDF or editable Excel spreadsheet.
- Editable starting point, not a final document — Review, verify, and adjust all content against your project requirements before use.
Static template vs. Quollnet workflow
| Feature | Static template | Quollnet |
|---|---|---|
| Project-specific content | Manual fill-in required | AI-assisted customization |
| Linked ITP | Separate document, no link | Matching ITP included |
| Export formats | Usually PDF only | PDF and Excel |
| Structured sections | Free-form layout | 13 standardized sections |
| Saved to your account | Local file only | Cloud-saved, reusable |
| Content accuracy | You verify everything | AI-assisted, you still verify |
| Cost | Often free but time-intensive | Free to customize and download |
What you can customize
When you save this method statement to your account, every section becomes editable. The following 13 sections are included:
- Scope — Defines the activity and its boundaries.
- References — Standards, specifications, and drawings.
- Responsibilities — Roles and accountabilities.
- Resources — Labour, plant, and equipment summary.
- Materials — Materials and compliance requirements.
- Equipment — Tools and equipment details.
- Prerequisites — Hold points and pre-conditions.
- Method sequence — Step-by-step construction sequence.
- Safety controls — HSE risk controls and PPE.
- Environmental controls — Environmental mitigation measures.
- QA/QC — Quality inspection and test requirements.
- ITP — Inspection and Test Plan table (has its own page).
- Attachments — Referenced drawings and documentation.
Why this method statement is used
This method statement is used to define and communicate the approved procedure for carrying out method statement: installation of rigid pir insulation boards in masonry cavity walls (partial-fill) on site. It ensures the work is planned in advance, the correct resources and controls are in place, and all personnel understand responsibilities, sequence, quality requirements, and safety controls before work begins. It aligns site execution with the documented scope and acceptance expectations.
Who uses this method statement
This method statement is used by contractors, site supervisors, project engineers, QA/QC engineers, HSE officers, consultants, and client representatives. It serves as a shared reference for planning, execution, supervision, inspection, and approval of the activity on site.
When it is prepared and submitted
The method statement is prepared before the work activity starts and submitted as part of the pre-construction documentation package for review and approval.
Who reviews or approves it
The method statement is usually submitted to the client representative, consultant, resident engineer, or project management consultant for review and approval before the work commences.
Important approval note
This method statement is an AI-assisted editable starting point, not a pre-approved document. Before use on any project, all content must be reviewed and approved by the relevant parties (superintendent, principal contractor, or client representative) in accordance with your contract and project quality plan.
For example: if your specification requires a departure from a referenced standard, that departure must be documented and approved separately — this method statement will not capture that automatically. Always verify against your applicable drawings, specifications, and regulatory requirements.
Method statement content
Scope
Overview
This method statement covers the installation of rigid polyisocyanurate (PIR) insulation boards as a partial-fill solution within new-build masonry cavity walls. It includes:
- Setting out and preparation of the inner and outer leaves up to the working lift
- Placement and density of cavity wall ties with drip features and retaining clips
- Installation of PIR boards with tight-butt joints; vertical joints staggered
- Maintaining a continuous, unobstructed residual air cavity between insulation and the external leaf
- Tape-sealing of board-to-board joints where specified
- Interface details at DPCs, cavity trays, weep vents, openings, and cavity closers
- Inspection, testing, and documentation prior to closing the cavity
Exclusions
- Structural masonry design and structural stability checks of the building (covered under separate method statement/design)
- Installation of full-fill insulation systems or pumped cavity insulation
- Fire stopping to floor edges/compartments beyond typical cavity barriers/closers around openings (refer to fire strategy)
Objectives
- Achieve specified U-values and condensation risk control
- Ensure moisture management via correct tie orientation, drips, DPCs, cavity trays, and residual cavity continuity
- Deliver workmanship per relevant standards and manufacturer’s instructions
Key Target Parameters
- Typical residual cavity: 50 mm clear minimum [Verify per project specifications]
- Tie density: typically 2.5 ties/m² (e.g., 900 mm horizontal x 450 mm vertical), and 300 mm vertical spacing within 225 mm of openings [Verify per project specifications]
- Tie embedment: minimum 50 mm into each leaf [Verify per project specifications]
- Start of insulation: typically at least 150 mm below DPC level to mitigate thermal bridging [Verify per project specifications]
- Tape width for foil-faced boards: typically ≥50 mm aluminium foil tape [Verify per project specifications]
- PIR thickness and λ-value: as per energy model and project drawings [Verify per project specifications]
References
| Document Type | Reference / Number | Revision | Notes |
|---|---|---|---|
| Standard | BS EN 13165 | Product conformity and declared thermal performance (λD). | |
| Code of practice | BS 8000-3 | Workmanship tolerances, laying, and site practice. | |
| Standard | BS EN 1996-2 (Eurocode 6) and PD 6697 | Cavity wall ties, embedment guidance, corrosion resistance and detailing. | |
| Standard | BS EN 845-1 | Tie types, material class, corrosion protection. | |
| Guide | BS 5250 | Condensation risk and vapour control strategies. | |
| Standard | BS EN 14909 | DPC material requirements. | |
| Technical standard | NHBC 6.1 (Latest) | Additional workmanship and tie-spacing guidance. [If NHBC warranty applies] | |
| Certification | BBA/EOTA (Project-specific) | Product-specific installation details and limitations. |
Responsibilities
| Role | Responsibility | Name / Party |
|---|---|---|
| Project Manager | Overall implementation of method statement, coordination with designer and HSE, approvals of materials and inspections. | Main Contractor |
| Site Engineer / Construction Manager | Daily supervision, sequencing with bricklayers, inspection of tie layout, cavity cleanliness, residual cavity verification, sign-off of ITP hold/witness points. | Main Contractor |
| Masons and Insulation Installers | Workface execution: placing ties, clips, PIR boards, tape-sealing, maintaining cavity control. | Main Contractor/Subcontractor |
| Procurement / Materials Controller | Material approvals, certificates, deliveries, storage, traceability. | Main Contractor |
| HSE Manager / Officer | HSE plan implementation, task-specific risk assessments, inspections of scaffolds/edge protection, PPE compliance, permits. | Main Contractor |
| Quality Engineer / Inspector | Inspections of workmanship, tie densities, cavity and insulation installation per ITP; NCRs and corrective actions. | Main Contractor |
| Engineer/Consultant / Clerk of Works | Review and acceptance at hold/witness points; compliance with design and standards. | Employer/Consultant |
Resources
| Resource Type | Description | Quantity | Remarks |
|---|---|---|---|
| 1 | |||
| 4–8 [Verify per productivity plan] | |||
| 2–4 [Verify] | |||
| 1–2 |
Materials
| Material | Specification / Grade | Quantity | Remarks |
|---|---|---|---|
| PIR Insulation Boards | Thickness: [Project-specified]; Dimensions: typically 1200x450/1200x600 mm [Verify]; Foil-faced both sides | ||
| Wall Ties & Retaining Clips | Austenitic stainless steel; tie length for correct embedment both leaves; UV-stable clips | ||
| DPC/Cavity Trays & Weeps | Width to suit leaf thickness; Weeps at 450 mm c/c above trays [Verify] | ||
| Aluminium Foil Tape | UV/weather-resistant for temporary exposure; same foil finish as PIR face | ||
| PU Gap-Filling Foam (optional) | Low-expansion, closed-cell, compatible with PIR foils |
Equipment
| Equipment | Capacity / Type | Quantity | Inspection Required |
|---|---|---|---|
| 2–4 | |||
| Set | |||
| Set | |||
| As required | |||
| As required | |||
| By area |
Prerequisites
Approvals and Documentation
- Approved shop drawings detailing cavity width, PIR thickness, tie type/length/density, DPC/tray locations, and opening details [Verify per project specifications].
- Manufacturer’s data sheets and BBA/EOTA certificates for PIR boards and retaining clips.
- ITP approved by the Engineer with identified hold/witness points.
Site Readiness
- Scaffolding installed, tagged, and inspected; access and lighting adequate.
- Inner leaf set out, first lift constructed to level; DPCs at base installed; cavity trays scheduled above openings per drawings.
- Materials delivered, inspected, undamaged, dry, and stored flat on pallets, off ground, under weatherproof breathable covers.
- Weather conditions suitable: avoid installation during driving rain; protect open cavities from water ingress.
Pre-Installation Checks
- Confirm cavity width equals design: nominal width ±10 mm tolerance [Verify per project specifications].
- Confirm tie selection: length to achieve ≥50 mm embedment each leaf; corrosion class stainless steel per exposure [Verify].
- Confirm residual cavity target (typically 50 mm clear for partial fill) and interface details at corners/reveals.
- Toolbox talk completed: hazards (cuts from ties, WAH, wind uplift on boards), manual handling, and blade safety.
- Mock-up panel (minimum 1.2 m x 1.2 m) constructed and approved if required.
Permits/Inspections
- Working at Height permit and scaffold inspection record within valid period [Verify per project HSE plan and local regulations].
- Daily pre-start HSE brief and inspection of clips, ties, and cavity cleanliness tools.
Method Sequence
| Step | Activity | Description | Responsibility | Inspection / Hold Point |
|---|---|---|---|---|
| 1 | Set out tie grid and build inner leaf to first lift | Mark horizontal courses and vertical spacing per tie density; build inner leaf to working lift maintaining plumb and level. | Masons / Site Engineer | Check coursing and cavity width at 2 m intervals. |
| 2 | Install first row of wall ties with drips | Insert stainless ties in bed joints to specified pattern. Ensure drip is central or 90 mm from inner face depending on tie design, and slope ties slightly downwards (≈2°) toward outer leaf. | Masons | Measure embedment; verify slope and drip orientation. |
| 3 | Fit retaining clips and starter boards | Push retaining clips onto ties against inner leaf. Place first course of PIR boards starting ≥150 mm below DPC, tight to inner leaf, tight-butted at joints. | Insulation Installers | Visual check of clip engagement and board seating. |
| 4 | Stagger and continue PIR installation | Continue boards up the lift; stagger vertical joints by ≥200 mm; cut neatly around ties and openings; maintain continuous contact with clips/inner leaf. | Insulation Installers | Check joint offsets and snug fit at cuts. |
| 5 | Maintain residual cavity and cavity cleanliness | As outer leaf is raised, use cavity battens/guards to prevent mortar droppings. Maintain unobstructed residual cavity (typically 50 mm). Remove snots daily. | Masons / Installers | Measure cavity at openings/corners and every 2 m. |
| 6 | Install subsequent rows of ties and clips through boards | Place ties at specified coursing; pierce boards if required; fit retaining clips at every tie passing the insulation. | Masons / Installers | Confirm one clip per tie; increased tie density at openings/edges. |
| 7 | Tape-seal board joints (if specified) | Apply ≥50 mm foil tape to all board-to-board joints and cut edges after surfaces are clean and dry. | Installers | Adhesion check; continuity at corners/returns. |
| 8 | Openings, trays, and weeps | Install cavity trays with stop-ends over all openings; provide weep vents at 450 mm c/c min (≥2 per opening); coordinate with insulation cuts and maintain residual cavity. | Masons / Installers | Visual check; count weeps; ensure no obstruction. |
| 9 | Corners, junctions, and cavity closers | Install proprietary insulated cavity closers or detailed returns at jambs and sills. Ensure no thermal bypass and water path to inner leaf. | Installers | Detail verification vs drawings. |
| 10 | Pre-close inspection | Before raising outer leaf to close cavity: inspect for tie density, clip installation, cavity cleanliness, residual cavity, taped joints, and interfaces. | QA Inspector / Engineer | Formal ITP hold point; joint walkdown with Consultant. |
| 11 | Weather and edge protection | At day’s end, protect exposed cavity tops with temporary covers; secure loose materials from wind uplift. | Foreman / Crew | End-of-day check. |
Health, Safety, and Environment – Safety Controls
Task-Specific Hazards and Controls
- Hazard: Working at height on scaffolds/working platforms
- Consequence: Falls leading to serious injury or fatality
- Engineering/Procedural Control: Certified scaffolding with double guardrails and toe-boards; scaffold tags in date; working lifts coordinated with bricklaying sequence; keep platforms free of debris.
- Required PPE: Hard hat, safety footwear, gloves, eye protection; fall-arrest only where collective measures cannot be provided.
- Collective Measure: Edge protection and safe access ladders/towers.
-
Inspection/Permit: Scaffold inspection every 7 days and after alterations or severe weather; WAH permit where required [Verify per project HSE plan and local regulations].
-
Hazard: Cuts/punctures from exposed wall ties and sharp foil edges
- Consequence: Lacerations, eye injury
- Engineering/Procedural Control: Cap protruding ties where feasible; do not leave ties protruding at head height; controlled handling and tie clip fitment sequence; use proper cutting benches.
- Required PPE: Cut-resistant gloves, long sleeves, safety glasses.
- Collective Measure: Housekeeping to remove offcuts; designated cutting area.
-
Inspection/Permit: Supervisor inspection each lift; HSE walkdowns.
-
Hazard: Manual handling of boards and blocks
- Consequence: Musculoskeletal strains
- Engineering/Procedural Control: Team lifts for large boards; limit carry distances; store boards close to point of use; use board carriers.
- Required PPE: Safety footwear, gloves.
- Collective Measure: Material hoists where practicable; mechanical handling for pallets.
-
Inspection/Permit: Manual handling assessment and briefing.
-
Hazard: Wind uplift (“sail effect”) on lightweight PIR boards
- Consequence: Loss of control, falls, falling objects
- Engineering/Procedural Control: Cease installation at sustained high winds (e.g., >12 m/s) [Verify per project HSE plan]; secure stacks; install small quantities ahead of outer leaf.
- Required PPE: Hard hat, eye protection.
- Collective Measure: Wind barriers/screening where feasible.
-
Inspection/Permit: Supervisor weather check and stop-work authority.
-
Hazard: Dust and particles from cutting PIR
- Consequence: Eye/respiratory irritation
- Engineering/Procedural Control: Use fine-tooth saws, cut in well-ventilated area, damp-wipe boards before taping; avoid power saws that generate excessive dust.
- Required PPE: Safety glasses, FFP2 mask (at minimum) [Verify local requirements].
- Collective Measure: Designated cutting station downwind; no dry sweeping (use vacuum).
-
Inspection/Permit: HSE inspections of cutting area.
-
Hazard: Falling objects (mortar snots, tools) into/through cavity
- Consequence: Struck-by injuries; cavity blockage
- Engineering/Procedural Control: Use cavity guards and toe-boards; tool lanyards at height; prohibit stacking above toe-board height.
- Required PPE: Hard hat, safety footwear.
- Collective Measure: Exclusion zones below active lifts.
-
Inspection/Permit: Daily housekeeping checks; supervisor sign-off.
-
Hazard: Use of low-expansion PU foam (if specified)
- Consequence: Skin/eye irritation, flammability
- Engineering/Procedural Control: Minimize use; follow SDS; provide ventilation; no hot works nearby.
- Required PPE: Chemical-resistant gloves, goggles.
- Collective Measure: COSHH assessment and storage in ventilated cabinet.
- Inspection/Permit: COSHH permit/control sheet; SDS available on site.
Environmental Controls
Controls and Good Practice
- Waste Management
- Segregate PIR offcuts and plastic/foil packaging; return clean offcuts to supplier take-back where available; otherwise dispose as non-hazardous construction waste per local regulations.
-
Record volumes on waste tracking sheets; avoid contamination with wet mortar.
-
Dust and Air Quality
-
Establish a designated cutting zone; use hand saws; prohibit high-speed abrasive cutting; provide FFP2 masks and vacuum clean-up.
-
Noise
-
Low-noise hand tools preferred; comply with site working hours; monitor if power tools used intermittently.
-
Water and Runoff
-
Protect open cavities from rainfall; do not wash mortar into drainage; provide drip protection at day’s end; manage cement washout in designated bays.
-
Material Storage and Protection
-
Store PIR on pallets, covered and tied down; prevent UV/weather degradation; keep dry to maintain adhesive tape performance.
-
Product Stewardship
-
Verify GWPs/blowing agents and embodied carbon data if required by project sustainability plan; maintain product batch traceability.
-
Compliance
- Follow the Project Environmental Management Plan and local regulations; record environmental inspections and corrective actions.
Quality Assurance and Quality Control
QA/QC Strategy
- Incoming Materials: Check delivery notes, BBA/EOTA certificate numbers, batch codes; verify thickness, board type, and condition.
- Pre-Works: Confirm tie type/length, density layout, and cavity width. Approve mock-up if required.
- In-Process Checks (each lift):
- Tie embedment ≥50 mm each leaf; slope outward to outer leaf; drip centrally located.
- Retaining clip fitted to every tie passing the board.
- Boards tight-butted; vertical joints staggered ≥200 mm; no visible gaps >2 mm without treatment.
- Residual cavity maintained typically at 50 mm clear minimum [Verify per project specifications]; cavity free of mortar snots.
- DPCs/trays installed with laps as per manufacturer; weeps installed and unobstructed.
- Tape application continuous, well-adhered, and clean where specified.
- Hold/Witness Points: Pre-close cavity inspection with Engineer/Consultant; do not proceed until accepted.
- Records: Tie density logs, cavity gauge logs, photographic evidence per lift, ITP checklists, NCRs/Corrective Actions.
- Acceptance: Conformance to BS 8000-3 workmanship and manufacturer guidance; achieves design thermal and moisture management intent.
- Defects and Remedials: Replace damaged boards; recut poor fits; remove and refit where cavity has been bridged; document all remedials before closure.
Attachments
- Manufacturer’s installation guide and BBA/EOTA certificates for specified PIR boards and clips
- Product data sheets (PIR, retaining clips, foil tape, DPCs/trays, cavity closers)
- Sample ITP forms: tie density sheet, cavity gauge log, pre-close checklist
- Toolbox talk: working at height, sharp hazards, manual handling, cutting of PIR
- As-built photo register template
- NCR/Corrective Action template
This content is a read-only public reference. Download or customize to get an editable version.
ITP preview
The first inspection activities from the linked ITP for Method Statement: Installation of Rigid PIR Insulation Boards in Masonry Cavity Walls (Partial-Fill):
| Activity | Inspection / Test | Acceptance Criteria | Responsibility | Record |
|---|---|---|---|---|
| Material receipt – PIR boards & accessories | Check certificates (BS EN 13165), thickness, condition, batch codes | Conforms to approvals; undamaged; correct type/thickness | QA Inspector / Materials Controller | Materials inspection report; delivery dockets |
| Cavity width and inner leaf level check | Measure cavity width at 2 m intervals and corners | Within design tolerance (e.g., ±10 mm) [Verify] | Site Engineer | Survey log; photos |
| Wall tie selection and spacing | Verify tie type/length; measure spacing pattern; check orientation/drip | Type per spec; embedment ≥50 mm; spacing e.g., 900 x 450 mm grid; enhanced around openings [Verify] | QA Inspector / Site Engineer | Tie density sheet; inspection checklist |
Showing 3 of 10 inspection activities. View full ITP →
Related Inspection and Test Plan
An Inspection and Test Plan (ITP) is available for Method Statement: Installation of Rigid PIR Insulation Boards in Masonry Cavity Walls (Partial-Fill). The ITP defines the inspection activities, acceptance criteria, hold and witness points, responsible parties, and records required to verify the work described in this method statement.
View the Method Statement: Installation of Rigid PIR Insulation Boards in Masonry Cavity Walls (Partial-Fill) ITP →Frequently asked questions
Continue with related Quollnet resources connected to this method statement.