Method Statement: Assembly and Erection of Heavy Modular Steel/Aluminum Panel Formwork for Retaining and Shear Walls – Method Statement
AI-assisted method statement with matching ITP, PDF download, and Excel export.
More than a static template
Unlike a downloadable Word or PDF template, this method statement is an AI-assisted editable starting point connected directly to a matching Inspection and Test Plan. Every section is structured, project-adaptable, and ready to export.
- AI-assisted drafting — Customize every section with AI for your specific project scope.
- Linked ITP — A matching inspection and test plan is generated alongside the method statement.
- Multiple export formats — Download as a formatted PDF or editable Excel spreadsheet.
- Editable starting point, not a final document — Review, verify, and adjust all content against your project requirements before use.
Static template vs. Quollnet workflow
| Feature | Static template | Quollnet |
|---|---|---|
| Project-specific content | Manual fill-in required | AI-assisted customization |
| Linked ITP | Separate document, no link | Matching ITP included |
| Export formats | Usually PDF only | PDF and Excel |
| Structured sections | Free-form layout | 13 standardized sections |
| Saved to your account | Local file only | Cloud-saved, reusable |
| Content accuracy | You verify everything | AI-assisted, you still verify |
| Cost | Often free but time-intensive | Free to customize and download |
What you can customize
When you save this method statement to your account, every section becomes editable. The following 13 sections are included:
- Scope — Defines the activity and its boundaries.
- References — Standards, specifications, and drawings.
- Responsibilities — Roles and accountabilities.
- Resources — Labour, plant, and equipment summary.
- Materials — Materials and compliance requirements.
- Equipment — Tools and equipment details.
- Prerequisites — Hold points and pre-conditions.
- Method sequence — Step-by-step construction sequence.
- Safety controls — HSE risk controls and PPE.
- Environmental controls — Environmental mitigation measures.
- QA/QC — Quality inspection and test requirements.
- ITP — Inspection and Test Plan table (has its own page).
- Attachments — Referenced drawings and documentation.
Why this method statement is used
This method statement is used to define and communicate the approved procedure for carrying out method statement: assembly and erection of heavy modular steel/aluminum panel formwork for retaining and shear walls on site. It ensures the work is planned in advance, the correct resources and controls are in place, and all personnel understand responsibilities, sequence, quality requirements, and safety controls before work begins. It aligns site execution with the documented scope and acceptance expectations.
Who uses this method statement
This method statement is used by contractors, site supervisors, project engineers, QA/QC engineers, HSE officers, consultants, and client representatives. It serves as a shared reference for planning, execution, supervision, inspection, and approval of the activity on site.
When it is prepared and submitted
The method statement is prepared before the work activity starts and submitted as part of the pre-construction documentation package for review and approval.
Who reviews or approves it
The method statement is usually submitted to the client representative, consultant, resident engineer, or project management consultant for review and approval before the work commences.
Important approval note
This method statement is an AI-assisted editable starting point, not a pre-approved document. Before use on any project, all content must be reviewed and approved by the relevant parties (superintendent, principal contractor, or client representative) in accordance with your contract and project quality plan.
For example: if your specification requires a departure from a referenced standard, that departure must be documented and approved separately — this method statement will not capture that automatically. Always verify against your applicable drawings, specifications, and regulatory requirements.
Method statement content
Scope
Work Summary
- Erection of heavy-duty modular steel or aluminum panel formwork systems for retaining and shear walls, including: crane-assisted panel handling, panel coupling/clamping, installation of walers/strongbacks, alignment with push–pull props/turnbuckles, joint gasketing/sealing, tie-rod and cone installation, anchorage of braces, and pre-pour integrity checks to prevent blow-outs.
Limits of Work
- From receipt/inspection of formwork components on site to pre-pour clearance and handover to the concrete works team. Striking/removal covered under separate method statement.
Objectives
- Achieve line, level, plumb, and wall thickness tolerances to ACI/EN benchmarks and project specifications.
- Maintain formwork system pressure within manufacturer’s allowable capacity by controlling tie layout, bracing, and pour rate [Verify per project specifications].
Interfaces
- Survey control, rebar installation, kicker/base preparation, embedded items installation, crane operations, concrete placing and vibration (for pressure control), HSE permitting and inspections.
References
| Document Type | Reference / Number | Revision | Notes |
|---|---|---|---|
| Standard | ACI 347 (latest) | Pressure control and formwork systems guidance. | |
| Standard | ACI 117 (latest) | ||
| Standard | BS EN 13670 | ||
| Standard | BS EN 1992-1-1 | Used for context; temporary works to manufacturer/TW design. | |
| Standard | DIN 18218 | ||
| Procedure | Project TWP / TWC | ||
| Regulation | OSHA/Local; ISO 45001 | ||
| Manual | Formwork OEM | Most stringent requirement governs. |
Responsibilities
| Role | Responsibility | Name / Party |
|---|---|---|
| PM | Ensure approvals and budgets. | Main Contractor |
| TWC | Check system capacity vs pressure; approve anchor/bracing design. | Main Contractor |
| Engineer | Survey control, hold point coordination. | Main Contractor |
| Supervisor | Toolbox talks, quality of assembly. | Formwork Subcontractor |
| AP | Risk assessment and method for lifts. | Main Contractor |
| Operator/Signaller | Safe lifts, tag-line control. | Plant Subcontractor |
| QA/QC | Documentation and NCR management. | Main Contractor |
| HSEO | Toolbox talks, inspections, incident response. | Main Contractor |
| Surveyor | Benchmarks and control. | Main Contractor |
| OEM Rep | Advise on special assemblies. | Supplier |
Resources
| Resource Type | Description | Quantity | Remarks |
|---|---|---|---|
| Manpower | Assemble panels, install ties/gaskets, brace and align. | 6–12 | |
| Manpower | Slinging, signalling, tag lines, landing panels. | 2–4 | |
| Manpower | Set-out and tolerance control. | 1–2 | |
| Manpower | Permits, inspections, monitoring. | 1 |
Materials
| Material | Specification / Grade | Quantity | Remarks |
|---|---|---|---|
| Panels | Heavy-duty system ≥60 kN/m² allowable pressure [Verify] | ||
| Tie assemblies | BS/EN compliant high tensile steel [Verify] | ||
| Props | Typical 10–40 kN working load [Verify] | ||
| Steel/aluminum walers and clamps | Per OEM | ||
| Gaskets | EPDM/PU foam, oil-resistant [Verify] | ||
| Release agent | ASTM C494 compatibility not applicable; follow OEM | ||
| Anchors | ETA/ICC approved [Verify] |
Equipment
| Equipment | Capacity / Type | Quantity | Inspection Required |
|---|---|---|---|
| Crane | Per lift study | As planned | Yes |
| Rigging | Set | Yes | |
| Torque tools | 2–4 | Yes | |
| Survey kit | 1 set | Yes | |
| Access & PPE | As required | Yes | |
| Sets |
Prerequisites
Approvals and Documentation
- Approved formwork layout drawings, tie-rod schedules, temporary works calculations, and bracing/anchor details signed by TWC/TWD.
- Approved lift plan, rigging studies, and operator certifications.
- ITP and checklists available; torque specifications from OEM; anchor design capacities documented.
Site Readiness
- Kicker/base prepared to line and level; compressive strength for anchors and prop bases achieved (typical fc' ≥ 20 MPa before loading) [Verify].
- Rebar and embedded items installed to drawings; clearance to tie lines confirmed.
- Survey control points established and protected.
Materials/Equipment Readiness
- Formwork components inspected; damaged parts quarantined.
- Lifting eyes/points checked and marked for use; slings/shackles inspected.
- Access platforms/guardrails installed where possible on ground; fall protection plan in place.
- Weather and wind forecast reviewed; wind action plan defined (e.g., suspend panel lifts >10–12 m/s; brace checks >8 m/s) [Verify per project HSE plan].
Permits and Briefings
- Permit to work, permit to lift, and permit to load (formwork) issued as applicable.
- Task-specific toolbox talk covering pinch points, coupling sequence, exclusion zones, and blow-out prevention completed.
- Emergency plan tested; rescue equipment for work at height available.
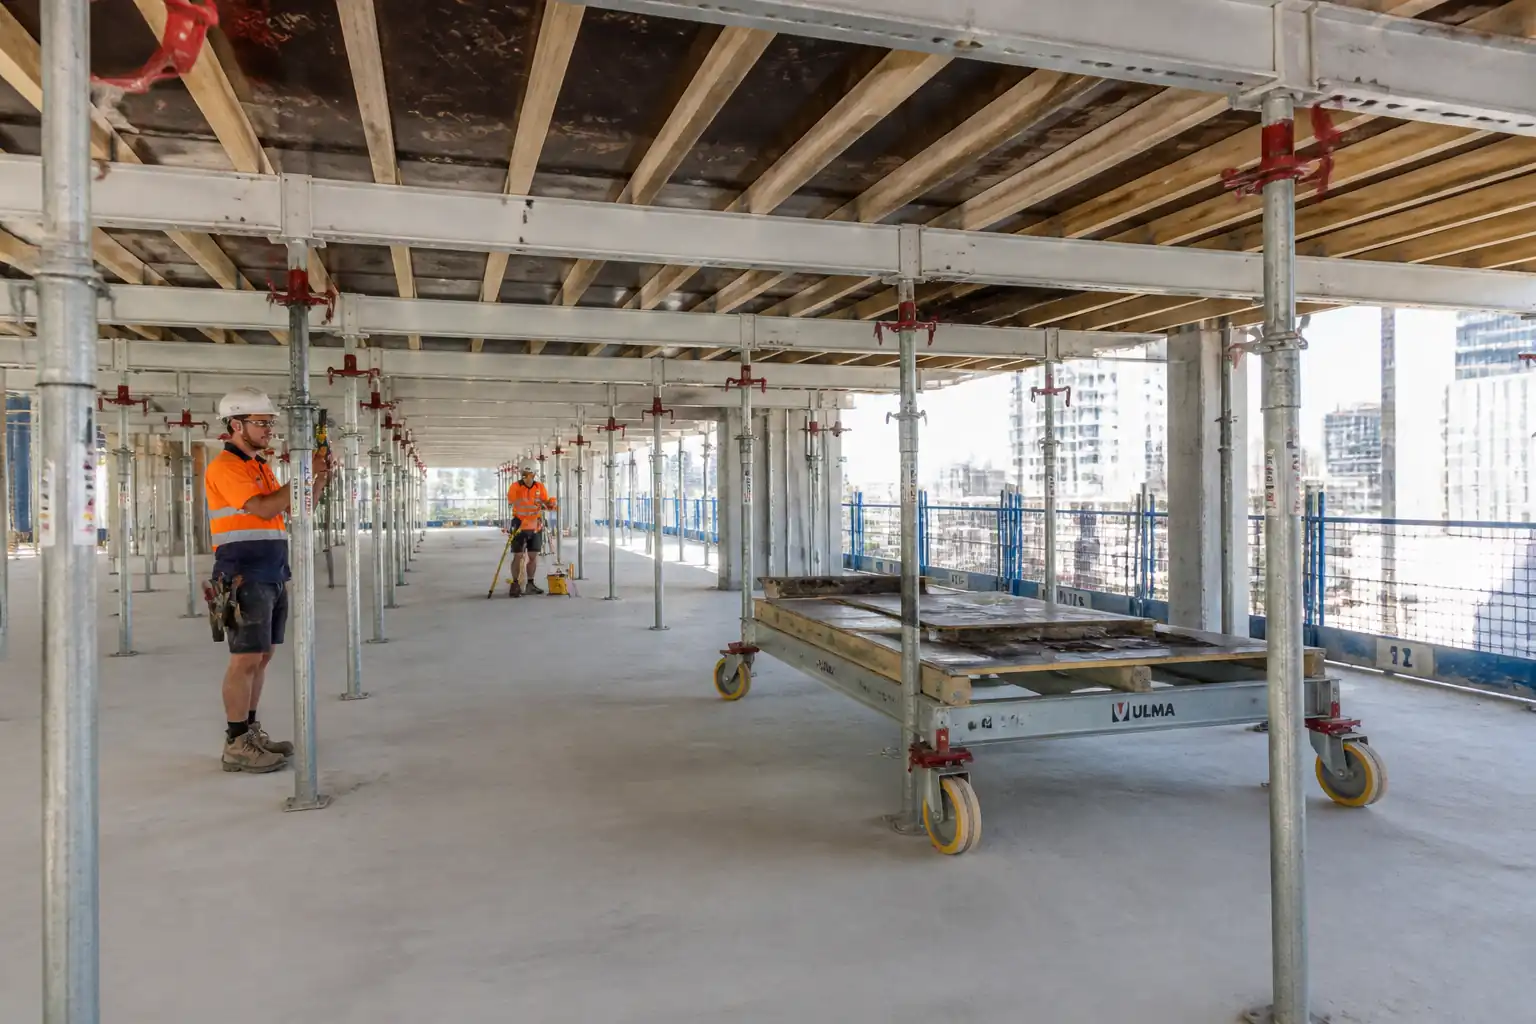
Method Sequence
| Step | Activity | Description | Responsibility | Inspection / Hold Point |
|---|---|---|---|---|
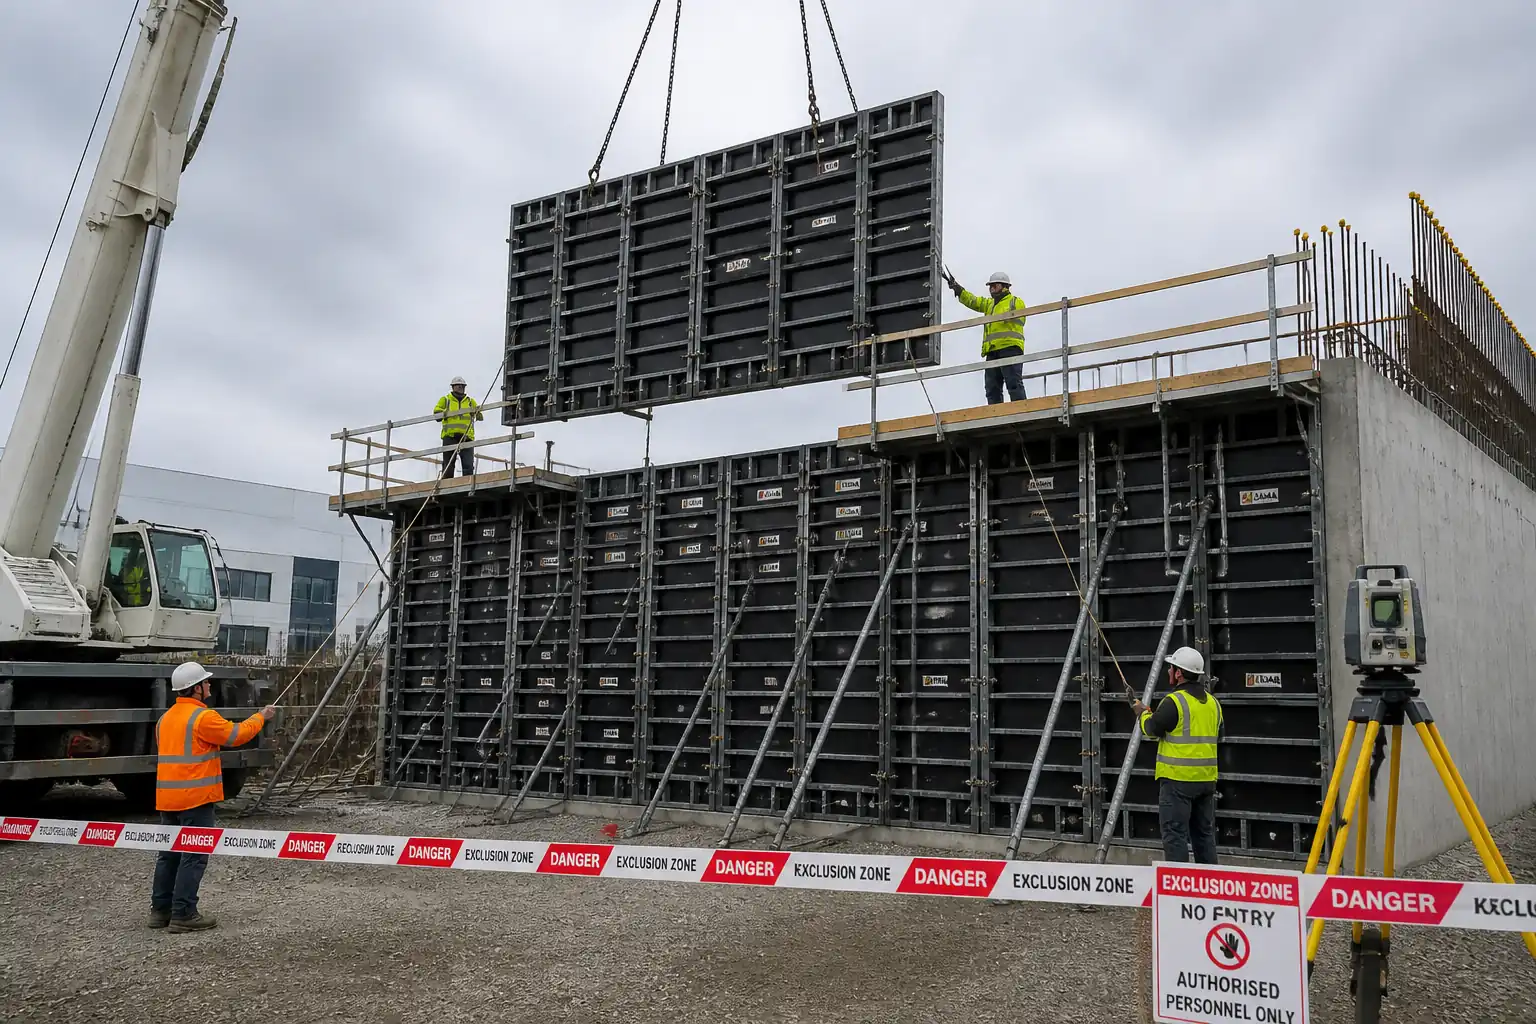
| 1 | Receiving and inspection of formwork components | Offload panels, walers, clamps, ties, gaskets; segregate damaged items; verify certificates. | Formwork Supervisor / QA/QC | Receiving checklist; visual inspection. |
| 2 | Pre-assembly on ground | Fit walers/strongbacks; pre-install gaskets; check clamp fit; lay out tie holes; mount integrated decks/rails if available. | Formwork Crew | Supervisor check; torque pre-check. |
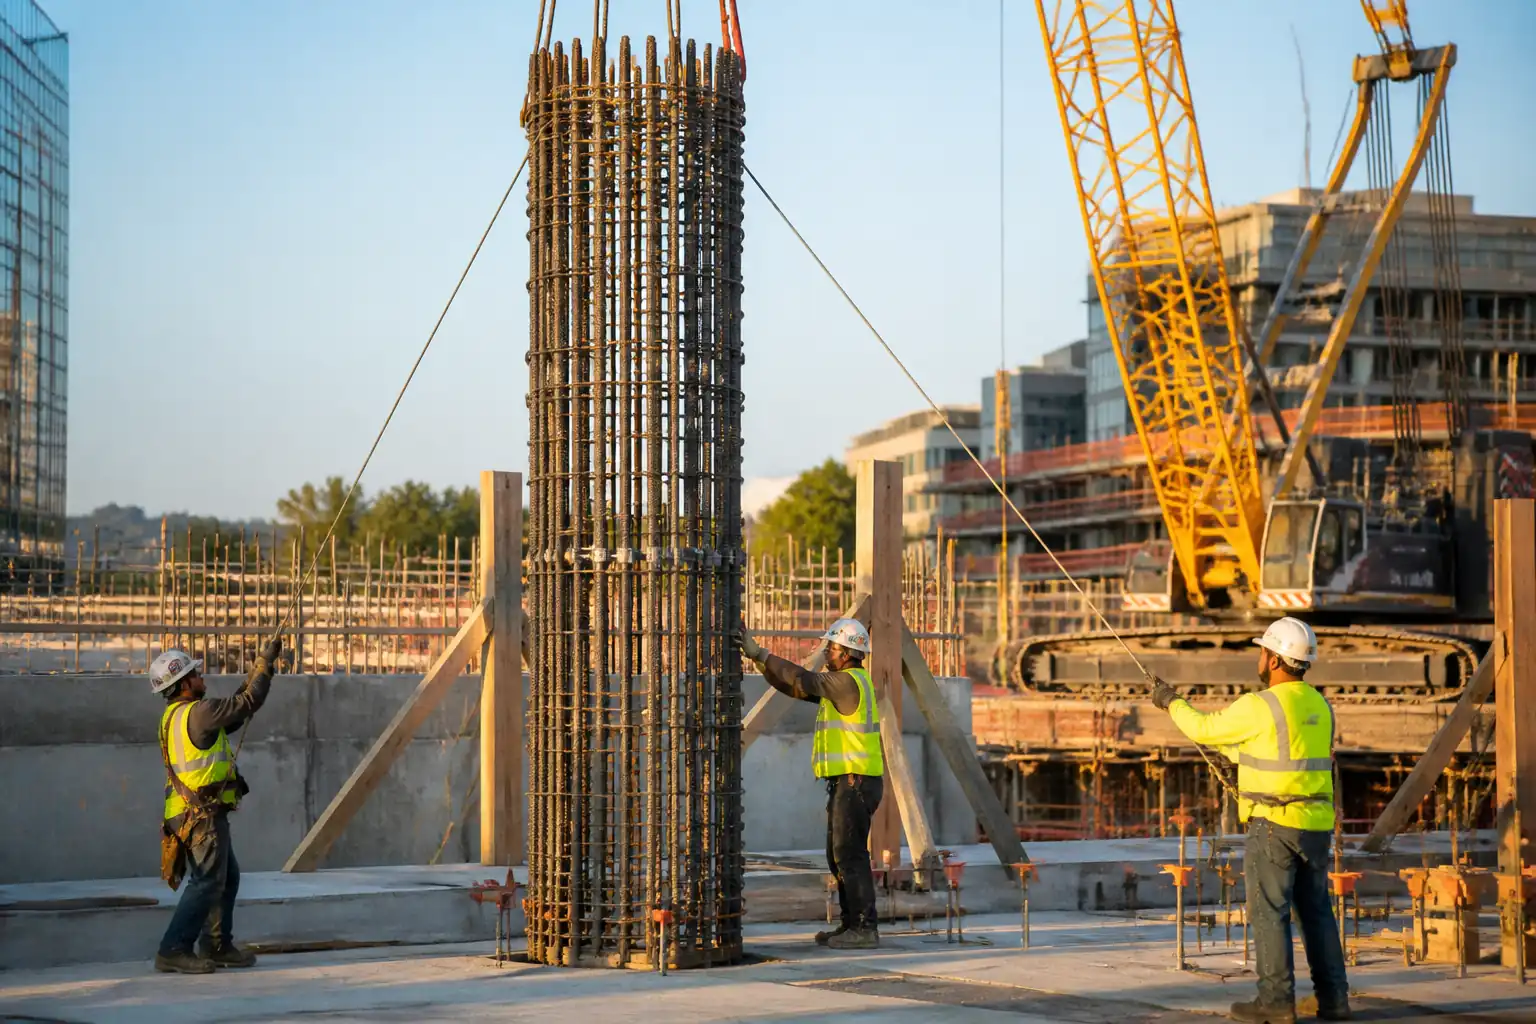
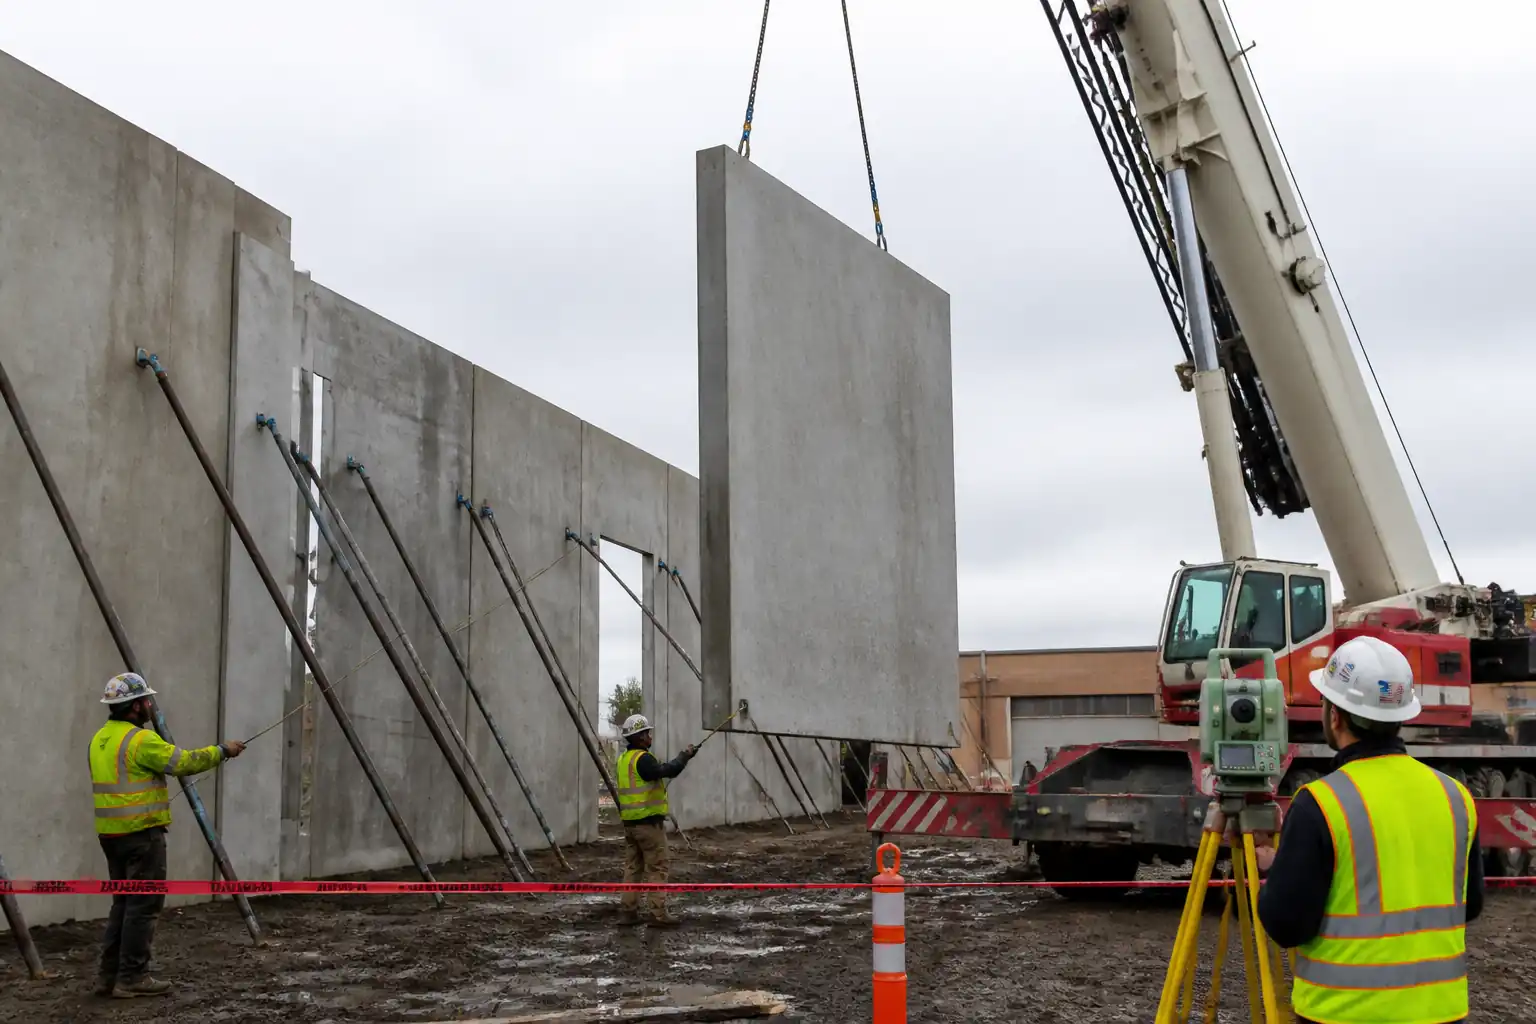
| 3 | Rigging and lift preparation | Select slings/spreader; attach to certified lifting eyes; rigging angle ≥60° where possible; fit tag lines; brief crew. | Appointed Person / Riggers | Pre-lift inspection; permit to lift. |
| 4 | Erect first (reference) panel | Land on kicker/base shims; align to setting-out line; fix temporary anchors/props; check plumb. | Site Engineer / Supervisor | Survey check; anchor torque/pull as specified. |
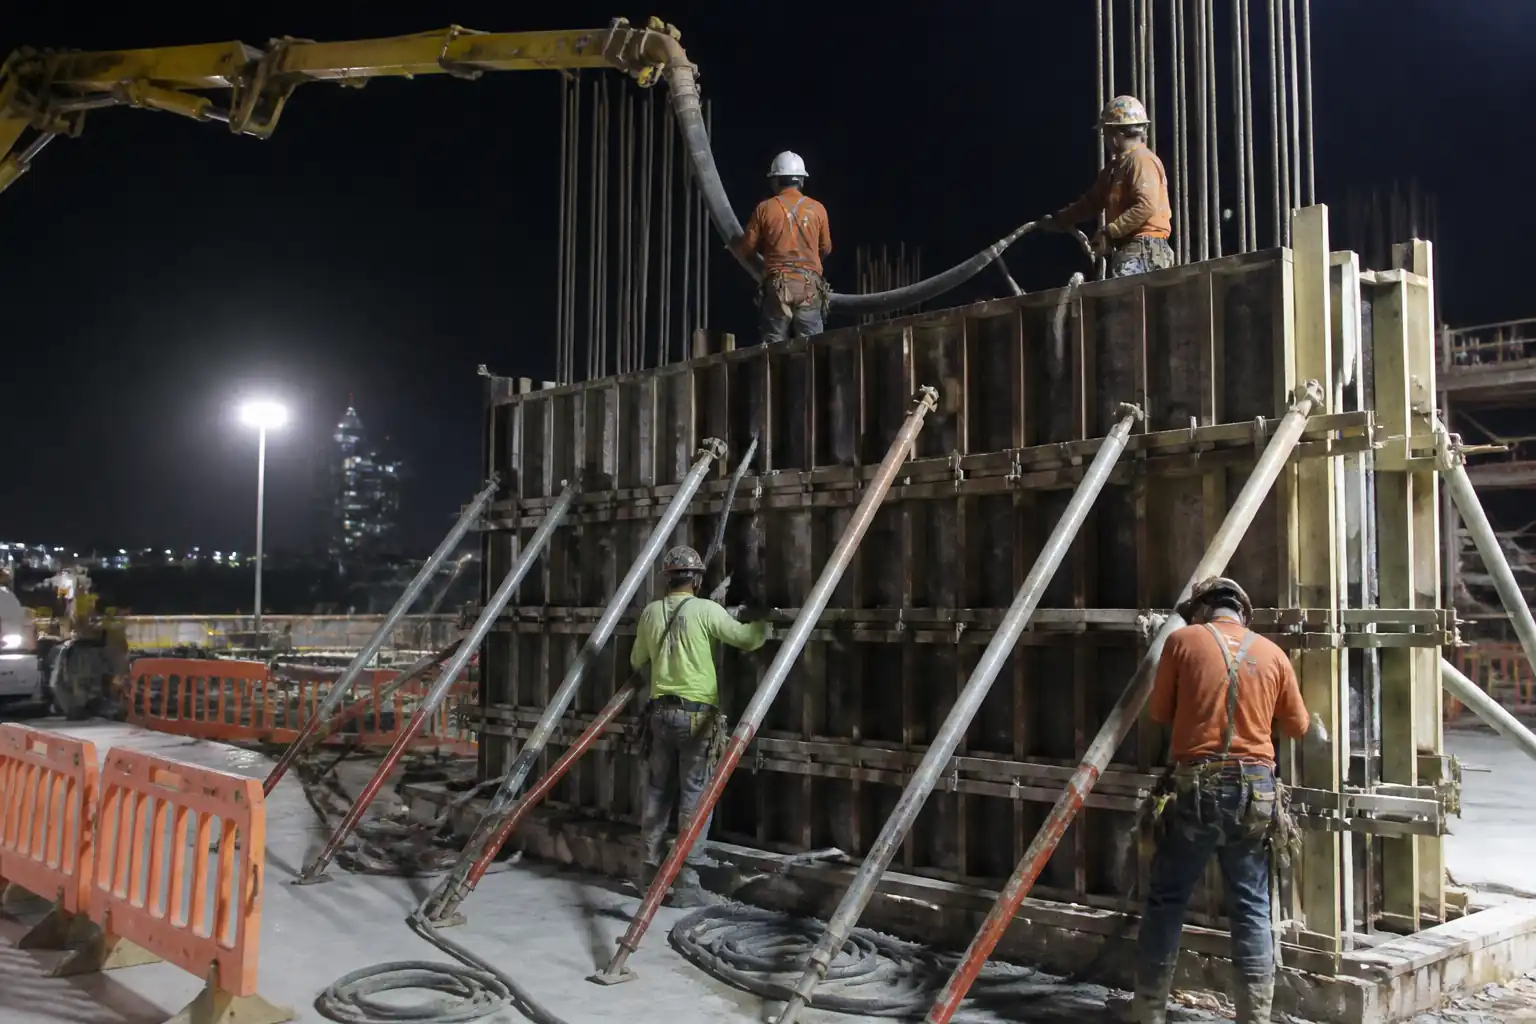
| 5 | Erect adjacent panel(s) and couple | Bring next panel into position using tag lines; align edges; close joints with OEM clamps/couplers in prescribed sequence (mid-height first, then alternating up/down). | Supervisor / Crew | Visual and tactile check; pinch point control. |
| 6 | Install joint gaskets/sealants | Place EPDM/foam strips continuously along vertical/horizontal joints; overlap per OEM; ensure clean, dry surfaces. | Crew | Continuity check; no tears. |
| 7 | Install walers/strongbacks and secondary stiffening | Fit horizontal walers at specified elevations; tighten connections; ensure continuity across panel joints. | Supervisor/Crew | Visual and torque check. |
| 8 | Install push–pull props (alignment turnbuckles) and brace anchors | Fix head to panel brackets; secure bases to designed anchors; set approximate plumb; leave adjustable for survey. | Crew / TWC oversight | Anchor installation check; proof testing if specified. |
| 9 | Tie-rod, cones, spacers installation | Thread tie rods through sleeves/cones at designed spacing; fit bearing plates/wing nuts; tighten snugly and evenly. | Crew / Supervisor | Visual; thread engagement check. |
| 10 | Opposite face panel erection and closing | Repeat steps 3–7 for opposite face; progressively close ties and clamps from bottom upwards; ensure uniform closure. | Supervisor / Crew | Visual; ensure no rebar clashes. |
| 11 | Alignment and plumb adjustment | Use push–pull props/turnbuckles to bring panels to line and plumb; re-check at panel joints and corners. | Site Engineer / Crew | Survey using laser/total station. |
| 12 | Apply release agent | Light, even coat to form face avoiding gaskets and reinforcement. | Crew | Visual film check. |
| 13 | Service integration and penetrations | Install blockouts, sleeves, and chamfers per drawings; seal per OEM. | Site Engineer / Crew | Check coordinates and sealing. |
| 14 | Pre-pour structural integrity verification | Calculate expected lateral pressure vs. system capacity; confirm pour rate/temperature assumptions; verify all clamps/ties/props/anchors; tighten final torque; clear debris. | TWC / QA/QC / Site Engineer | Hold Point HP-01 before pour. |
| 15 | Exclusion zone and monitoring during pour (interface) | Establish barricades; assign spotters to watch for deflection/leakage; adjust props if instructed; do not over-tighten under load. | Supervisor / HSEO | Surveillance (Witness Point WP-01). |
| 16 | Post-pour secure and handover | Confirm props and ties remain until instructed by engineer; clean exposed hardware; record as-built plumb/line. | Supervisor / Site Engineer | Post-pour check. |
Health, Safety and Welfare Controls
Key Task-Specific Hazards and Controls
1) Hazard: Crane lifts and suspended loads
- Likely consequence: Crush injuries, fatality from dropped load.
- Engineering/procedural control: Approved lift plan; certified crane/rigging; tag lines; exclusion zone equal to load radius plus 20% buffer; wind limits enforced; no personnel under loads.
- Required PPE: Helmet with chin strap, gloves, high-vis, safety boots, eye protection.
- Collective preventive measure: Physical barriers and banksmen to control access; radio comms.
- Inspection/permit/supervision: Daily crane checks; Permit to Lift; Appointed Person supervision [Verify per project HSE plan].
2) Hazard: Pinch points during panel coupling/clamping
- Likely consequence: Finger/hand crush injuries.
- Engineering/procedural control: Use OEM clamp handles; hands clear of joints; use pry bars; sequence clamps mid-height first then alternate.
- PPE: Impact gloves, eye protection.
- Collective measure: Exclusion strip each side of closing joint; briefing on hand placement.
- Inspection/permit/supervision: Supervisor to control sequence; spot checks.
3) Hazard: Falls from height on wall faces/edges
- Likely consequence: Serious injury or fatality.
- Engineering/procedural control: Install integrated working decks/guardrails on ground before lifting; use MEWPs or scaffolds where needed; 100% tie-off when outside protected areas.
- PPE: Full body harness with double lanyard; helmet with chin strap; non-slip boots.
- Collective measure: Guardrails (top/mid/toe), self-closing gates, access ladders fixed.
- Inspection/permit/supervision: Work at Height permit; weekly scaffold/MEWP inspections.
4) Hazard: Instability or overturning of free-standing panels (wind or impact)
- Likely consequence: Collapse, crush injuries, structural damage.
- Engineering/procedural control: Temporary works design for props and anchors; immediate bracing after landing; no release from crane until stable; stop work above defined wind speeds; secure at end of shift.
- PPE: Standard PPE; hearing/eye protection as needed.
- Collective measure: Additional temporary guys/props for large heights; night-time tie-downs.
- Inspection/permit/supervision: TWC sign-off; Permit to Load; inspections after high winds and before each shift.
5) Hazard: Over-pressurization and blow-out during concrete placement
- Likely consequence: Structural failure, injury from ejected components, concrete spill.
- Engineering/procedural control: Pressure calculation; controlled pour rate; adequate tie spacing and torque; monitor vibration intensity; stagger pour lifts.
- PPE: Helmet with visor or safety glasses, gloves, boots.
- Collective measure: Barricade pour side; assign spotters.
- Inspection/permit/supervision: Hold Point before pour; continuous monitoring; authority to stop pour.
6) Hazard: Anchor/fixing failure for push–pull props
- Likely consequence: Panel collapse.
- Engineering/procedural control: Use approved anchors; verify substrate strength; perform pull tests; fit shear checks where needed.
- PPE: Standard PPE.
- Collective measure: Secondary props when required by design.
- Inspection/permit/supervision: Anchor pull test records; TWC review.
7) Hazard: Manual handling and awkward postures
- Likely consequence: Strains/sprains.
- Engineering/procedural control: Use mechanical aids; team lifts; store panels to minimise re-handling; rotate tasks.
- PPE: Back support belts as advised, gloves.
- Collective measure: Material hoists and trolleys.
- Inspection/permit/supervision: Supervisor planning and briefings.
8) Hazard: Noise and vibration from impact wrenches/hammering
- Likely consequence: Hearing loss, hand–arm vibration syndrome.
- Engineering/procedural control: Use low-vibration tools; limit exposure; maintain tools.
- PPE: Hearing protection; anti-vibration gloves where effective.
- Collective measure: Noise barriers if required.
- Inspection/permit/supervision: HAVS monitoring; noise assessments [Verify per project HSE plan].
9) Hazard: Slips/trips on release agent or debris
- Likely consequence: Minor to serious injuries.
- Engineering/procedural control: Controlled application of release agent; drip trays; housekeeping and clean-as-you-go.
- PPE: Slip-resistant boots.
- Collective measure: Designated storage and waste areas.
- Inspection/permit/supervision: Supervisor walkdowns; HSE inspections.
10) Hazard: Contact with protruding reinforcement
- Likely consequence: Cuts, impalement risk.
- Engineering/procedural control: Cap rebar ends; maintain clearances; use spacers.
- PPE: Gloves, eye protection.
- Collective measure: Rebar caps and covers on workfaces.
- Inspection/permit/supervision: Pre-erection checklists.
Environmental Controls
Environmental Risk Controls
- Noise: Schedule high-noise tasks during permitted hours; use maintained tools; provide temporary acoustic screens near sensitive receptors [Verify local requirements].
- Air quality/dust: Minimal dust expected; keep workfaces clean; avoid dry grinding/cutting near forms; damp down if needed.
- Spills and contamination: Use drip trays for hydraulic tools; store oils in bunded containers; immediate spill kit deployment for any release; prevent release agent overspray.
- Waste management: Segregate scrap timber, metal offcuts, used gaskets; return reusable ties/cones to racks; dispose of sealant/chemical wastes via licensed contractor.
- Water protection: Prevent grout washout to drains; seal joints to minimise leakage; use collection trays where penetrations are numerous.
- Material efficiency: Pre-plan panel layouts to reduce cutting/drilling; re-use gaskets when OEM allows; maintain inventory to prevent losses.
- Wildlife/vegetation: Protect adjacent areas; no storage within root protection zones where applicable.
- Compliance: Follow ISO 14001 and project EMP; document incidents and corrective actions.
Quality Assurance and Quality Control
QA/QC Strategy
- Use ITP with defined hold/witness points (HP/WP). No concrete placement before HP-01 (pre-pour integrity) is accepted by QA/QC and TWC.
- Instruments and torque tools calibrated and within validity; maintain torque logs for clamps and critical bolted joints.
- Survey control at initial panel, after each 10 m length or every third panel, and at corners/openings.
- Anchor proof testing where specified prior to load; record substrate strength where anchors rely on concrete.
- Gasket continuity inspection before closing joints and visual verification during clamp tightening.
- Tie-rod schedule check against drawings; record actual spacing and any site adjustments with engineer approval.
- Nonconformance control: Stop work for damaged components, out-of-tolerance plumb/line, failed anchors, missing gaskets/clamps; raise NCR and corrective action plan.
- Documentation: Checklists, torque logs, survey reports, calibration certs, permits, OEM manuals, photos, and as-built sketches retained per project document control.
Typical Tolerances [Verify per project specifications]
- Plumbness of wall: 6 mm per 3 m; not to exceed 20 mm overall height.
- Wall thickness: ±10 mm.
- Line/straightness: ≤5 mm in 10 m run.
- Joint gaps pre-compression: ≤2 mm; gasket compressed 30–50%.
- Pour rate limit: typically ≤2 m/h, adjusted for temperature/cement type and per DIN 18218/OEM charts.
- Allowable formwork pressure: per OEM (typ. 60–80 kN/m² for heavy-duty systems).
Attachments
- Form FWK-01: Formwork Receiving Inspection Checklist
- Form FWK-02: Clamp and Bolt Torque Log
- Form FWK-03: Tie-Rod Installation Log and Sketch
- Form FWK-04: Anchor Installation and Pull Test Record
- Form FWK-05: Pre-Pour Integrity and Pressure Calculation Sheet (DIN 18218/OEM)
- Form FWK-06: Survey Report Template (Line/Plumb/Thickness)
- OEM Technical Manuals and Data Sheets (panels, clamps, ties, props)
- Lift Plan and Rigging Certificates
- Calibration Certificates (torque tools, survey instruments)
- HSE Permits (Work at Height, Lift, Permit to Load)
- Risk Assessment/Method Statement (RAMS) for associated lifting and work at height
This content is a read-only public reference. Download or customize to get an editable version.
ITP preview
The first inspection activities from the linked ITP for Method Statement: Assembly and Erection of Heavy Modular Steel/Aluminum Panel Formwork for Retaining and Shear Walls:
| Activity | Inspection / Test | Acceptance Criteria | Responsibility | Record |
|---|---|---|---|---|
| Material receiving inspection (panels, ties, clamps, walers) | Random dimensional checks | Undamaged; certificates valid; no deformation >2 mm over 2 m | QA/QC Engineer | Receiving ITR, photos |
| Rigging and lifting gear verification | N/A | In-date inspection; WLL adequate; tags present | Appointed Person / HSEO | Rigging register |
| Setting out and base/kicker level | Instrument readings | Line/level within drawings; base level ±5 mm | Site Engineer / Surveyor | Survey report |
Showing 3 of 14 inspection activities. View full ITP →
Related Inspection and Test Plan
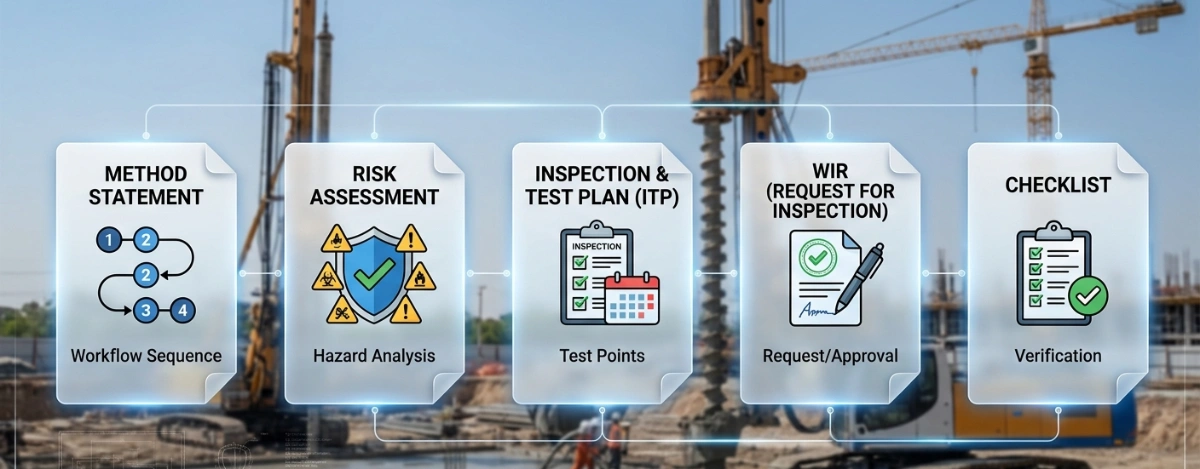
An Inspection and Test Plan (ITP) is available for Method Statement: Assembly and Erection of Heavy Modular Steel/Aluminum Panel Formwork for Retaining and Shear Walls. The ITP defines the inspection activities, acceptance criteria, hold and witness points, responsible parties, and records required to verify the work described in this method statement.
View the Method Statement: Assembly and Erection of Heavy Modular Steel/Aluminum Panel Formwork for Retaining and Shear Walls ITP →Frequently asked questions
Continue with related Quollnet resources connected to this method statement.