Method Statement for Internal Cement Plastering Works – Method Statement
AI-assisted method statement with matching ITP, PDF download, and Excel export.
More than a static template
Unlike a downloadable Word or PDF template, this method statement is an AI-assisted editable starting point connected directly to a matching Inspection and Test Plan. Every section is structured, project-adaptable, and ready to export.
- AI-assisted drafting — Customize every section with AI for your specific project scope.
- Linked ITP — A matching inspection and test plan is generated alongside the method statement.
- Multiple export formats — Download as a formatted PDF or editable Excel spreadsheet.
- Editable starting point, not a final document — Review, verify, and adjust all content against your project requirements before use.
Static template vs. Quollnet workflow
| Feature | Static template | Quollnet |
|---|---|---|
| Project-specific content | Manual fill-in required | AI-assisted customization |
| Linked ITP | Separate document, no link | Matching ITP included |
| Export formats | Usually PDF only | PDF and Excel |
| Structured sections | Free-form layout | 13 standardized sections |
| Saved to your account | Local file only | Cloud-saved, reusable |
| Content accuracy | You verify everything | AI-assisted, you still verify |
| Cost | Often free but time-intensive | Free to customize and download |
What you can customize
When you save this method statement to your account, every section becomes editable. The following 13 sections are included:
- Scope — Defines the activity and its boundaries.
- References — Standards, specifications, and drawings.
- Responsibilities — Roles and accountabilities.
- Resources — Labour, plant, and equipment summary.
- Materials — Materials and compliance requirements.
- Equipment — Tools and equipment details.
- Prerequisites — Hold points and pre-conditions.
- Method sequence — Step-by-step construction sequence.
- Safety controls — HSE risk controls and PPE.
- Environmental controls — Environmental mitigation measures.
- QA/QC — Quality inspection and test requirements.
- ITP — Inspection and Test Plan table (has its own page).
- Attachments — Referenced drawings and documentation.
Why this method statement is used
This method statement is used to define and communicate the approved procedure for carrying out method statement for internal cement plastering works on site. It ensures the work is planned in advance, the correct resources and controls are in place, and all personnel understand responsibilities, sequence, quality requirements, and safety controls before work begins. It aligns site execution with the documented scope and acceptance expectations.
Who uses this method statement
This method statement is used by contractors, site supervisors, project engineers, QA/QC engineers, HSE officers, consultants, and client representatives. It serves as a shared reference for planning, execution, supervision, inspection, and approval of the activity on site.
When it is prepared and submitted
The method statement is prepared before the work activity starts and submitted as part of the pre-construction documentation package for review and approval.
Who reviews or approves it
The method statement is usually submitted to the client representative, consultant, resident engineer, or project management consultant for review and approval before the work commences.
Important approval note
This method statement is an AI-assisted editable starting point, not a pre-approved document. Before use on any project, all content must be reviewed and approved by the relevant parties (superintendent, principal contractor, or client representative) in accordance with your contract and project quality plan.
For example: if your specification requires a departure from a referenced standard, that departure must be documented and approved separately — this method statement will not capture that automatically. Always verify against your applicable drawings, specifications, and regulatory requirements.
Method statement content
Scope
Scope of Works
- Internal cement-sand plastering to blockwork and concrete walls/soffits including reveals, columns, beams, and service chases.
- Activities include substrate assessment and preparation, installation of beads/mesh, screed pad and guide alignment, mortar batching/mixing, application (one or two coat system), surface finishing, curing, protection, and QA/QC verification leading to release for painting.
- Typical plaster thickness: 12–15 mm overall, with tolerance ±2 mm [Verify per project specifications].
- Interfaces: movement/control joints, MEP penetrations and boxes, door/window frames, and architectural features.
- Exclusions: gypsum-based plasters, external renders, skim coats by painters (unless stated), acoustic/thermal systems.
References
| Document Type | Reference / Number | Revision | Notes |
|---|---|---|---|
| Standard | BS EN 13914-2 | General guidance for internal plasters. | |
| Standard | EN 998-1 | ||
| Standard | BS EN 13139 | ||
| Standard | EN 197-1 / ASTM C150 | ||
| Standard | ASTM C144 | ||
| Standard | ASTM C1059 | ||
| Standard | ASTM C1437 | ||
| Standard | EN 1015-12 | ||
| Standards | ISO 9001 / 45001 / 14001 | ||
| Guide | ACI 524R | Use for good practice where consistent with EN/ASTM. | |
| Project | Specifications/IFC Drawings | [Verify per project specifications] |
Responsibilities
| Role | Responsibility | Name / Party |
|---|---|---|
| PM | Project Manager | Main Contractor |
| CM | Construction Manager | Main Contractor |
| SE | Site Engineer/Surveyor | Main Contractor |
| QA/QC | QA/QC Engineer | Main Contractor |
| HSE | HSE Officer | Main Contractor |
| Foreman/Trades | Plastering Foreman & Skilled Plasterers | Main Contractor |
| Engineer | Engineer/Consultant | Engineer/Consultant |
| Lab | Independent Laboratory | Approved Laboratory |
Resources
| Resource Type | Description | Quantity | Remarks |
|---|---|---|---|
| Manpower | 1 Construction Manager, 1 Site Engineer, 1 QA/QC Engineer, 1 HSE Officer, 1 Foreman | 5 | |
| Manpower | 6–12 Skilled Plasterers + 8–14 Laborers per zone [Verify per productivity] | 14–26 | Adjust by area and program |
| Temporary Works | Mobile scaffold towers/steel scaffolds, working platforms, edge protection | As required | Scaffolds tagged/inspected |
Materials
| Material | Specification / Grade | Quantity | Remarks |
|---|---|---|---|
| Cement | EN 197-1 / ASTM C150 | Fresh, unexpired, dry storage | |
| Fine aggregate | EN 13139 / ASTM C144 | Washed if necessary | |
| Water | ASTM C1602 (reference) | ||
| Bonding agent | ASTM C1059 Type II | ||
| Bond coat | Per project/manufacturer [Verify] | ||
| Admixture | EN 934-3 | ||
| AR glass mesh | Manufacturer data | Width ≥200 mm either side of joint [Verify] | |
| Profiles | EN 10346 (galv.) |
Equipment
| Equipment | Capacity / Type | Quantity | Inspection Required |
|---|---|---|---|
| Electric 1.5–3 kW | 50–120 L/batch | 1–2 | Yes |
| Set | Yes | ||
| Sets per gang | |||
| 1 set | |||
| As required | Yes | ||
| As required |
Prerequisites
Pre-Start Requirements
- Approvals: Method Statement, ITP, materials, and mock-up approved.
- Drawings: Latest IFC drawings, finishes schedule, and coordinated MEP layouts available.
- Substrate readiness: Masonry cured ≥7 days; concrete cured ≥14 days [Verify]; chases/boxes fixed and backfilled; surfaces free of oil, dust, paint, and loose laitance.
- Permits: Hot work (if cutting beads), work-at-height, and electrical permits as applicable [Verify per project HSE plan and local regulations].
- Access: Scaffolds erected, inspected, and tagged; lighting adequate; housekeeping established.
- Services: Power and potable water available; mixing zone identified with spill control and washout.
- Environment: Ambient temperature 5–40°C, avoid rapid drying winds; do not apply onto frozen or saturated surfaces [Verify per manufacturer].
- Tools: Mixers, gauges, straightedges, and measuring tools available and checked.
- Safety: Task risk assessment briefed; TBT completed; SDS for all materials available; PPE issued.
- Protection: Adjacent finishes masked; floors protected; drainage points covered to prevent cement washout.
- Mock-up: Construct and obtain approval demonstrating finish, thickness, and curing standard.
- Joint coordination: Confirm locations of structural/control joints and do not bridge with rigid plaster; provide beads or sealant breaks as detailed.
Method Sequence
| Step | Activity | Description | Responsibility | Inspection / Hold Point |
|---|---|---|---|---|
| 1 | Pre-work inspection and setting out | Confirm substrate acceptance; establish datum lines; mark plaster finished face allowing for thickness; identify movement joints and interfaces. | Site Engineer / QA/QC | Hold Point – no plastering until substrate accepted |
| 2 | Surface preparation | For blockwork: rake out high points, fill voids; for concrete: hack to obtain key (CSP 3–5) or apply spatterdash/bonding agent per spec; remove dust with vacuum/brush; pre-dampen to SSD. | Foreman / Plasterers | Surveillance |
| 3 | Install beads and mesh | Fix corner/stop beads plumb/level with dabs; embed AR fiberglass mesh over dissimilar material interfaces and at corners of openings (≥200 mm each side) with base coat. | Foreman / Plasterers | Witness |
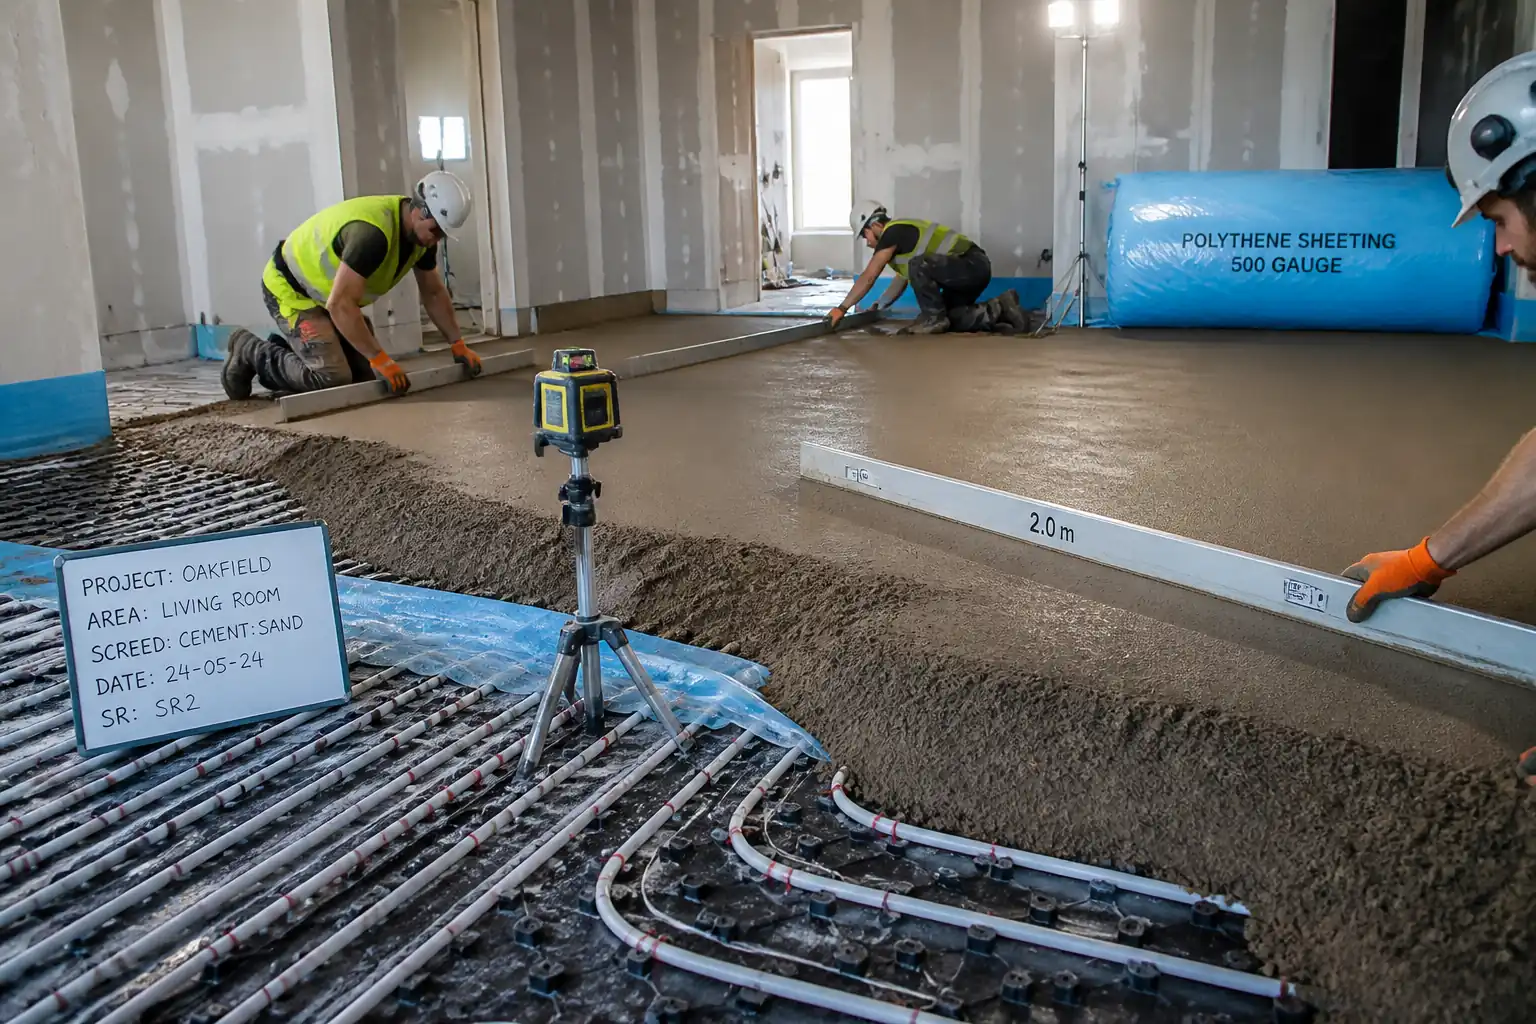
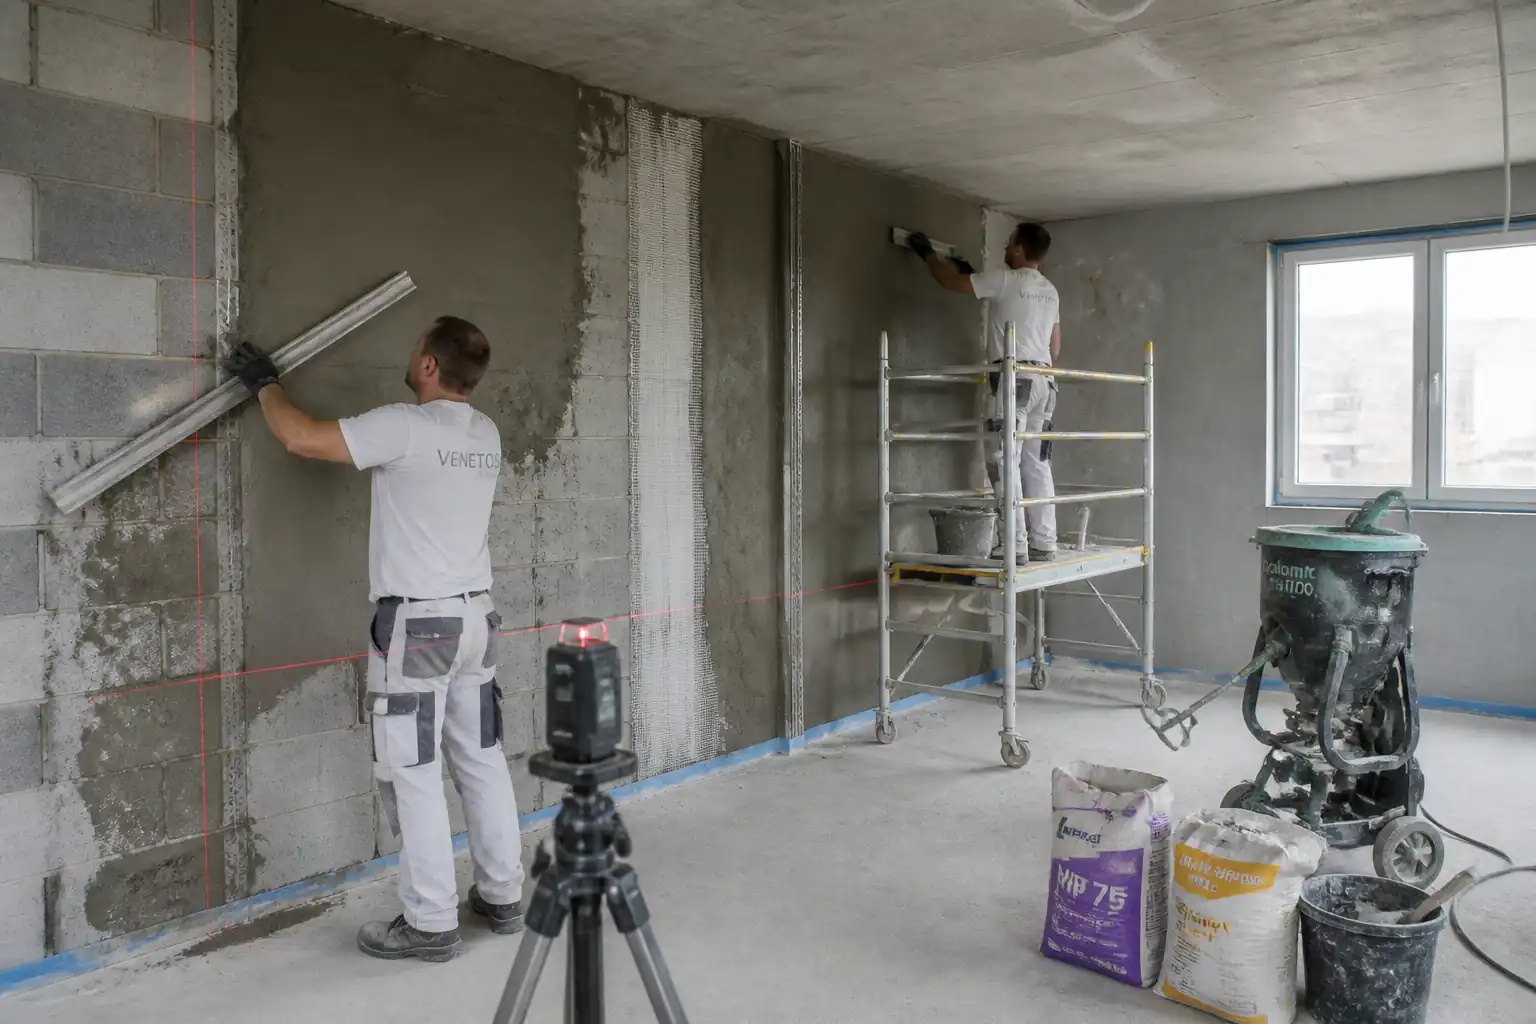
| 4 | Form screed pads and guides | Create vertical pads and screed strips at 1.5–2.0 m centers using 1:3 cement:sand mortar; align to datum with laser/level; allow to set before application. | Site Engineer / Plasterers | Hold Point – alignment check |
| 5 | Batching and mixing | Batch cement and sand by gauge boxes or mass; typical proportion 1:4 to 1:6 by volume [Verify]; water added to achieve workable yet cohesive mortar; mix 3–5 minutes to uniform consistency; do not retemper after initial set. | Foreman / Plasterers | Surveillance |
| 6 | Application – first coat (one- or two-coat system) | Apply mortar onto pre-dampened substrate; for two-coat, apply scratch/brown 8–10 mm and scratch horizontally ~3 mm deep; for single coat, build to near full thickness; compact and rule off to screeds. | Plasterers | Surveillance |
| 7 | Intercoat curing/second coat (if applicable) | Lightly cure scratch coat 24–48 h, then apply finish coat 2–3 mm; bring to plane with straightedge; close with trowel and float finish as specified (wood or sponge). | Plasterers | Witness |
| 8 | Finish and detailing | Form neat arises at corners with beads; maintain reveals; stop at control joints with stop beads; sealant gaps left per detail. | Plasterers | Surveillance |
| 9 | Curing and protection | Begin mist curing after initial set (within 12–24 h); maintain dampness 3–7 days depending on environment; protect from rapid drying, impact, and staining. | Foreman / Plasterers | Surveillance |
| 10 | Quality checks – geometry and soundness | After curing, check flatness/plumb/level; tap test for hollowness; measure thickness at concealed spots; repair defects. | QA/QC Engineer | Witness |
| 11 | Adhesion (pull-off) testing (if specified) | Perform pull-off adhesion tests on representative areas/rooms. | Third-Party Lab / QA/QC | Witness/Hold (sample areas) |
| 12 | Release to painting | Confirm drying and pH meet paint manufacturer requirements; rectify minor defects; obtain final approval. | QA/QC Engineer / Engineer | Hold Point – final acceptance |
Health & Safety Controls
Task-Specific HSE Controls
- Working at height on scaffolds/towers
- Hazard: Falls from height during application/finishing.
- Consequence: Serious injury/fatality.
- Engineering/Procedural Control: Use erected and tagged mobile/steel scaffolds with full planking and toe boards; lock castors; maintain 1 m guardrails; do not overreach; climb using ladder access; move towers only when platform is clear.
- PPE: Hard hat, non-slip safety shoes, gloves, safety glasses.
- Collective Measure: Edge protection, barricades below work area.
-
Inspection/Permit/Supervision: Daily scaffold inspection by competent person; work-at-height permit where required [Verify per project HSE plan and local regulations].
-
Silica dust from sand and cutting/grinding
- Hazard: Inhalation of respirable crystalline silica.
- Consequence: Respiratory illness, silicosis.
- Engineering/Procedural Control: Pre-wet sand; use enclosed/bagged transfer; vacuum (M/H-class) for cleanup; avoid dry sweeping; use low-dust cutting methods.
- PPE: Fit-tested P2/P3 respirator when dusty; safety glasses.
- Collective Measure: Local ventilation; isolation of mixing area.
-
Inspection/Permit/Supervision: HSE monitoring; ensure RPE fit-test records current.
-
Cement burns/dermatitis (wet mortar)
- Hazard: Skin/eye contact with alkaline materials (hexavalent chromium exposure possible).
- Consequence: Chemical burns, dermatitis, eye injury.
- Engineering/Procedural Control: Provide washing stations; avoid prolonged skin contact; use long sleeves; follow SDS; consider chromate-reduced cement where specified.
- PPE: Alkali-resistant gloves, long sleeves, impermeable apron (mixing), goggles/face shield for mixing.
- Collective Measure: Safety showers/eyewash within 10 m of mixing area.
-
Inspection/Permit/Supervision: Supervisor to enforce PPE; SDS available.
-
Manual handling of cement bags and equipment
- Hazard: Overexertion, musculoskeletal injury.
- Consequence: Strain/sprain.
- Engineering/Procedural Control: Use trolleys; team lifts; limit bag stacking height; rotate tasks.
- PPE: Gloves, safety shoes with toe protection.
- Collective Measure: Mechanical aids for bulk movement.
-
Inspection/Permit/Supervision: Manual handling training verified.
-
Electrical hazards (mixers, cables)
- Hazard: Electric shock from damaged leads or wet conditions.
- Consequence: Shock, burns.
- Engineering/Procedural Control: Use 110 V center-tapped or RCD-protected circuits; IP-rated connectors; keep electrics elevated from wet floors.
- PPE: Dielectric gloves when inspecting; dry gloves.
- Collective Measure: Cable management, drip loops.
-
Inspection/Permit/Supervision: Pre-use PAT checks; permits for temporary power if required.
-
Entanglement with rotating mixer paddles
- Hazard: Contact with moving parts during operation/cleaning.
- Consequence: Lacerations, fractures.
- Engineering/Procedural Control: Guards in place; lock-out before cleaning; only trained operators.
- PPE: Gloves, eye protection.
- Collective Measure: Exclusion zone around mixer.
-
Inspection/Permit/Supervision: Supervisor authorization for maintenance.
-
Slips/trips on wet floors and debris
- Hazard: Wet curing water and mortar spillages.
- Consequence: Sprains/fractures.
- Engineering/Procedural Control: Maintain housekeeping; designate washout area; use squeegees and wet vac.
- PPE: Non-slip footwear.
- Collective Measure: Signage and barriers during curing.
-
Inspection/Permit/Supervision: HSE inspections; close out findings.
-
Sharp edges from beads/mesh
- Hazard: Cuts/punctures.
- Consequence: Lacerations.
- Engineering/Procedural Control: Deburr cuts; use proper snips; store profiles safely.
- PPE: Cut-resistant gloves, sleeves.
- Collective Measure: Waste bins for offcuts.
-
Inspection/Permit/Supervision: Foreman checks.
-
Chemical exposure from bonding agents/admixtures
- Hazard: Vapors/skin contact.
- Consequence: Irritation/sensitization.
- Engineering/Procedural Control: Follow manufacturer instructions; ensure ventilation; decant carefully.
- PPE: Nitrile gloves, goggles.
- Collective Measure: Ventilation fans.
- Inspection/Permit/Supervision: SDS on site; COSHH assessments [Verify per local regs].
Environmental Controls
Environmental Management
- Cementitious washout and alkaline water
- Impact: High pH discharge harming drains/soil.
- Control: Designate lined washout pit/tray; collect and dispose via approved waste contractor; do not discharge to stormwater.
-
Inspection: Daily check of washout integrity; records of disposal.
-
Dust emissions
- Impact: Nuisance, air quality.
- Control: Pre-wet materials; sealed bags; vacuum instead of dry sweeping; local extraction at mixing station.
-
Inspection: HSE walkdowns; complaints log.
-
Noise from mixers and cutting
- Impact: Disturbance to occupants/neighbors.
- Control: Use low-noise equipment; schedule noisy tasks in permitted hours; provide hearing protection if >85 dB(A).
-
Inspection: Spot noise measurements.
-
Solid waste (bags, offcuts, mesh)
- Impact: Waste to landfill.
- Control: Segregate by type; compact empties; recycle where facilities exist.
-
Inspection: Waste skips labeled and audited weekly.
-
Water consumption for curing/cleaning
- Impact: Resource use.
- Control: Low-pressure nozzles; timed curing cycles; reuse final rinse water for first-pass cleaning where acceptable.
-
Inspection: Supervisor checks.
-
Protection of adjacent finishes and MEP
- Impact: Contamination/staining.
- Control: Masking, polythene sheets, drip trays; remove protection after works without residue.
-
Inspection: Pre/post work photos.
-
Indoor air quality
- Impact: Moisture and VOC accumulation in enclosed spaces.
- Control: Ventilation via fans; avoid solvent-based products indoors unless approved.
- Inspection: Supervisor monitoring.
QA/QC Requirements
Quality Controls and Acceptance
- Materials
- Verify cement type and shelf life; sand cleanliness and grading; potable water; approved admixtures/bonding agents.
-
Records: Delivery tickets, mill certificates, product data/SDS.
-
Mixing and Workability
- Proportion: 1:4 to 1:6 (cement:sand by volume) [Verify]. Water addition to achieve cohesive, non-segregating mix.
-
Optional check: ASTM C1437 flow 110–130% [Verify]. No retempering after initial set.
-
Geometry and Finish
- Thickness: 12 mm ±2 mm typical [Verify]. Check at minimum 1 per 10 m² and at corners/reveals.
- Flatness: Max 3 mm deviation under 2 m straightedge [Verify]. Plumb/level: ≤3 mm per 2 m [Verify].
- Edges/corners: Crisp and true within ±2 mm; beads straight.
-
Surface: Uniform, free from hollows, laitance, bulges, sanding, or blistering. No cracks >0.2 mm.
-
Adhesion and Soundness
- Tap test to identify voids. Area of hollowness ≤5% per room/zone and no single hollow patch >0.25 m² [Verify].
-
Pull-off adhesion (if specified): ≥0.20–0.30 MPa to concrete substrates per EN 1015-12 [Verify].
-
Curing
-
Begin within 12–24 h; maintain for 3–7 days depending on ambient [Verify]. Avoid rapid drying.
-
Pre-Paint Release
- Moisture: ≤5% by electrical meter [Verify].
- pH: ≤9–10 [Verify] as per paint data sheet.
-
Minimum curing/age before painting: typically ≥14 days [Verify].
-
Inspection/Test Frequency
- Materials receipt: Each delivery.
- Thickness: 1 per 10 m².
- Flatness/plumb: Each wall/soffit panel.
- Adhesion pull-off: 1 per 200 m² per substrate type, minimum 3 tests per level [Verify].
-
Records: QA checklists, test reports, IRs, photos.
-
Defect Rectification
- Minor pinholes/crazing: fill with same mortar or approved filler after curing.
- Debonded areas: remove to sound substrate, reapply with bonding treatment.
-
Cracks >0.2 mm: chase and fill with polymer-modified mortar after cause analysis.
-
Hold/Witness Points
- H: Substrate acceptance; screed guide alignment; final pre-paint acceptance.
- W: Beads/mesh installation; finishing; selected adhesion tests.
Attachments
Attachments / Records
- Approved product data sheets and SDS for cement, admixtures, bonding agents, beads, and mesh.
- Material inspection reports and delivery tickets.
- Mix proportion and batching records.
- Substrate acceptance checklist and photos.
- Screed alignment check sheets and survey records.
- Daily QA checklists and curing logs.
- Mock-up approval documentation with photos.
- Adhesion test reports (if specified) and any cube tests (if required by spec).
- Final inspection request (IR) with sign-offs and punch list closeout.
- Permits to Work (work-at-height, electrical) and TBT attendance records.
- HSE inspections and incident/near-miss reports (if any).
This content is a read-only public reference. Download or customize to get an editable version.
ITP preview
The first inspection activities from the linked ITP for Method Statement for Internal Cement Plastering Works:
| Activity | Inspection / Test | Acceptance Criteria | Responsibility | Record |
|---|---|---|---|---|
| Material receipt and storage | Check certificates, labels, condition, storage off ground and dry | Materials comply with approvals; no damage or contamination; valid certificates. | QA/QC Engineer / Storekeeper | Material inspection report, delivery tickets |
| Substrate readiness (Hold Point) | Visual, tap test, moisture (no free water), check MEP closures | Sound, clean, roughened or bond coat applied; interfaces identified; datum set. H: Work cannot proceed without sign-off. | QA/QC Engineer / Engineer | IR/Checklist with Engineer sign-off |
| Mock-up inspection (Hold/Witness) | Review finish, thickness, beads/mesh, curing method | Mock-up meets specified finish/tolerance; benchmark established. H/W as designated. | QA/QC / Engineer | Mock-up approval memo/photos |
Showing 3 of 12 inspection activities. View full ITP →
Related Inspection and Test Plan
An Inspection and Test Plan (ITP) is available for Method Statement for Internal Cement Plastering Works. The ITP defines the inspection activities, acceptance criteria, hold and witness points, responsible parties, and records required to verify the work described in this method statement.
View the Method Statement for Internal Cement Plastering Works ITP →Frequently asked questions
Continue with related Quollnet resources connected to this method statement.