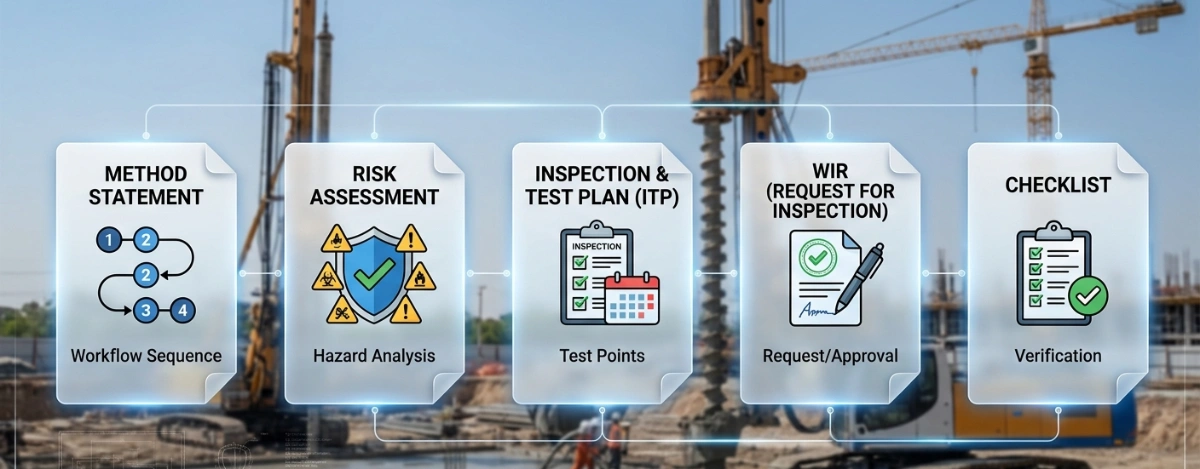
Method Statement — Ceramic Wall and Floor Tiling Works (Wet and Dry Areas) – Method Statement
AI-assisted method statement with matching ITP, PDF download, and Excel export.
More than a static template
Unlike a downloadable Word or PDF template, this method statement is an AI-assisted editable starting point connected directly to a matching Inspection and Test Plan. Every section is structured, project-adaptable, and ready to export.
- AI-assisted drafting — Customize every section with AI for your specific project scope.
- Linked ITP — A matching inspection and test plan is generated alongside the method statement.
- Multiple export formats — Download as a formatted PDF or editable Excel spreadsheet.
- Editable starting point, not a final document — Review, verify, and adjust all content against your project requirements before use.
Static template vs. Quollnet workflow
| Feature | Static template | Quollnet |
|---|---|---|
| Project-specific content | Manual fill-in required | AI-assisted customization |
| Linked ITP | Separate document, no link | Matching ITP included |
| Export formats | Usually PDF only | PDF and Excel |
| Structured sections | Free-form layout | 13 standardized sections |
| Saved to your account | Local file only | Cloud-saved, reusable |
| Content accuracy | You verify everything | AI-assisted, you still verify |
| Cost | Often free but time-intensive | Free to customize and download |
What you can customize
When you save this method statement to your account, every section becomes editable. The following 13 sections are included:
- Scope — Defines the activity and its boundaries.
- References — Standards, specifications, and drawings.
- Responsibilities — Roles and accountabilities.
- Resources — Labour, plant, and equipment summary.
- Materials — Materials and compliance requirements.
- Equipment — Tools and equipment details.
- Prerequisites — Hold points and pre-conditions.
- Method sequence — Step-by-step construction sequence.
- Safety controls — HSE risk controls and PPE.
- Environmental controls — Environmental mitigation measures.
- QA/QC — Quality inspection and test requirements.
- ITP — Inspection and Test Plan table (has its own page).
- Attachments — Referenced drawings and documentation.
Why this method statement is used
This method statement is used to define and communicate the approved procedure for carrying out method statement — ceramic wall and floor tiling works (wet and dry areas) on site. It ensures the work is planned in advance, the correct resources and controls are in place, and all personnel understand responsibilities, sequence, quality requirements, and safety controls before work begins. It aligns site execution with the documented scope and acceptance expectations.
Who uses this method statement
This method statement is used by contractors, site supervisors, project engineers, QA/QC engineers, HSE officers, consultants, and client representatives. It serves as a shared reference for planning, execution, supervision, inspection, and approval of the activity on site.
When it is prepared and submitted
The method statement is prepared before the work activity starts and submitted as part of the pre-construction documentation package for review and approval.
Who reviews or approves it
The method statement is usually submitted to the client representative, consultant, resident engineer, or project management consultant for review and approval before the work commences.
Important approval note
This method statement is an AI-assisted editable starting point, not a pre-approved document. Before use on any project, all content must be reviewed and approved by the relevant parties (superintendent, principal contractor, or client representative) in accordance with your contract and project quality plan.
For example: if your specification requires a departure from a referenced standard, that departure must be documented and approved separately — this method statement will not capture that automatically. Always verify against your applicable drawings, specifications, and regulatory requirements.
Method statement content
Scope
Overview
This method covers supply, coordination, installation, and quality control of ceramic/porcelain wall and floor tiling works in wet (showers, bathrooms, kitchens, plant rooms) and dry (corridors, lobbies, rooms) areas. It includes substrate assessment and preparation, waterproofing interfaces, layout and setting out, adhesive mixing and application, tile placement and alignment, movement joints, grouting, sealing, protection, and inspections up to final handover.
Inclusions
- Substrate inspection and preparation (concrete, screed, render, cement boards)
- Coordination and verification of waterproofing works in wet areas
- Setting out, control lines, and mock-up
- Adhesive selection and application, back-buttering (as required)
- Tiling to walls and floors, internal and external corners, thresholds, and perimeters
- Movement joint installation and perimeter gaps
- Grouting and sealants (including sanitary grade in wet areas)
- Cleaning, curing, protection, rectification of snags
- QA/QC inspections, hold/witness points, and records per ITP
Exclusions
- Structural works, screed/render placement by others unless specified
- Supply/installation of drains, hobs, and fixtures by others unless specified
Key Performance Targets [Verify per project specifications]
- Substrate flatness: ≤3 mm deviation under 2 m straightedge; ≤1 mm under 300 mm
- Floor falls in wet areas: 1.0%–2.0% to drains without ponding
- Joint width: walls 2–3 mm (rectified ≥2 mm); floors 3–5 mm; consistent throughout
- Lippage (finished surface): ≤1.0 mm for joints ≤3 mm; ≤1.5 mm for joints >3 mm (plus inherent tile warpage where applicable)
- Adhesive coverage: ≥95% wet areas/exteriors; ≥80% dry internal areas; 95% for large-format tiles ≥400×400 mm
- Perimeter/movement joint gaps: 6–10 mm or per detail
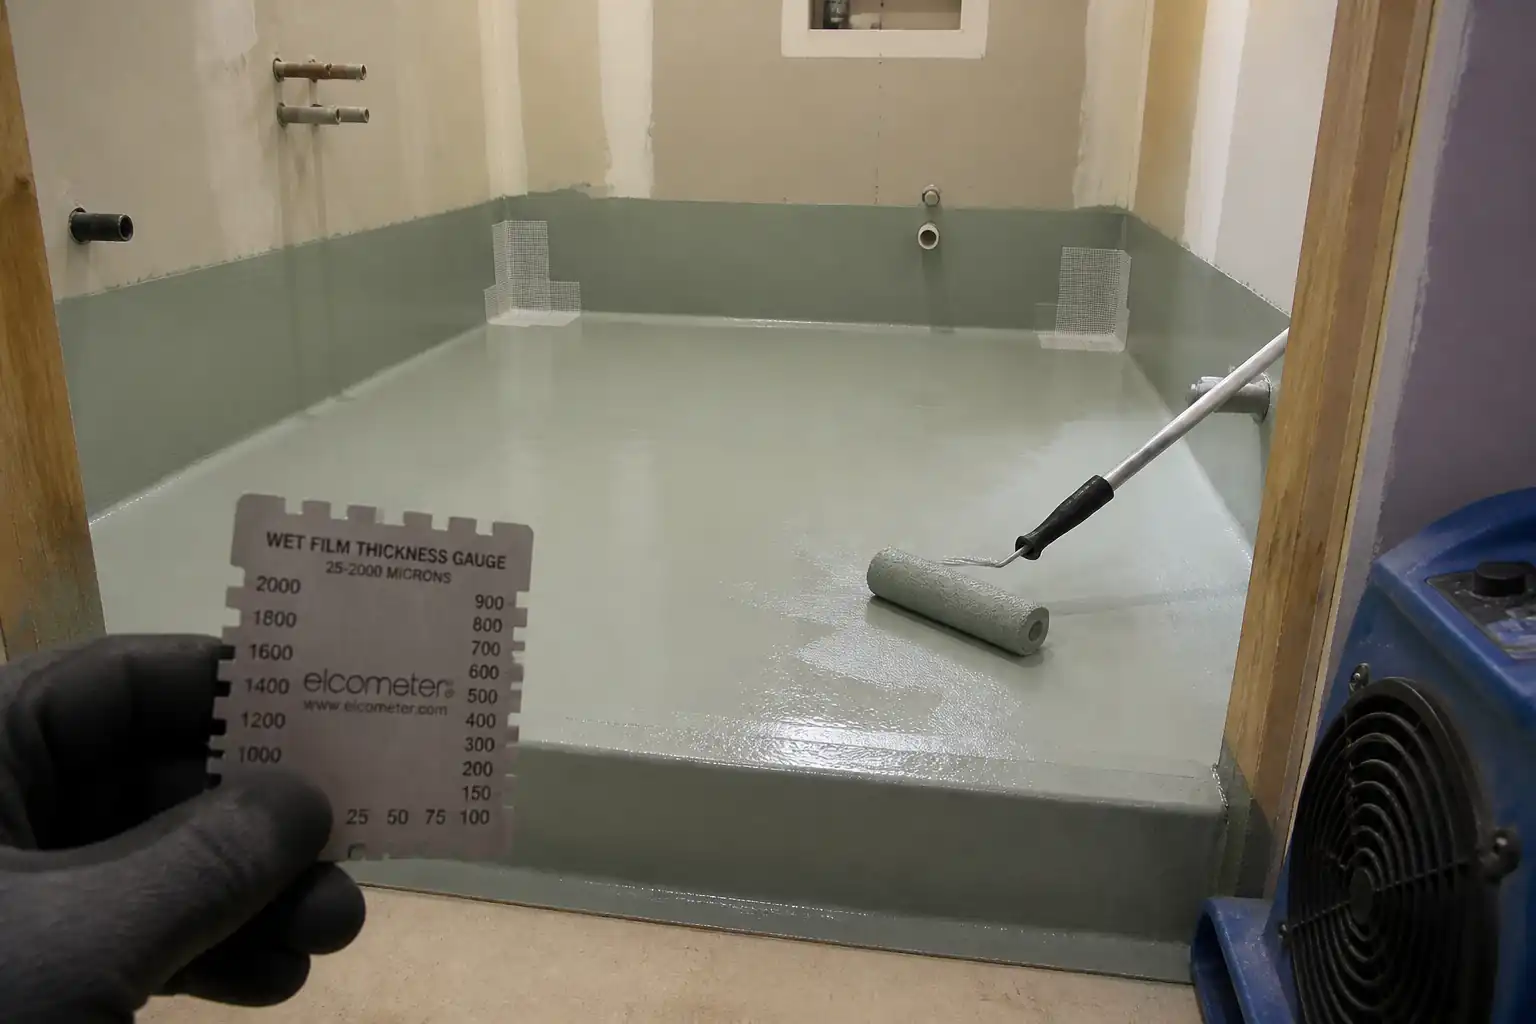
- Waterproofing: DFT typically ≥1.0 mm (liquid-applied) with fully sealed penetrations
- Flood test (showers/wet rooms): 24 h, no leakage, water level drop ≤2 mm/24 h after evaporation correction
- Cure periods and traffic restrictions per manufacturer’s TDS
References
| Document Type | Reference / Number | Revision | Notes |
|---|---|---|---|
| ISO 13007 / EN 12004 (adhesives); EN 13888 (grouts) | Adhesive class C2TE S1 typical for porcelain and wet areas [Verify]. | ||
| ANSI A108/A118; TCNA Handbook EJ171 (movement joints) | Use if project governed by ANSI/TCNA. [Verify per project specs]. | ||
| EN 14891 (liquid-applied waterproofing beneath tiles); ANSI A118.10; ASTM C836/C836M | Membrane class/type per TDS and area use [Verify]. | ||
| BS 5385 series (wall and floor tiling) / ISO 17966 (where relevant); Project specs | Do not quote clause numbers unless issued. [Verify]. | ||
| ISO 10545 series (ceramic tile test methods) | Slip resistance per project (e.g., DIN 51130/EN 16165 or ANSI A326.3) [Verify]. | ||
| ISO 45001, ISO 14001, local regulations, Project HSE Plan | Permits to work, chemical handling, noise/dust, electrical safety [Verify]. |
Responsibilities
| Role | Responsibility | Name / Party |
|---|---|---|
| Project Manager | Ensure programme compliance and resolve constraints | Contractor |
| Site Engineer | Check levels/falls, verify tolerances, maintain as-builts | Contractor |
| QA/QC Engineer | Manage hold/witness points and acceptance records | Contractor |
| HSE Officer | Toolbox talks, inspections, compliance with HSE Plan | Contractor |
| Tiling Foreman | Ensure workmanship, coverage, joint control, curing | Contractor |
| Approved Applicator | Comply with EN 14891/ANSI A118.10 and TDS | Specialist |
| Land Surveyor | Confirm datum and fall set-out to drains | Contractor |
| Engineer/Consultant | Approve mock-ups, substrate acceptance, waterproofing and flood tests | Employer |
Resources
| Resource Type | Description | Quantity | Remarks |
|---|---|---|---|
| Manpower | Skilled masons/tilers | 1 per 15–25 m²/day (floor); 1 per 12–18 m²/day (wall) [Verify] | |
| Manpower | Mixing, logistics, cleaning | 1 per 1–2 tilers | |
| Manpower | RCD checks, equipment connections | Shared |
Materials
| Material | Specification / Grade | Quantity | Remarks |
|---|---|---|---|
| Tiles | Size/finish per drawings; water absorption and PEI/Class per spec | Comply with ISO 10545 performance; slip resistance per project [Verify]. | |
| Cementitious/Polymer-modified adhesive | Open time, pot life, bed thickness per TDS | EN 12004 (C2TE S1) or ANSI A118.4/A118.15 [Verify]. | |
| Cementitious or Epoxy Grout | Colour per schedule; water absorption; flexural/compressive per standard | EN 13888 CG2 WA (polymer modified) or RG (epoxy) [Verify]. | |
| Liquid-applied membrane + accessories | DFT ≥1.0 mm typical; crack-bridging per standard; primer as needed | EN 14891 class (e.g., DM O/P) or ANSI A118.10 [Verify]. | |
| Primer/Bond coat | TDS-defined consumption and drying time | From same manufacturer as adhesive [Verify]. | |
| Profiles, backing rod, primer, elastomeric sealant | Width and spacing per drawings/TCNA EJ171/BS 5385 [Verify]. | Sealant ISO 11600, low-modulus sanitary for wet areas [Verify]. |
Equipment
| Equipment | Capacity / Type | Quantity | Inspection Required |
|---|---|---|---|
| Rotary/line laser | 1 set/crew | ||
| Aluminium straightedge, levels | 2 m and 300 mm | ||
| Steel trowels | 6–10 mm notches | ||
| Wet tile saw, snap cutter, angle grinder (with guard) | 1 per crew | ||
| Electric mixer | 1 mixer/crew | ||
| Reusable wedges/clips | As required | ||
| Hand tools | |||
| Industrial vacuum, Ram board/kraft paper |
Prerequisites
- Approved shop drawings, room data sheets, and finishes schedules.
- Approved Method Statement and ITP; toolbox talk conducted and recorded.
- Material approvals: MIRs with COAs for tiles, adhesives, grouts, waterproofing.
- Mock-up: Minimum 2 m² wall and 2 m² floor with full build-up and lighting; obtain consultant approval (hold point).
- Substrate readiness:
- Curing: Concrete ≥28 days; cement screed/render per TDS (commonly ≥7 days per 25 mm) [Verify].
- Moisture: Cementitious screeds typically ≤4 CM% or ≤75% RH (in-situ) before tiling [Verify per TDS/spec].
- Strength: Pull-off (where specified) ≥1.0 N/mm² [Verify].
- Flatness and levels within tolerance; drains installed and tested for flow.
- Services and penetrations coordinated and fixed; backing boards installed per manufacturer.
- Waterproofing scope, details, and interfaces coordinated and approved.
- Access equipment/scaffolds inspected (tagged) and lighting suitable for finish works.
- RCD-protected power supply available; cutting area designated with water/drainage control.
- Confirm slip-resistance class of tiles per project for area usage [Verify].
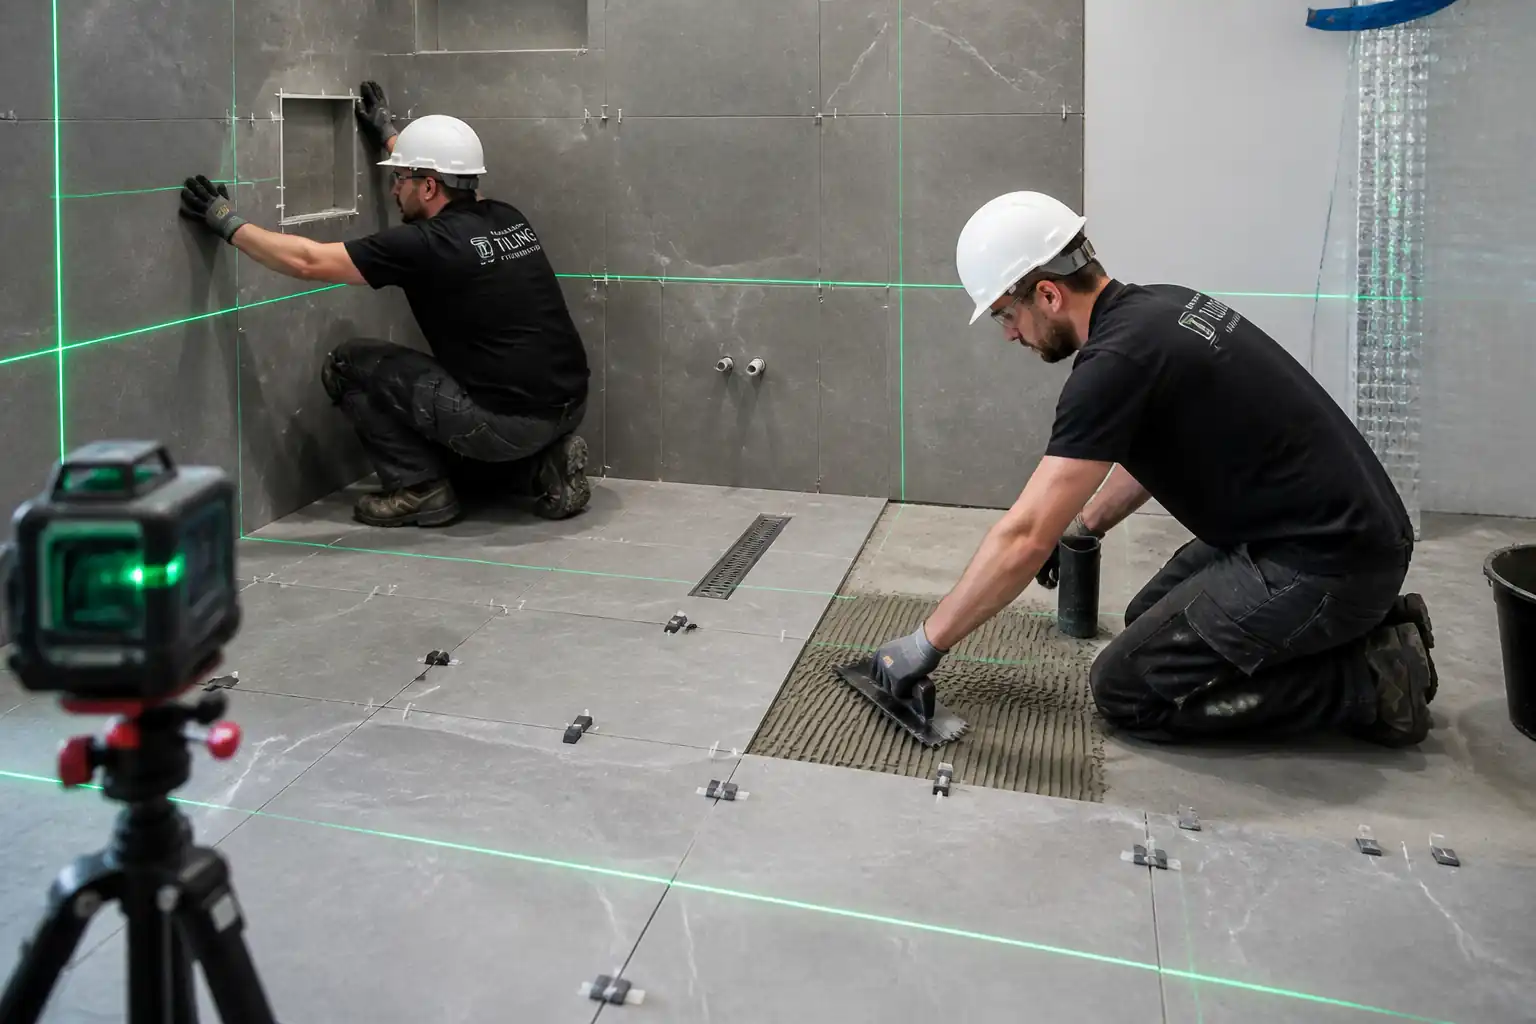
Method Sequence
| Step | Activity | Description | Responsibility | Inspection / Hold Point |
|---|---|---|---|---|
| 1 | Pre-start and area release | Confirm area is released; review drawings, details, and mock-up acceptance. Conduct toolbox talk focusing on cutting, chemicals, and manual handling. | Tiling Foreman / HSE Officer | Pre-start checklist; work permit if required |
| 2 | Substrate survey and preparation | Check flatness (≤3 mm in 2 m; ≤1 mm in 300 mm), soundness, cleanliness. Remove laitance, dust, and contaminants. Fill voids, repair cracks as specified; apply primer/bond coat as per TDS. | Site Engineer / Tiling Foreman | Straightedge, level checks; surface pull-off if specified |
| 3 | Waterproofing (wet areas) | Prime (if required). Install pre-formed corners, banding at junctions, and collars at penetrations. Apply first coat of membrane (WFT per TDS). After cure, apply second coat at right angles. Upstands: showers to ≥1.8 m, other wet perimeters ≥150–300 mm; floors fully covered with returns up walls ≥100 mm or per drawings. | Approved Waterproofing Applicator | Wet film gauge per coat; visual continuity checks |
| 4 | Flood test (wet rooms/showers) | Plug drain; fill to threshold or 25–50 mm depth. Maintain 24 h. Mark level at start/end; inspect below for leaks. | QA/QC Engineer | Visual leakage survey; measure level drop |
| 5 | Setting out and dry layout | Establish control lines and datum. Dry-lay tiles to confirm joint width and cuts (prefer ≥1/2 tile at perimeters). Align with drains/thresholds; coordinate movement joints and trims. | Site Engineer / Tiling Foreman | Consultant review of layout |
| 6 | Adhesive mixing | Measure water per TDS; mix 2–3 min to lump-free; rest (slake) 5 min; remix. Use within pot life; discard skin-formed or expired material. | Tiling Foreman | Check batch, expiry, mix ratio, pot life |
| 7 | Adhesive application | Spread with notched trowel sized to tile; comb one direction. Bed thickness typically 3–6 mm. Back-butter for tiles ≥400×400 mm or profiled backs. Avoid skinning; refresh adhesive as required. | Tilers | Open time checks; lift-and-check |
| 8 | Tile laying and alignment | Press tile and slide perpendicular to ridges. Use spacers/leveling clips. Tap lightly with rubber mallet. Maintain joint width: walls 2–3 mm, floors 3–5 mm. Check plane/level frequently. | Tilers / Foreman | Coverage verification by lifting 1 tile per ~10 tiles and each start; straightedge and level checks |
| 9 | Cuts and penetrations | Mark and cut using wet saw; maintain 3–5 mm clearance around penetrations; fit collars/trims. Smooth edges; no chips visible at 1 m normal viewing. | Tilers | Visual and measurement |
| 10 | Movement and perimeter joints | Honor structural joints; provide intermediate joints: interiors typically at ≤6–8 m or ≤25–40 m² floors; walls ≤3–4.5 m in both directions; perimeters 6–10 mm. Install profiles/backer rod and sealant as detailed. | Site Engineer / Tilers | Spacing and width verification |
| 11 | Pre-grout curing and clean | Allow adhesive to cure (typically ≥24 h; rapid set per TDS). Remove spacers; clean joints to ≥2/3 tile thickness depth; surface dust removed. | Tiling Foreman | Cure time check; joint cleanliness |
| 12 | Grouting | Mix grout per TDS. Force grout diagonally across joints. Compact fully. Initial clean with damp sponge; final clean when haze forms. For epoxy, follow pot life and cleaning agents carefully. | Tilers | Visual; joint fullness checks |
| 13 | Sealant (sanitary and movement) | Install primer (if required), backer rod, and sealant. Tool to concave finish. Use sanitary grade in wet areas. | Tilers / Finishing crew | Adhesion and finish check |
| 14 | Protection and curing | Restrict traffic for ≥24–48 h (cementitious grout may require longer). Protect with breathable boards; avoid plastic films. Prevent water ponding for ≥7 days in newly grouted wet areas. | Tiling Foreman | Barricades/signage in place |
| 15 | QA/QC and final inspection | Verify levels, falls, alignment, joint widths, lippage, finish, and cleanliness under final lighting. Compile records and as-builts. | QA/QC Engineer / Consultant | Final punch and acceptance |
Health, Safety, and Environment — Safety Controls
For each significant hazard: hazard, likely consequence, engineering/procedural control, PPE, collective measure, inspection/permit.
- Tile cutting (silica dust and flying fragments)
- Consequence: Respiratory illness (silicosis), eye injury, lacerations
- Controls: Prefer wet cutting; use HEPA extraction for dry grinding; isolate cutting zone; use intact blade guards
- PPE: Safety glasses/face shield, cut-resistant gloves, FFP3/N95 respirator, hearing protection
- Collective: Designated cutting station with water management and barriers
-
Inspection/Permit: Equipment pre-use checks; RCD verification; [Verify per project HSE plan and local regulations]
-
Electrical risk with wet saws
- Consequence: Electric shock, burns
- Controls: 230/120 V supply via RCD; IP-rated connectors; keep connections off wet floors; cable management
- PPE: Dielectric gloves when connecting, dry footwear
- Collective: Lockable distribution boards, drip loops, signage
-
Inspection/Permit: Weekly PAT, daily visual checks; permit if near water bodies [Verify]
-
Manual handling of tiles/adhesive bags
- Consequence: Musculoskeletal injury, crush injuries
- Controls: Use team lifting and tile suction lifters; split loads; mechanical aids for pallets; plan delivery near point-of-use
- PPE: Gloves with grip, safety boots
- Collective: Trolley/handlers, clear access routes
-
Inspection/Permit: Manual handling assessment; supervisor oversight
-
Chemical exposure (adhesives, grouts, waterproofing)
- Consequence: Dermatitis, respiratory irritation, chemical burns
- Controls: Review SDS; use minimum quantities; ensure ventilation; prohibit mixing in confined spaces unless controlled
- PPE: Chemical-resistant gloves, goggles, long sleeves; respirator if stated in SDS
- Collective: Local ventilation/air movers; eyewash nearby
-
Inspection/Permit: COSHH/chemical permit where applicable; SDS on site [Verify]
-
Work at height (wall tiling, high wet areas)
- Consequence: Falls, serious injury
- Controls: Use inspected podiums/step-ups/scaffold with guardrails; avoid standing on buckets or unstable platforms
- PPE: Non-slip footwear; fall arrest if required by risk assessment
- Collective: Guardrails, toe boards, access control
-
Inspection/Permit: Scaffold/tagged inspection; work-at-height permit [Verify]
-
Slips/trips in wet works
- Consequence: Sprains, fractures
- Controls: Keep floors tidy; immediate cleanup; anti-slip temporary covers; segregate wet zones
- PPE: Slip-resistant footwear
- Collective: Barricades and warning signage
-
Inspection/Permit: Housekeeping inspections each shift
-
Noise and vibration from cutters/mixers
- Consequence: Hearing damage, hand–arm vibration
- Controls: Low-noise blades; limit trigger time; maintenance of tools
- PPE: Hearing protection; anti-vibration gloves
- Collective: Noise monitoring if required
-
Inspection/Permit: Compliance with project noise limits [Verify]
-
Sharp edges and glassy tiles
- Consequence: Cuts/lacerations
- Controls: Deburr edges; proper handling; store vertically in racks
- PPE: Cut-resistant gloves, long sleeves
- Collective: Edge guards, storage racks
-
Inspection/Permit: Daily tool and material storage checks
-
Confined wet rooms during membrane application
- Consequence: Asphyxiation, solvent exposure (if solvent-based)
- Controls: Prefer water-based, low-VOC products; forced ventilation; hot-work/chemical permit if required
- PPE: Respirator as per SDS, goggles, gloves
- Collective: Ventilation fans; gas detection if specified
- Inspection/Permit: Confined space/chemical permit [Verify]
Environmental Controls
- Dust control: Use wet cutting or local extraction with HEPA; enclose cutting area; vacuum with HEPA filters.
- Noise management: Schedule noisy cutting in agreed windows; use low-noise blades; monitor per project limits [Verify].
- Slurry and wastewater: Collect wet saw runoff; do not discharge to drains; settle solids and dispose as construction waste per local regulations.
- VOC management: Select low-VOC adhesives/membranes where possible; ensure ventilation; keep containers closed.
- Waste segregation: Separate tile off-cuts, bags, plastics, and pallets; recycle packaging where facilities exist.
- Material storage: Keep tiles dry on flat pallets; protect adhesives from moisture and heat; FIFO to minimize expired stock.
- Spill control: Trays under mixing stations; spill kits available; train crew in immediate containment and cleanup.
- Water and energy: Use trigger-controlled hoses; switch off idle equipment; LED task lighting.
- Protection of adjacent finishes: Masking and temporary protection; no acidic cleaners near sensitive metals/stone.
- Records: Maintain waste transfer notes and SDS; environmental inspections weekly.
QA/QC Controls
Material Controls
- Verify conformance to ISO 13007/EN 12004 (adhesives) and EN 13888 (grouts) or ANSI A118 equivalents [Verify].
- Check batch numbers, expiry dates, and COAs. Maintain shade/batch consistency; do not mix different tile batches in one room unless approved.
Process Controls
- Substrate acceptance checklist before starting: flatness, moisture, strength, cleanliness.
- Waterproofing inspection: WFT/DFT, overlaps, corners, collars, continuity; flood test report for wet areas.
- Setting-out approval: control lines, cut tile distribution, movement joints; consultant witness/approval.
- Adhesive application: monitor open time and bed thickness; lift-and-check frequency: at start of shift, change of tile size, and minimum 1 per 10 tiles.
- Coverage targets: ≥95% in wet areas/large-format; ≥80% in dry areas; edges and corners fully supported.
- Joint control: verify width and straightness each 3 m; maintain consistent alignment with control lines.
- Lippage checks: at each bay and door threshold using 300 mm straightedge/feeler gauges.
Inspection Metrics and Tolerances [Verify per project specifications]
- Flatness: ≤3 mm in 2 m; ≤1 mm in 300 mm.
- Falls: 1–2% to drain; no ponding after 10 min of flow test.
- Lippage: ≤1.0 mm (joints ≤3 mm); ≤1.5 mm (joints >3 mm) plus inherent warpage allowance.
- Movement joints: spacing/locations per approved drawings and standards.
Testing and Records
- Flood test: 24 h with photos and measurements.
- Adhesion (if specified): pull-off tests after curing per ASTM C1583 or EN 1542; ≥1.0 N/mm² typical [Verify].
- Slip resistance: verify tile classification and finish per spec (e.g., EN 16165/ANSI A326.3) for wet areas [Verify].
- Records: MIRs, SIRs, IRs, checklists, photographs, as-builts, training/toolbox records, equipment calibration, waste disposal notes.
Nonconformance and Rectification
- Record NCR for out-of-tolerance work. Propose corrective action: tile removal and re-fix, re-leveling compound, re-application of membrane if damaged. Re-inspect and close NCR with Consultant approval.
Attachments
- Approved shop drawings and room finish schedules
- Manufacturer Technical Data Sheets (TDS) and Safety Data Sheets (SDS)
- Mock-up approval records and photographs
- Material approvals (MIR/COA) for tiles, adhesives, grouts, waterproofing
- Substrate Inspection Reports (SIR) and surveys
- Flood Test Reports and photos
- In-process checklists (coverage, lippage, joint control)
- Inspection Requests (IR) and approvals at hold/witness points
- Equipment calibration certificates (laser levels, gauges)
- Training/competency records for tilers and applicators
- Waste transfer/disposal notes and environmental inspections
- As-built and O&M manuals including cleaning/maintenance guidance
This content is a read-only public reference. Download or customize to get an editable version.
ITP preview
The first inspection activities from the linked ITP for Method Statement — Ceramic Wall and Floor Tiling Works (Wet and Dry Areas):
| Activity | Inspection / Test | Acceptance Criteria | Responsibility | Record |
|---|---|---|---|---|
| Materials receipt (tiles, adhesives, grouts, membrane) | Check COA, batch, expiry, conformity to ISO 13007/EN 12004/EN 13888 or ANSI A118 | Approved MIR; materials undamaged; within shelf life | QA/QC Engineer | MIR; delivery notes; photos |
| Substrate acceptance (floors/walls) — HOLD | Flatness and level survey; moisture as required; cleanliness and soundness | Within tolerances; dryness per spec/TDS; sound and clean | QA/QC Engineer / Consultant | SIR; IR |
| Waterproofing application (wet areas) — HOLD | WFT/DFT checks; continuity at corners/penetrations; upstand heights | DFT per TDS (typically ≥1.0 mm); continuous film; details complete | QA/QC Engineer / Consultant | Waterproofing checklist; IR; photos |
Showing 3 of 11 inspection activities. View full ITP →
Related Inspection and Test Plan
An Inspection and Test Plan (ITP) is available for Method Statement — Ceramic Wall and Floor Tiling Works (Wet and Dry Areas). The ITP defines the inspection activities, acceptance criteria, hold and witness points, responsible parties, and records required to verify the work described in this method statement.
View the Method Statement — Ceramic Wall and Floor Tiling Works (Wet and Dry Areas) ITP →Frequently asked questions
Continue with related Quollnet resources connected to this method statement.