Method Statement: Placing and Finishing Concrete for Internal Slab-on-Grade Floors (Warehouses/Commercial) – Method Statement
AI-assisted method statement with matching ITP, PDF download, and Excel export.
More than a static template
Unlike a downloadable Word or PDF template, this method statement is an AI-assisted editable starting point connected directly to a matching Inspection and Test Plan. Every section is structured, project-adaptable, and ready to export.
- AI-assisted drafting — Customize every section with AI for your specific project scope.
- Linked ITP — A matching inspection and test plan is generated alongside the method statement.
- Multiple export formats — Download as a formatted PDF or editable Excel spreadsheet.
- Editable starting point, not a final document — Review, verify, and adjust all content against your project requirements before use.
Static template vs. Quollnet workflow
| Feature | Static template | Quollnet |
|---|---|---|
| Project-specific content | Manual fill-in required | AI-assisted customization |
| Linked ITP | Separate document, no link | Matching ITP included |
| Export formats | Usually PDF only | PDF and Excel |
| Structured sections | Free-form layout | 13 standardized sections |
| Saved to your account | Local file only | Cloud-saved, reusable |
| Content accuracy | You verify everything | AI-assisted, you still verify |
| Cost | Often free but time-intensive | Free to customize and download |
What you can customize
When you save this method statement to your account, every section becomes editable. The following 13 sections are included:
- Scope — Defines the activity and its boundaries.
- References — Standards, specifications, and drawings.
- Responsibilities — Roles and accountabilities.
- Resources — Labour, plant, and equipment summary.
- Materials — Materials and compliance requirements.
- Equipment — Tools and equipment details.
- Prerequisites — Hold points and pre-conditions.
- Method sequence — Step-by-step construction sequence.
- Safety controls — HSE risk controls and PPE.
- Environmental controls — Environmental mitigation measures.
- QA/QC — Quality inspection and test requirements.
- ITP — Inspection and Test Plan table (has its own page).
- Attachments — Referenced drawings and documentation.
Why this method statement is used
This method statement is used to define and communicate the approved procedure for carrying out method statement: placing and finishing concrete for internal slab-on-grade floors (warehouses/commercial) on site. It ensures the work is planned in advance, the correct resources and controls are in place, and all personnel understand responsibilities, sequence, quality requirements, and safety controls before work begins. It aligns site execution with the documented scope and acceptance expectations.
Who uses this method statement
This method statement is used by contractors, site supervisors, project engineers, QA/QC engineers, HSE officers, consultants, and client representatives. It serves as a shared reference for planning, execution, supervision, inspection, and approval of the activity on site.
When it is prepared and submitted
The method statement is prepared before the work activity starts and submitted as part of the pre-construction documentation package for review and approval.
Who reviews or approves it
The method statement is usually submitted to the client representative, consultant, resident engineer, or project management consultant for review and approval before the work commences.
Important approval note
This method statement is an AI-assisted editable starting point, not a pre-approved document. Before use on any project, all content must be reviewed and approved by the relevant parties (superintendent, principal contractor, or client representative) in accordance with your contract and project quality plan.
For example: if your specification requires a departure from a referenced standard, that departure must be documented and approved separately — this method statement will not capture that automatically. Always verify against your applicable drawings, specifications, and regulatory requirements.
Method statement content
Scope
Summary
This method statement covers the controlled placement and finishing of internal slab-on-grade concrete floors for warehouses and commercial facilities, including:
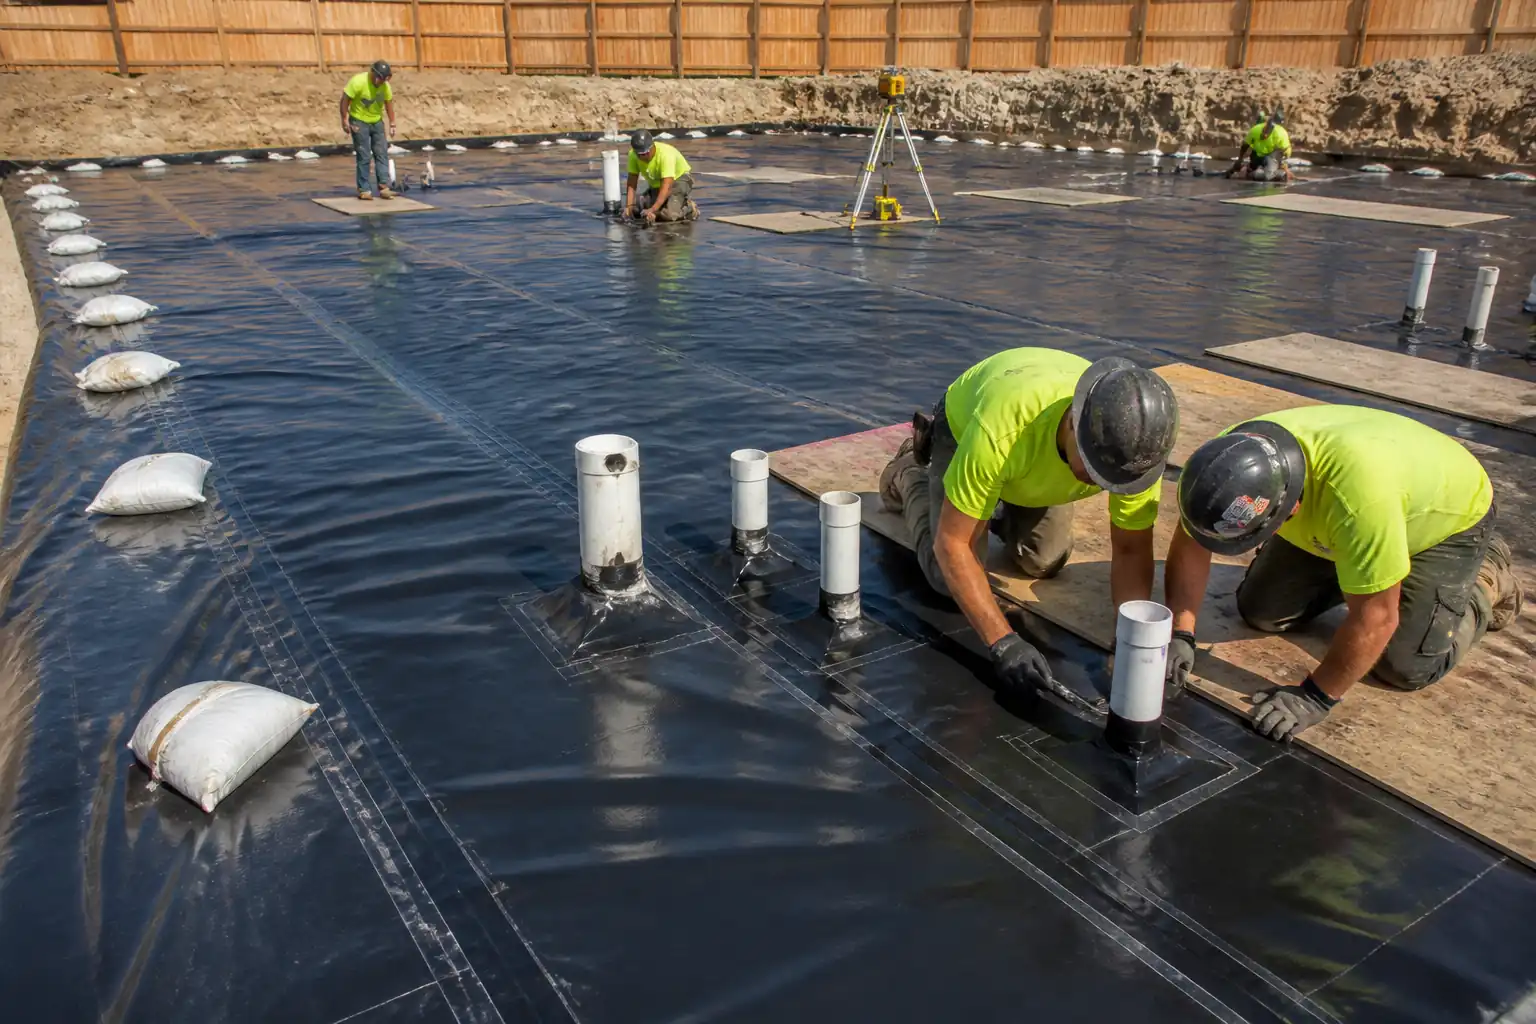
- Protection and installation verification of below-slab vapor barrier/retarder.
- Setting screed control using laser screed equipment and survey control.
- Concrete receiving, testing, placement, consolidation, laser screeding, and initial bull floating.
- Dry-shake hardener application (where specified) and integration.
- Mechanical finishing using walk-behind and ride-on power trowels (pans and blades) to achieve specified finish class.
- Curing, joint formation (saw-cut), edge finishing, protection, and early-age floor care.
- Floor Flatness/Levelness (FF/FL) measurement timing and acceptance per ASTM E1155.
Exclusions
- Structural slab design and geotechnical design.
- External slabs exposed to weather.
- Epoxy/urethane toppings or polishing processes (unless noted).
Objectives
- Deliver a dense, durable, flat, and level internal slab surface suitable for racking, MHE, or commercial use, meeting specified FF/FL and durability requirements, with verified moisture control for subsequent floor coverings.
References
| Document Type | Reference / Number | Revision | Notes |
|---|---|---|---|
| Standard | ACI 302.1R | ||
| Standard | ACI 117 | ||
| Standard | ASTM E1155/E1155M | ||
| Standard | ASTM E1643 | ||
| Standard | ASTM E1745 (Class A/B/C) | ||
| Standard | ACI 301 | ||
| Standard | ACI 308R | ||
| Standard | ACI 305R, ACI 306R | ||
| Standard | ASTM C143, C231, C173, C138, C31, C39 | ||
| Standard | ASTM C309, ASTM C1315 | ||
| Standard | BS EN 13670, BS EN 206 | Use if project follows Eurocodes. | |
| Product Data | Latest revisions |
Responsibilities
| Role | Responsibility | Name / Party |
|---|---|---|
| Project Manager | Lead | Main Contractor |
| Site Engineer | Control | Main Contractor |
| QA/QC Engineer | QA/QC | Main Contractor |
| HSE Advisor | HSE | Main Contractor |
| Foreman | Execution | Subcontractor |
| Surveyor | Survey | Main Contractor |
| Supplier QC | Supply | Supplier |
| Laser Screed Operator | Operate | Subcontractor |
Resources
| Resource Type | Description | Quantity | Remarks |
|---|---|---|---|
| Labor | Pump crew 3–4, placing crew 6–10, screed operator 1–2, bull floaters 2–3. | ~12–18 | |
| Labor | Ride-on operators 2, walk-behind operators 2–3, edgers 2, saw-cut operator 1–2. | ~7–9 | |
| Labor | 1 QA/QC Engineer, 1 Lab Tech for sampling/testing. | 2 |
Materials
| Material | Specification / Grade | Quantity | Remarks |
|---|---|---|---|
| Concrete | |||
| Vapor barrier | |||
| Dry-shake | |||
| Curing compound | |||
| Evaporation retarder | |||
| Jointing materials |
Equipment
| Equipment | Capacity / Type | Quantity | Inspection Required |
|---|---|---|---|
| Laser Screed | 1–2 | Yes | |
| Ride-on trowel | 2 | Yes | |
| Walk-behind trowel | 2–3 | Yes | |
| Pump | 1 | Yes | |
| Vibrator | 2–3 | Yes | |
| Hand tools | As needed | No | |
| Joint saw | 1–2 | Yes | |
| Total station/level | 1 | Yes |
Prerequisites
- Approvals: Method Statement, ITP, mix design approvals, material submittals (vapor barrier, dry-shake, curing compound) approved.
- Survey: Control points established; benchmark transferred to pour area; laser screed calibrated and trial-checked on reference pad.
- Subgrade: Compaction certificates available; final trimming completed; proof-rolled and accepted. Tolerance typically ±10 mm over 3 m straightedge [Verify].
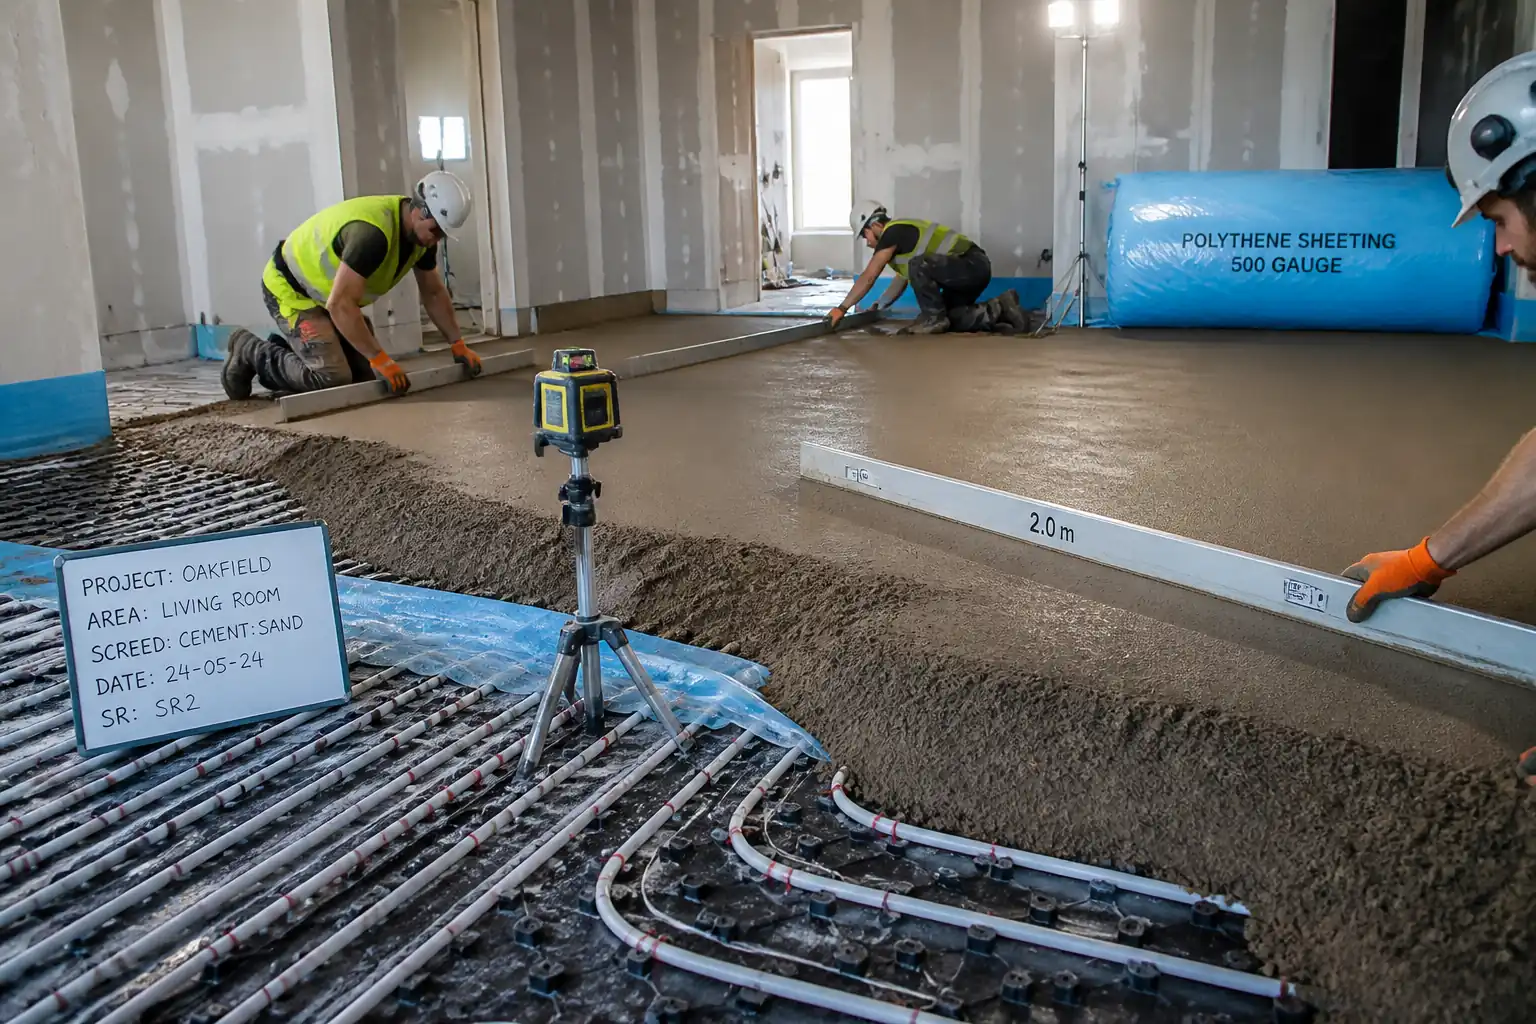
- Vapor barrier: Installed, lapped ≥150 mm, taped, and sealed at penetrations; protection boards/walkways placed to prevent puncture during reinforcement placing.
- Reinforcement/dowels: Mesh/chairs, dowel baskets at construction joints fixed to line/level; cover as specified [Verify per project].
- MEP sleeves/penetrations: Fixed, sealed to vapor barrier with compatible boots/tapes.
- Environmental: Pour window selected based on weather; hot/cold weather measures ready per ACI 305R/306R.
- Manpower and equipment: Sufficient finishing crew and equipment available to match pour size and set time; backup equipment ready.
- HSE: Task-specific risk assessment, permits to work, toolbox talk delivered; lighting planned for night pours.
- Mock-up (if specified): Approved sample panel for finish and hardener color/texture.
- Delivery logistics: Access/traffic plan, pump setup area, washout contained; batch plant notified of target rate and slump/admixture plan.
Method Sequence
| Step | Activity | Description | Responsibility | Inspection / Hold Point |
|---|---|---|---|---|
| 1 | Pre-pour Inspection & Hold Point | Verify subgrade, vapor barrier integrity, reinforcement/dowels, embedded items, and level control prior to concrete delivery. | QA/QC Engineer + Client Rep | Hold Point |
| 2 | Form/Edge Header Setting | Install edge forms or construction joint headers/dowel baskets; set to design elevation and line; fix securely. | Site Engineer/Surveyor | Witness |
| 3 | Concrete Receipt & Verification | Receive concrete; review tickets for mix ID, time, admixtures; perform fresh tests. | QA/QC + Lab Tech | Witness |
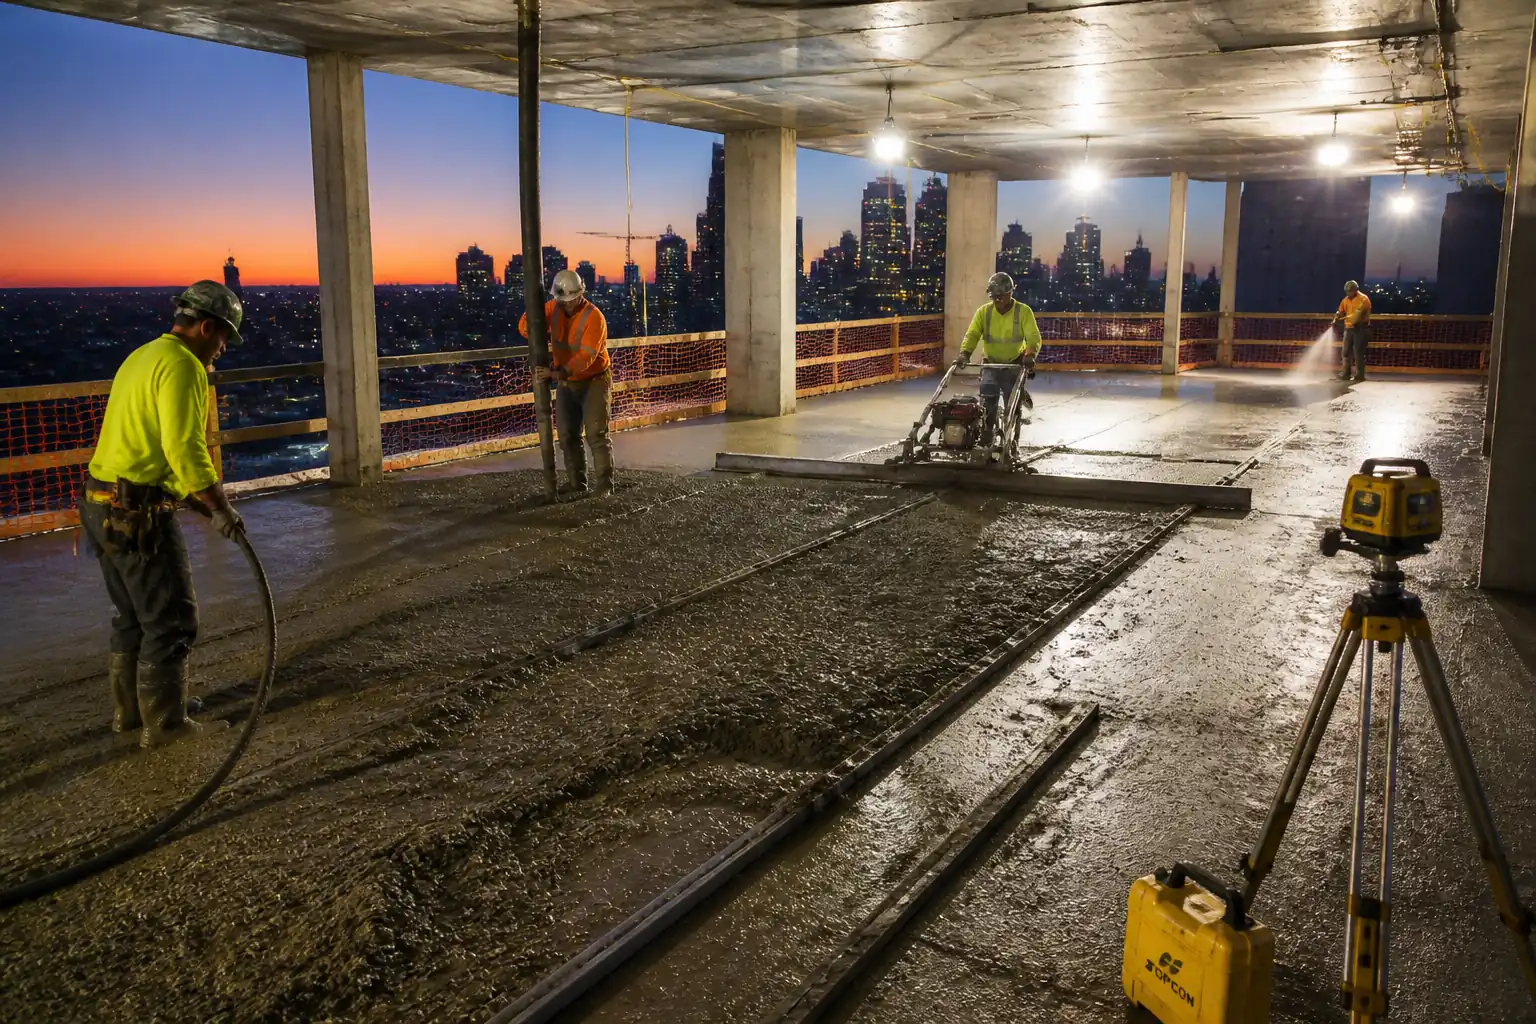
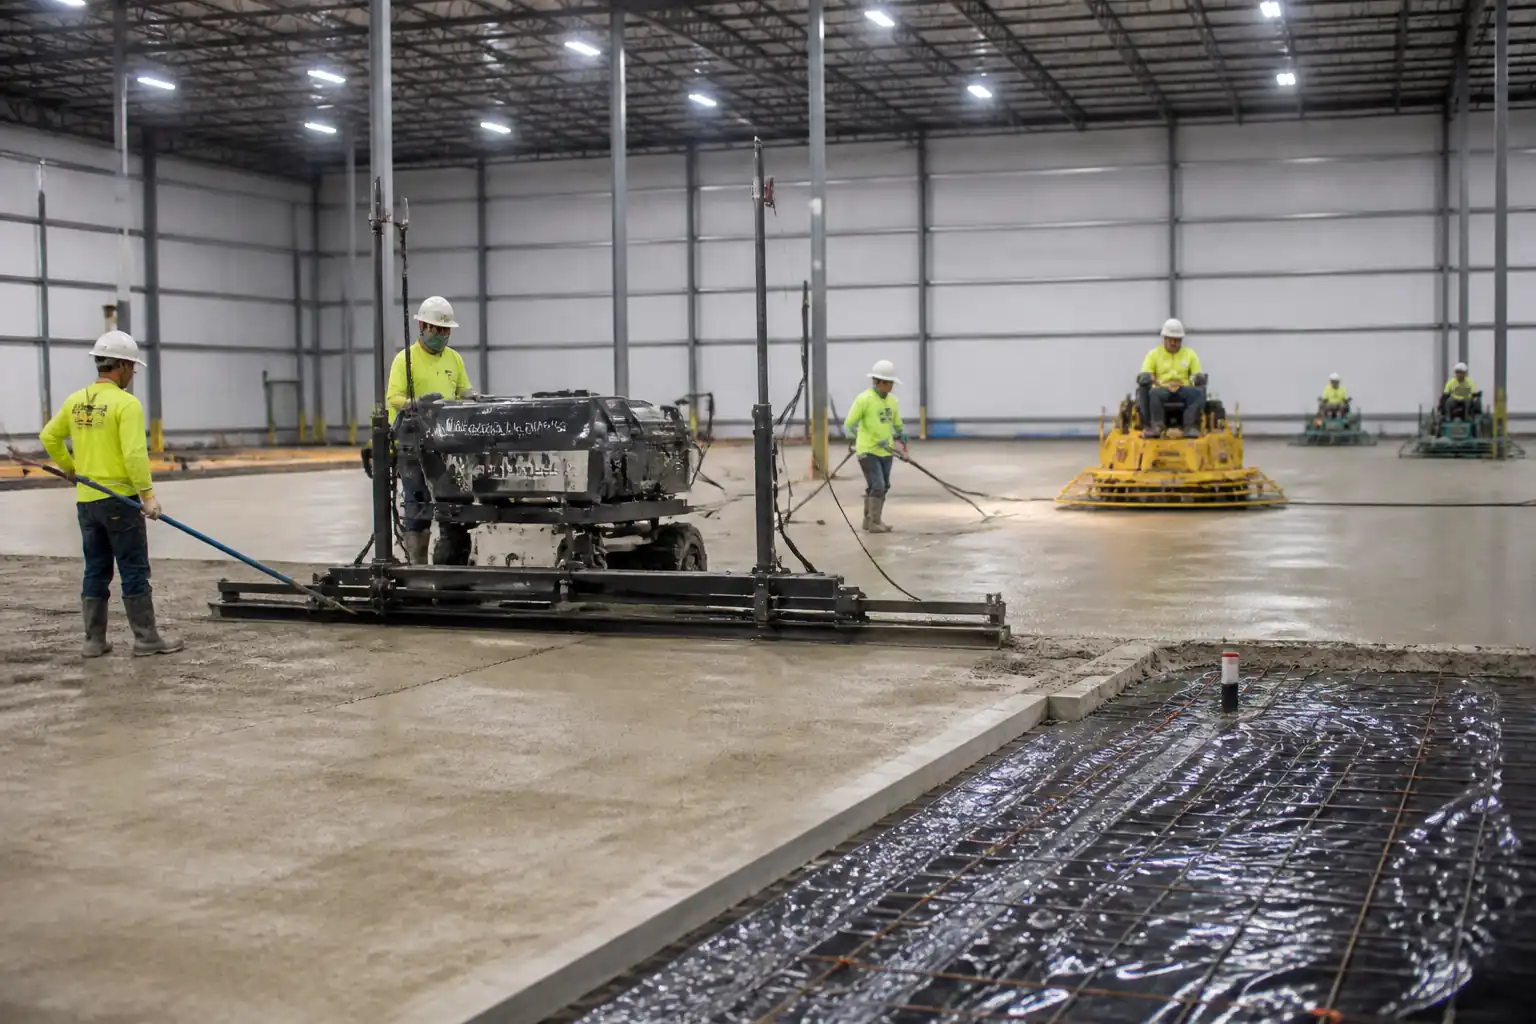
| 4 | Placement & Consolidation | Discharge via pump/truck; place in strips suited to laser screed; minimal rehandling; internal vibration only at edges/penetrations. | Placing Crew | In-process |
| 5 | Laser Screeding | Laser screed to target elevation using control system; screed pattern coordinated with pour sequence and joint layout. | Laser Screed Operator | In-process |
| 6 | Initial Bull Floating | Immediately after screeding, bull float to embed aggregate and remove ridges; do not close surface prematurely. | Finishing Crew | In-process |
| 7 | Bleed Water Management | Allow bleed water to dissipate; apply evaporation retarder as mist if high evaporation rate; no water sprinkling. | Finishing Foreman | In-process |
| 8 | Dry-Shake Hardener – First Broadcast | When slab supports foot pressure with ~3–5 mm indentation and no surface sheen, broadcast ~2/3 of total rate uniformly; allow to darken; float with pans. | Finishing Crew | Witness |
| 9 | Dry-Shake Hardener – Second Broadcast | Apply remaining ~1/3 rate once first is integrated; pan float to fully wet-in and densify. | Finishing Crew | In-process |
| 10 | Power Floating (Pans) | Use ride-on with pans to compact and close surface progressively; maintain flat, overlapping passes; edge with walk-behind units. | Ride-on Operators | In-process |
| 11 | Power Troweling (Blades) | Transition to blades in multiple passes with increasing pitch to achieve specified finish (e.g., hard-troweled). | Finishing Crew | In-process |
| 12 | Contraction Joints (Saw-Cut) | Early-entry saw within 1–4 hours of final trowel, or conventional saw 4–12 hours, depending on mix/ambient; lay out per drawings. | Saw-Cut Operator | Witness |
| 13 | Curing | Immediately after final pass/sawing dust removal, apply curing compound uniformly at specified rate; or commence wet curing (7 days typical). | Finishing Foreman | Witness |
| 14 | FF/FL Measurement Timing | Perform ASTM E1155 floor profile measurements on designated strips within 24 hours of final set and preferably before saw-cutting; if not practical, within 72 hours. | QA/QC + Specialist | Witness |
| 15 | Protection & Early-Age Care | Restrict traffic; install barriers; avoid point loads; maintain curing; protect from dust, water, and staining. | Site Team | Daily |
| 16 | Joint Sealing (If Specified) | After slab has dried and joints are clean and dry, install sealant; shave flush for MHE traffic. | Finishing Subcontractor | Witness |
| 17 | Strength & Thickness Verification | Test cylinders at 7/28 days; core thickness checks if required. | QA/QC + Lab | Witness |
| 18 | Moisture Testing for Floor Coverings (If Applicable) | Prior to resilient/epoxy flooring, test slab moisture: RH (ASTM F2170) and/or MVER (ASTM F1869). | QA/QC | Witness |
Health, Safety, and Environment (HSE) – Safety Controls
Principal Hazards and Controls
1) Concrete chemical burns and dermatitis
- Consequence: Skin/eye burns, long-term dermatitis.
- Engineering/Procedural Control: Provide running water/eyewash near pour; prohibit kneeling in wet concrete; use waterproof knee boards.
- Required PPE: Alkali-resistant gloves, long sleeves, waterproof boots, safety glasses/goggles, forearm protection.
- Collective Preventive Measure: Work platforms/knee boards for finishers.
- Inspection/Permit/Supervision: HSE inspections; first-aid/eyewash checks before pour [Verify per project HSE plan and local regulations].
2) Silica/cement dust during dry-shake application and saw-cutting
- Consequence: Respiratory irritation or long-term illness.
- Engineering/Procedural Control: Use pre-dampened dry-shake if permitted; low-dust products; local exhaust or HEPA vacuums on saws; no dry sweeping—use vacuums.
- Required PPE: FFP2/N95 or higher respirators, safety glasses, gloves.
- Collective Preventive Measure: Dust extraction on equipment; zoned work areas.
- Inspection/Permit/Supervision: Air monitoring as required; equipment dust controls checked daily.
3) Ride-on/walk-behind trowel mechanical hazards
- Consequence: Entanglement, crush injuries.
- Engineering/Procedural Control: Guards in place; trained/authorized operators; clear exclusion zones; maintain safe fueling areas.
- Required PPE: Hard hat, safety boots, high-vis, gloves, hearing protection.
- Collective Preventive Measure: Barricaded finishing zones; banksman for maneuvering.
- Inspection/Permit/Supervision: Pre-use inspections and operator certification verification.
4) Pump line/boom hazards and hose whip
- Consequence: Struck-by, loss of control.
- Engineering/Procedural Control: Secure lines; use end-hose restrainers; controlled priming; exclusion during start/stop.
- Required PPE: Hard hat, eye protection, gloves.
- Collective Preventive Measure: Barriers and spotter; communication protocol with pump operator.
- Inspection/Permit/Supervision: Pump inspection records; daily pre-pour checklist; permit to pump where required.
5) Slips, trips, and falls on plastic sheeting and wet surfaces
- Consequence: Sprains, fractures, punctures of vapor barrier.
- Engineering/Procedural Control: Provide walk boards on vapor barrier; housekeeping; anti-slip mats at access points.
- Required PPE: Slip-resistant boots, high-vis.
- Collective Preventive Measure: One-way traffic routes; lighting for night works.
- Inspection/Permit/Supervision: Supervisor inspections each hour during pour.
6) Manual handling of dry-shake bags and equipment
- Consequence: Strains, back injury.
- Engineering/Procedural Control: Mechanical aids (buggies/carts); team lifts; limit bag weights.
- Required PPE: Gloves, boots, back support if approved.
- Collective Preventive Measure: Pre-stage materials near point of use.
- Inspection/Permit/Supervision: Manual handling training records; spot checks.
7) Noise and vibration from equipment
- Consequence: Hearing loss, hand-arm vibration syndrome.
- Engineering/Procedural Control: Maintain equipment; limit exposure time; use low-vibration tools.
- Required PPE: Ear protection (SNR/NRR suitable), anti-vibration gloves.
- Collective Preventive Measure: Noise zoning and signage.
- Inspection/Permit/Supervision: Noise surveys where required; HAVS monitoring.
8) Laser equipment exposure (laser screed)
- Consequence: Eye injury.
- Engineering/Procedural Control: Use Class 2/IIIa lasers with warning labels; do not look into beam; set exclusion.
- Required PPE: Safety glasses.
- Collective Preventive Measure: Signage and cordon around base station.
- Inspection/Permit/Supervision: Calibration/label checks prior to use.
9) Hot/cold weather concreting
- Consequence: Heat stress/hypothermia; poor quality.
- Engineering/Procedural Control: Shading/misting; cool water/ice in mix as allowed; heated enclosures in cold; adjust pour timing.
- Required PPE: Weather-appropriate PPE; hydration packs or thermal wear.
- Collective Preventive Measure: Rest breaks; warm/cool shelters.
- Inspection/Permit/Supervision: Environmental monitoring; hot/cold weather plan approvals.
10) Electrical hazards from portable tools and wet environment
- Consequence: Electric shock.
- Engineering/Procedural Control: 110V/cordless tools or GFCI/RCD-protected circuits; IP-rated leads; keep connections off ground.
- Required PPE: Dielectric gloves where relevant, dry gloves.
- Collective Preventive Measure: Cable management overhead.
- Inspection/Permit/Supervision: PAT testing and daily checks.
11) Night works and poor visibility
- Consequence: Struck-by or slips.
- Engineering/Procedural Control: Minimum lighting levels (e.g., ≥200 lux working plane) [Verify]; glare-free positioning.
- Required PPE: High-vis reflective clothing.
- Collective Preventive Measure: Light towers on separate circuits.
- Inspection/Permit/Supervision: Lighting checks pre-pour.
Environmental Controls
- Concrete washout management: Designated, lined washout with capacity sized for pour; no discharge to ground or drains; pH monitoring of wash water; arrange collection by licensed waste contractor.
- VOC/overspray control for curing compounds: Use low-VOC products where specified; apply via controlled, low-pressure sprayers; mask adjacent finishes/equipment.
- Dust and particulates: HEPA vacuums on saws; no dry sweeping; damp wipe or vacuum; schedule saw-cutting to minimize nuisance.
- Noise: Keep within local limits [Verify]; use acoustic shrouds on saws; plan works within permitted hours where possible.
- Waste minimization: Accurately estimate materials; segregate and recycle pallets, plastic vapor barrier offcuts (if acceptable), and cardboard; return unused admixtures per supplier scheme.
- Spill prevention: Drip trays under plant; spill kits at pump and fueling areas; immediate containment and reporting.
- Water use: Controlled use for equipment cleaning; avoid hosing slabs during early-age curing; capture slurry from saw-cutting if required.
- Energy and idling: Turn off engines when idle; use electric tools where practicable.
- Protection of vapor barrier: Use boards/walkways to prevent punctures generating rework/waste.
- Compliance: Follow project Environmental Management Plan and local regulations [Verify per project HSE plan and local regulations].
Quality Assurance / Quality Control
Key Controls
- Mix verification: Confirm mix design approvals, aggregate gradation, admixture compatibility with dry-shake and finishing method.
- Fresh concrete testing: Each truck or at minimum 1 set per 50–75 m³ and each production day [Verify]; slump, air, temperature, density; make cylinders per ITP.
- Placement rates: Match crew/equipment to setting time to avoid cold joints; monitor ambient conditions and evaporation rate.
- Elevations/thickness: Random checks after screeding; confirm minimum thickness not less than design minus tolerance per ACI 117 [Verify].
- Dry-shake coverage: Track bags per bay; confirm two-stage broadcast and full integration; log m² per bag count.
- Finishing: No addition of water to surface; use evaporation retarder only as mist; avoid finishing on bleed water; monitor for blistering/tearing.
- Joints: Layout compliance; correct depth and timing; cleanliness prior to sealing.
- Curing: Continuous and uniform application; verify rate by container volume vs area; ensure compatibility with dry-shake and future coatings.
- FF/FL Testing: ASTM E1155 within specified timing; report per bay/strip; compare to project minimum and overall average criteria.
- Strength: Test cylinders at 7 and 28 days (and additional ages if specified); investigate low breaks per ASTM C39/C94 guidance.
- Moisture for coverings: RH/MVER tests at specified locations and depths; comply with flooring manufacturer limits.
- Nonconformance: Issue NCR for deviations; agree corrective measures (e.g., grinding, topping, or panel replacement) with Engineer.
Records
- Pre-pour checklist; calibration certificates; batch tickets; fresh concrete test reports; cylinder test reports; FF/FL reports; curing logs; saw-cut logs; moisture test reports; as-built levels/thickness; NCR/CAR forms; photos.
Attachments
- Pour sequence and bay layout drawings with joint plan and dowel basket details.
- Approved concrete mix design and supplier certificates.
- Product Data Sheets and Safety Data Sheets (SDS): dry-shake hardener, curing compound, evaporation retarder, joint sealant.
- Equipment calibration certificates: laser screed, total station/laser level.
- Pre-pour checklist template; daily QA log; curing log; saw-cut log templates.
- FF/FL test procedure and sample report format.
- Hot/Cold weather concreting plan.
- HSE: Task-specific risk assessment, PTW samples, toolbox talk brief.
- Photos/records of vapor barrier installation and penetrations sealing.
This content is a read-only public reference. Download or customize to get an editable version.
ITP preview
The first inspection activities from the linked ITP for Method Statement: Placing and Finishing Concrete for Internal Slab-on-Grade Floors (Warehouses/Commercial):
| Activity | Inspection / Test | Acceptance Criteria | Responsibility | Record |
|---|---|---|---|---|
| Subgrade and Level Prep Approval | Visual; density certificates; elevation checks. | Compaction per spec (e.g., ≥95% MDD) [Verify]; tolerance ±10 mm over 3 m [Verify]. | QA/QC, Client Rep | Pre-pour checklist, certificates |
| Vapor Barrier Installation | Visual seams, laps, tape adhesion; penetration seals. | ASTM E1643; laps ≥150 mm; taped continuous; no punctures. | QA/QC | Inspection report, photos |
| Formwork/Headers and Dowel Baskets | Survey check; dowel alignment/spacing. | Elevation ±6 mm; dowel alignment within tolerance. | Site Engineer/QA | Survey record |
Showing 3 of 15 inspection activities. View full ITP →
Related Inspection and Test Plan
An Inspection and Test Plan (ITP) is available for Method Statement: Placing and Finishing Concrete for Internal Slab-on-Grade Floors (Warehouses/Commercial). The ITP defines the inspection activities, acceptance criteria, hold and witness points, responsible parties, and records required to verify the work described in this method statement.
View the Method Statement: Placing and Finishing Concrete for Internal Slab-on-Grade Floors (Warehouses/Commercial) ITP →Frequently asked questions
Continue with related Quollnet resources connected to this method statement.