Place Non-Shrink Grout Pads/Capping: Mix, Place, Cure, Verify
Definition: Place non-shrink grout pads/capping provides field-ready controls for mixing, placement, curing, and final flatness/level checks for supervisors and QA teams, excluding bearing surface preparation tasks.
- Standardize mix water, flow, and pot life for predictable performance.
- Place and finish for planarity and level within tight millimetre tolerances.
- Cure and protect to achieve strength and non-shrink performance reliably.
- Interactive, commentable checklist; export records with QR code verification.
Place non-shrink grout pads/capping is a focused activity that demands disciplined mix control, careful placement, thorough curing, and tight verification of flatness and level. This checklist supports supervisors and inspectors executing nonshrink grout capping and grout pad works while intentionally excluding bearing surface preparation, which must be completed and accepted beforehand. You will confirm batch tickets and water-to-powder ratios, verify flow spread and working time, and place grout to thickness while avoiding segregation and cold joints. Finishing uses straightedges and laser levels to achieve precise elevation and planarity, followed by moisture-retentive curing to lock in non-shrink performance. The outcome is predictable, dimensionally accurate pads/caps ready for subsequent installations, avoiding rocking supports, misalignment, premature cracking, or understrength issues. Use this interactive page to tick each step, add field comments and photos, and export a complete QA pack to PDF/Excel with a QR code that secures traceability and site acceptance.
- Control non-shrink grout performance by fixing water addition, material temperatures, mixing time, and flow spread. Record batch tickets, thermometer readings, and cone flow measurements to keep every pad consistent and traceable across shifts and varying weather conditions.
- Achieve dimensional accuracy by placing from one side, avoiding re-tempering, and checking thickness with depth pins. Finish with a straightedge and confirm level using a laser level, documenting millimetre deviations against approved tolerances and benchmarks.
- Protect early-age grout with immediate curing blankets or compound per approved project specifications and authority requirements. Maintain moisture and temperature logs, restrict loading until strength acceptance, and inspect for voids after formwork removal with photo evidence.
- Interactive online checklist with tick, comment, and export features secured by QR code. Supervisors capture approvals, attach images, and produce a signed QA dossier for handover, ensuring repeatable, auditable outcomes on every pour.
Pre-Placement Verification
Mix Control
Placement and Consolidation
Finishing, Flatness and Level
Curing and Protection
Quality Records and Handover
Mix Control That Delivers Predictable Non-Shrink Performance
Non-shrink grout behaves consistently only when water dosing, material temperature, and mixing energy are controlled. Before opening any bag, standardize the water-to-powder ratio and pre-condition materials to a moderate temperature band so working time and flow spread stay within target. Use a paddle mixer to fully wet out powders; incomplete shear yields lumps, segregation, and variable set times. Time-stamp each batch, test flow spread in millimetres, and reject off-spec material immediately rather than fighting finishability later. Record every batch ticket and flow photo—these simple records close the loop when questions arise about strength or volume stability. With repeatable mixing, you remove the largest source of variability and protect downstream steps like precision leveling and curing. Aim for clean, labelled equipment and enforce a strict no re-temper rule; once setting begins, adding water destroys strength and expansion control. Consistency here saves costly rework.
- Fix water addition; record litres per batch.
- Keep materials 18–24 °C for stable pot life.
- Machine-mix to uniform, lump-free consistency.
- Measure and photo flow spread in mm.
- Reject any batch outside target range.
Placement and Finishing for Flat, Level Pads
Achieving flatness and correct level starts with controlled placement. Discharge from one side so grout flows under itself, pushing air ahead without trapping voids. Light rodding and tapping the formwork releases bubbles while avoiding vibration that can separate fines. Establish a clear datum and strike-off method; then verify thickness with depth pins and confirm level with a laser relative to a known benchmark. A 1 m straightedge check for gaps prevents rocking supports and misalignment later. Keep the surface free of extra water—do not dilute or re-temper to chase finishability. If bleed water appears, manage it per the product data sheet without disturbing aggregates. Document elevations and any minor rub before initial set. These small, timely checks ensure the pad top is truly planar and on-grade, making installation of baseplates, rails, or equipment both faster and more reliable.
- Place continuously from one side.
- Release air with gentle rodding/tapping.
- Verify level with a laser to ±2 mm.
- Use a 1 m straightedge; ≤2 mm gap.
- Record thickness with depth pins.
Curing, Protection, and Acceptance Records
Curing converts a good placement into durable, dimensionally stable grout. Start immediately after finishing or initial set by covering with wet hessian and plastic or applying an approved curing compound. Maintain moisture and moderate temperatures to control drying shrinkage and ensure non-shrink expansion occurs as designed. Log temperature and moisture checks frequently during the first day, then at suitable intervals until acceptance. Protect from wind and direct sun, and prohibit loading until strength or time criteria are met per approved project specifications and authority requirements. When removing forms, inspect faces for voids or honeycombing and repair minor defects using the same grout. Finally, consolidate all QA records—batch tickets, flow tests, temperature logs, elevation surveys, curing logs—and secure digital sign-offs. A complete, exportable dossier speeds approvals and provides traceability if equipment alignment issues surface later.
- Start curing immediately after finishing.
- Keep surface moist; log hourly first 24 h.
- Maintain 10–30 °C with blankets/shades.
- No loading until approved strength/time.
- Archive QA with signatures and photos.
How to Use This Non-Shrink Grout Pads/Capping Checklist
- Preparation: Gather approved non-shrink grout, paddle mixer, graduated cylinders, thermometers, flow cone, depth pins, 1 m straightedge, laser level, curing blankets/hessian/plastic, PPE (gloves, goggles, respirator if dusty). Verify drawings, benchmarks, formwork readiness, and prior acceptance of bearing prep (out of scope).
- Using the Interactive Checklist: Start interactive mode on your device, open the relevant section, and tick items as performed. Add time-stamped comments, photos, and readings. Use acceptance notes to capture tolerances. Export interim reports to PDF/Excel for shift handover if needed.
- Sign-Off: On completion, review attachments, confirm tolerances met, and request digital signatures from the supervisor and QA. Export the final, commentable report as PDF/Excel. Share with stakeholders and archive. Use the embedded QR code to authenticate the record in the field.

Call to Action
- Start Checklist Tick off tasks, leave comments on items or the whole form, and export your completed report to PDF or Excel—with a built-in QR code for authenticity.
- Download Excel - Non-Shrink Grout Pads/Capping Placement
- Download PDF - Non-Shrink Grout Pads/Capping Placement
- View Image - Non-Shrink Grout Pads/Capping Placement
Cite & Embed
“Non-Shrink Grout Pads/Capping Placement by Quollnet”
with a link to
this source page.

FAQ
Question: What flow or slump spread should I target for non-shrink grout pads?
Question: How soon should curing begin after finishing the grout pad?
Question: What tolerances are reasonable for flatness and level on small grout pads?
Question: When can the pad be loaded or equipment installed on the grout?
Related Articles
Broader reading and guidance connected to this checklist topic.


Master Construction Project Cashflow With Cashflowpot

Is It Important To Customize Your Qr Code And How To Do It?
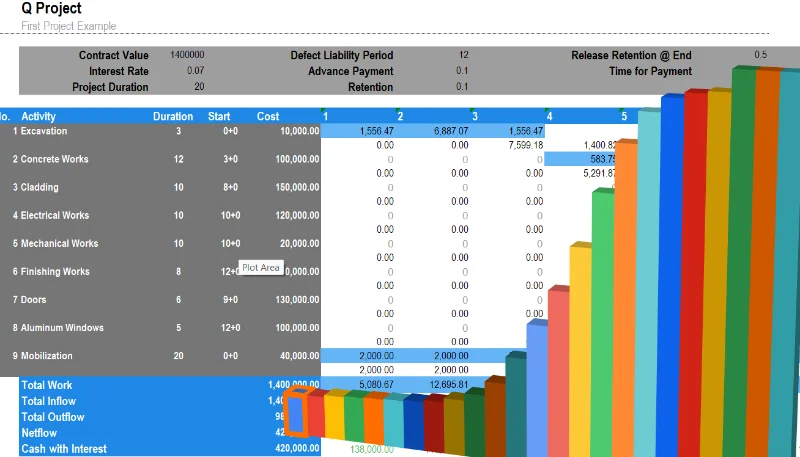
Construction Project Cash Flow Prediction
Related Checklists
Keep the workflow moving with nearby templates chosen from similar checklist content.