Low Concrete Compressive Strength: Investigation, Cores and Next Steps
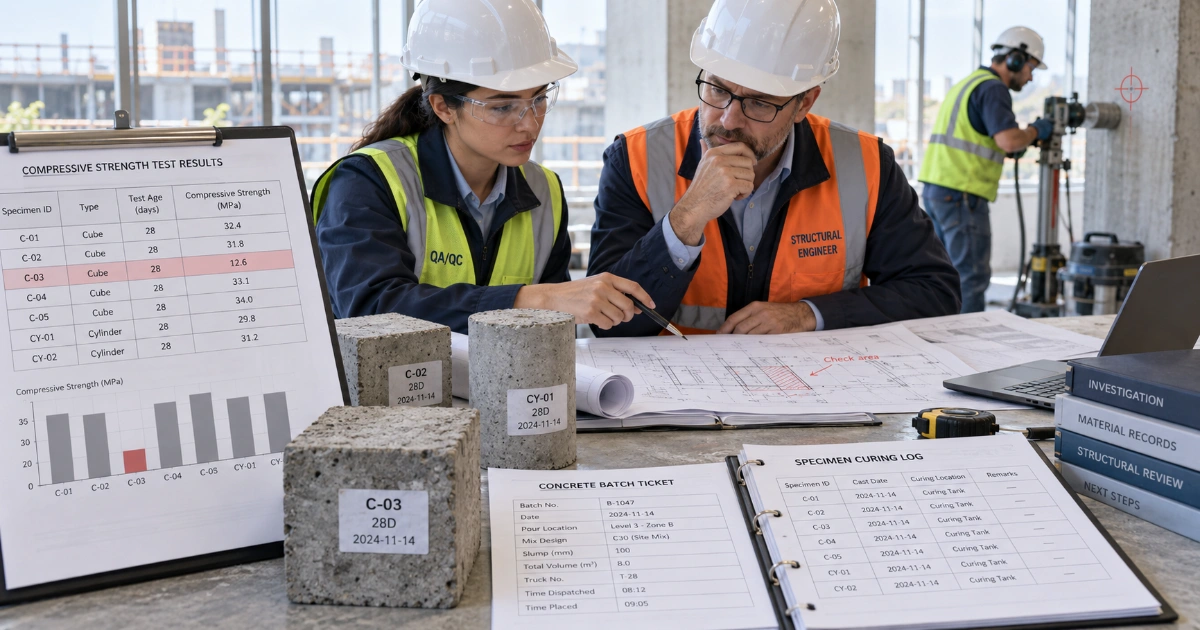
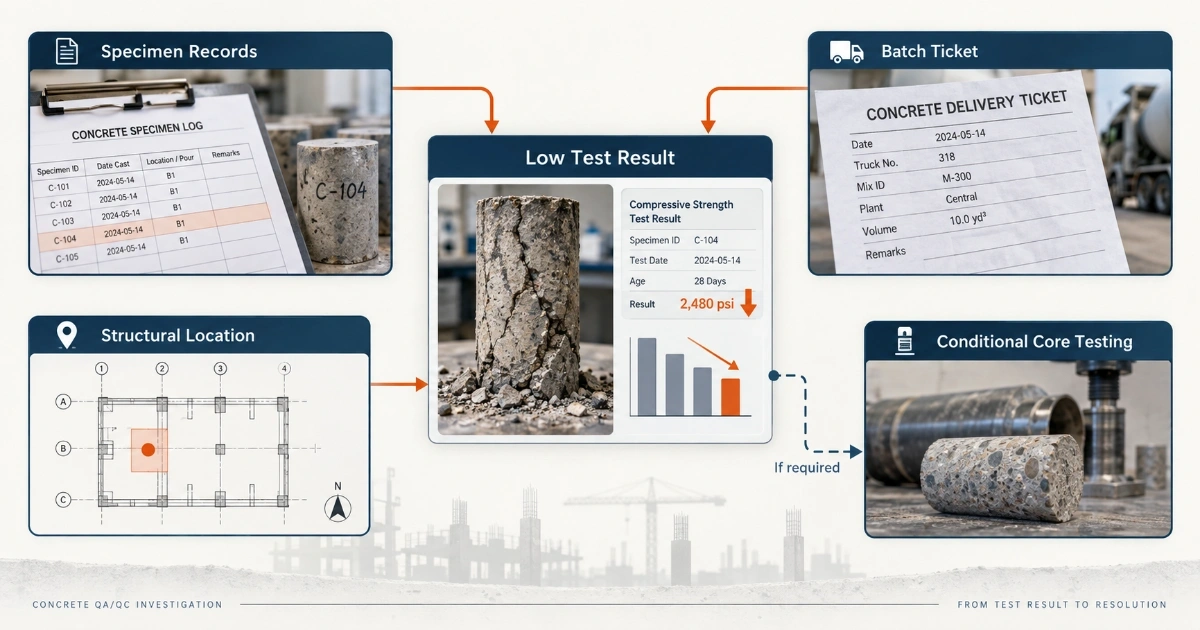
A low concrete compressive-strength result should trigger a structured investigation, not automatic rejection and not an improvised correction factor. First verify what was actually tested, whether the specimen and laboratory procedure were valid, and whether the result fails the project’s governing acceptance rule. Then trace the concrete back to its batch, placement location and curing history before deciding whether the concern is limited to the test specimen or may represent the concrete in the structure.
Start by asking whether the result is valid, what concrete it represents, which acceptance rule applies, and whether there is evidence that the in-place concrete may actually be deficient.
What should you do immediately after a low concrete strength result?
The first response should be to preserve the evidence and stop assumptions from spreading. Do not overwrite the laboratory report, average unrelated specimens together, convert cubes to cylinders with an informal factor, or discard a suspicious result without documentation.
A practical first review is:
- Identify the exact strength test. Confirm specimen IDs, sample ID, test age, specimen type, dimensions and reported strength.
- Confirm the governing acceptance basis. Check the project specification, design code, approved ITP and concrete submittal.
- Verify the specimen history. Review sampling, molding, identification, site curing, transport and laboratory curing.
- Verify the laboratory test. Check specimen condition, end preparation where applicable, machine records, loaded dimensions, failure observations and calculation.
- Trace the result to the structure. Identify the truck/load, pour, element, location and quantity of concrete represented.
- Review related results. Look at companion specimens, early-age results, adjacent test sets and historical performance of the same approved mix.
- Decide whether further investigation is justified. Additional testing, cores or structural assessment should follow an approved engineering plan, not an automatic recipe.
One low specimen is not always the same as one failed strength test
A common source of confusion is treating every individual cube or cylinder as the contractual strength test. Many specifications define a strength test using an average or set of specimens, while others define their own acceptance rules.
Before declaring the concrete nonconforming, confirm:
- how many specimens constitute one test;
- which test age governs acceptance;
- whether the requirement applies to an individual result, an average, a running average or another statistical criterion;
- whether cube or cylinder strength is specified; and
- whether the result is being compared with the correct strength class or specified compressive strength.
This is why the laboratory report alone does not always answer the acceptance question. The report gives the measured result; the contract and governing code determine how that result is evaluated.
Step 1: verify the compression test itself
Before investigating the concrete mixture or the structure, verify that the reported strength was calculated from a valid test.
Check the original laboratory record for:
- specimen ID and traceability;
- test date and actual age;
- measured dimensions or loaded area;
- maximum machine load;
- calculation and units;
- visible specimen defects before testing;
- cylinder capping or end preparation where applicable;
- centering and loading observations;
- failure pattern or unusual break; and
- testing-machine calibration status.
ASTM C39/C39M emphasizes that measured compressive strength depends on specimen size and shape, sampling, molding, fabrication, age, temperature and moisture conditions during curing. In other words, a low break is evidence that needs interpretation; it is not automatically proof of low in-place concrete strength.
For the detailed test sequence and strength calculation, see How to Perform a Concrete Compressive Strength Test: Cubes & Cylinders.
Step 2: confirm the specimen type and strength basis
A cube result should not be compared directly with a cylinder requirement unless the governing system explicitly provides the relationship. The same concrete can produce different measured strengths in cubes and cylinders because specimen geometry changes platen restraint and failure behavior.
If the wrong specimen shape was tested, do not simply multiply by 0.8, 0.85 or another convenient factor after seeing the result. Review the specification and any approved correlation first.
See Concrete Cube vs Cylinder Strength: Why the 0.8 Rule Can Mislead for the geometry, standards and conversion issue.
Step 3: review specimen curing before blaming the concrete
Poor specimen curing can produce a low measured strength even when the concrete placed in the structure is satisfactory. Initial site storage is especially important because freshly molded specimens can be affected by heat, cold, drying, vibration or delayed transfer to controlled curing.
Review:
- where specimens were stored immediately after casting;
- temperature records if available;
- moisture protection;
- demoulding time;
- dispatch and laboratory receipt times;
- transport conditions;
- curing tank or moist-room records; and
- any known deviation or nonconformance.
The basic specimen journey is covered in Concrete Cube Curing: Site Storage, Water Tank & Laboratory Requirements. When there is an actual curing excursion and the question is whether it could materially explain the low result, use Improper Concrete Specimen Curing: Impact on Cube & Cylinder Test Strength.
Preserve the original measured strength and document the curing deviation separately. The investigation then considers whether the specimen was representative of the concrete it was intended to assess.
Step 4: use the 7-day result as evidence, not as a verdict
If a 28-day result is low, the earlier strength trend can help reconstruct what happened. A normal 7-day result followed by an unexpectedly low later result raises different questions from a mixture that was already substantially below its normal trend at 7 days.
However, the familiar statement that concrete “must reach 70% at 7 days” is not a universal acceptance rule. Strength development depends on the cementitious system, temperature and curing history.
Use 7-Day vs 28-Day Concrete Strength: What the Results Actually Mean to interpret the early result and, where appropriate, compare it with historical performance of the same approved mix.
Step 5: trace the test back to the delivered and placed concrete
A low test result becomes useful only when the project can identify what concrete it represents.
Trace the specimen set back to:
- supplier and approved mix designation;
- truck or batch ticket;
- batching and discharge times;
- recorded water or admixture additions;
- slump, temperature and other fresh-concrete tests;
- pour location and structural element;
- placement sequence;
- quantity represented; and
- adjacent concrete supplied before and after the affected load.
The project register should make that chain visible. The Concrete Cube Test Register Excel Format – PDF & Excel Sample is useful for tying specimen IDs, ages and results back to the pour.
Step 6: decide whether the problem is likely the specimen, production or the structure
| Evidence pattern | Possible direction | Next review |
|---|---|---|
| One abnormal specimen; companion specimens normal | Specimen-specific defect or testing issue may be more likely | Specimen condition, dimensions, preparation and break pattern |
| Entire set low with documented poor specimen curing | Representativeness of the standard-cured test may be in doubt | Curing record, duration/severity, engineer review |
| Multiple consecutive sets low from same mix | Production, materials, batching or mixture performance may be involved | Batch records, material changes, water content, plant control, historical trend |
| Low standard tests plus construction concerns or structural distress | Potential in-place concrete concern | Licensed/design professional, investigation plan, cores or other approved assessment |
These patterns are investigative clues, not automatic conclusions. More than one cause can exist at the same time.
Should you retest the same cube or cylinder?
A specimen that has already been loaded to failure cannot simply be retested as though the first result never happened. Likewise, testing a spare specimen later does not automatically replace the original contractual test.
If reserve specimens exist, the governing procedure may permit additional information to be obtained from them, but the purpose and interpretation should be agreed before using the result as a substitute for the original test.
Do not create a new acceptance rule after the result is known.
When should concrete cores be considered?
Core testing is generally considered when there is a credible concern that the standard strength-test results may represent genuinely low concrete in the structure, or when structural adequacy needs further investigation.
Under the ASTM route, ASTM C42/C42M provides procedures for obtaining, preparing and testing drilled concrete cores. Under an EN/BS route, BS EN 13791 provides procedures for assessment of in-situ compressive strength using core testing and, where appropriately correlated, indirect methods.
Core testing should therefore begin with an investigation plan that defines:
- the purpose of the investigation;
- the concrete volume or structural region being assessed;
- core locations;
- number and dimensions of cores;
- reinforcement avoidance and drilling constraints;
- conditioning and testing procedure;
- the governing evaluation criteria; and
- who is responsible for interpreting and accepting the results.
Do not drill cores simply because a single cube or cylinder result is below the specified number. First establish whether the low result actually triggers the investigation pathway defined by the project.
Core strength is not the same number as a standard-cured cylinder or cube strength
A drilled core represents concrete that has experienced the actual temperature, moisture, compaction and structural environment of the member. A standard-cured specimen represents the sampled concrete under a controlled specimen-curing procedure.
The values are therefore not interchangeable. Core result interpretation must account for the governing standard and variables such as core dimensions, length-to-diameter ratio, location, moisture condition and the adopted acceptance procedure.
Do not apply a generic “core = 85% of cylinder” correction. Historical relationships are not universal. Use the acceptance and assessment procedure required by the governing code, specification and core-testing standard.
Can rebound hammer or ultrasonic testing prove the concrete is acceptable?
Indirect methods such as rebound number or ultrasonic pulse velocity can be useful for mapping variability and selecting areas for further investigation, but they should not be treated as direct replacements for compressive-strength tests without an appropriate correlation.
BS EN 13791 specifically addresses the establishment of relationships between indirect measurements and in-situ compressive strength. The investigation plan should state whether an indirect method is being used for screening, relative comparison or quantitative strength assessment.
What if the concrete is actually low strength?
If the investigation confirms that the concrete may be below the required strength, the issue moves beyond laboratory QA/QC into engineering assessment.
Possible outcomes depend on the structure and governing contract and may include:
- acceptance based on demonstrated structural adequacy;
- additional in-situ testing;
- load restrictions or delayed loading;
- strengthening or repair;
- removal and replacement; or
- another engineered disposition approved under the project procedure.
The correct disposition cannot be determined from the MPa result alone. Member demand, actual geometry, reinforcement, load path, durability requirements and the extent of affected concrete all matter.
What should the low-strength investigation record contain?
Even when the concrete is ultimately accepted, keep a complete investigation record. At minimum, preserve:
- original laboratory reports;
- specimen IDs and sample records;
- batch and delivery tickets;
- fresh-concrete results;
- pour location and element identification;
- curing and transport records;
- laboratory calibration and test information reviewed;
- early-age and companion results;
- historical mix-performance data;
- photographs and correspondence;
- engineering assessment;
- core or in-situ test reports where used;
- NCR, concession or disposition record; and
- corrective and preventive actions.
A dedicated low-strength investigation checklist can make this process easier to audit because each conclusion can be tied to its supporting evidence rather than reconstructed weeks later.
Common mistakes after a failed cube or cylinder test
- Rejecting concrete immediately without checking the actual acceptance rule.
- Using a 0.8 or 0.85 cube/cylinder factor to rescue a result.
- Assuming 7-day strength must equal 70% of the specified 28-day strength.
- Blaming curing without evidence or, conversely, ignoring a documented curing deviation.
- Testing cores without defining the investigation region and acceptance method first.
- Using rebound hammer readings as direct strength values without a defensible correlation.
- Losing traceability between the specimen, truck, pour and structural element.
- Deleting or replacing the original low result.
A practical low-strength investigation sequence
Confirm the result → confirm the acceptance rule → verify specimen type, age and test → review curing and handling → trace the concrete to the pour → review companion and historical results → identify the likely failure path → escalate for engineering review when required → perform approved in-situ investigation if justified → document final disposition and preventive action.
References
ASTM C39/C39M-26 – Standard Test Method for Compressive Strength of Cylindrical Concrete Specimens