Concrete QA for Piles – Sampling and Testing Checklist
Definition: Concrete QA for Piles guides site engineers and inspectors through on-site sampling—slump/flow, temperature, and cylinders/cubes—and complete ID traceability during pile concreting, excluding mix approvals.
- On-site sampling for piles: slump/flow, temperature, strength specimens.
- Prevents defective piles by verifying fresh properties and traceability.
- Clear steps with tools, tolerances, photos, and recorded evidence.
- Interactive, commentable, export-ready checklist secured with a QR code.
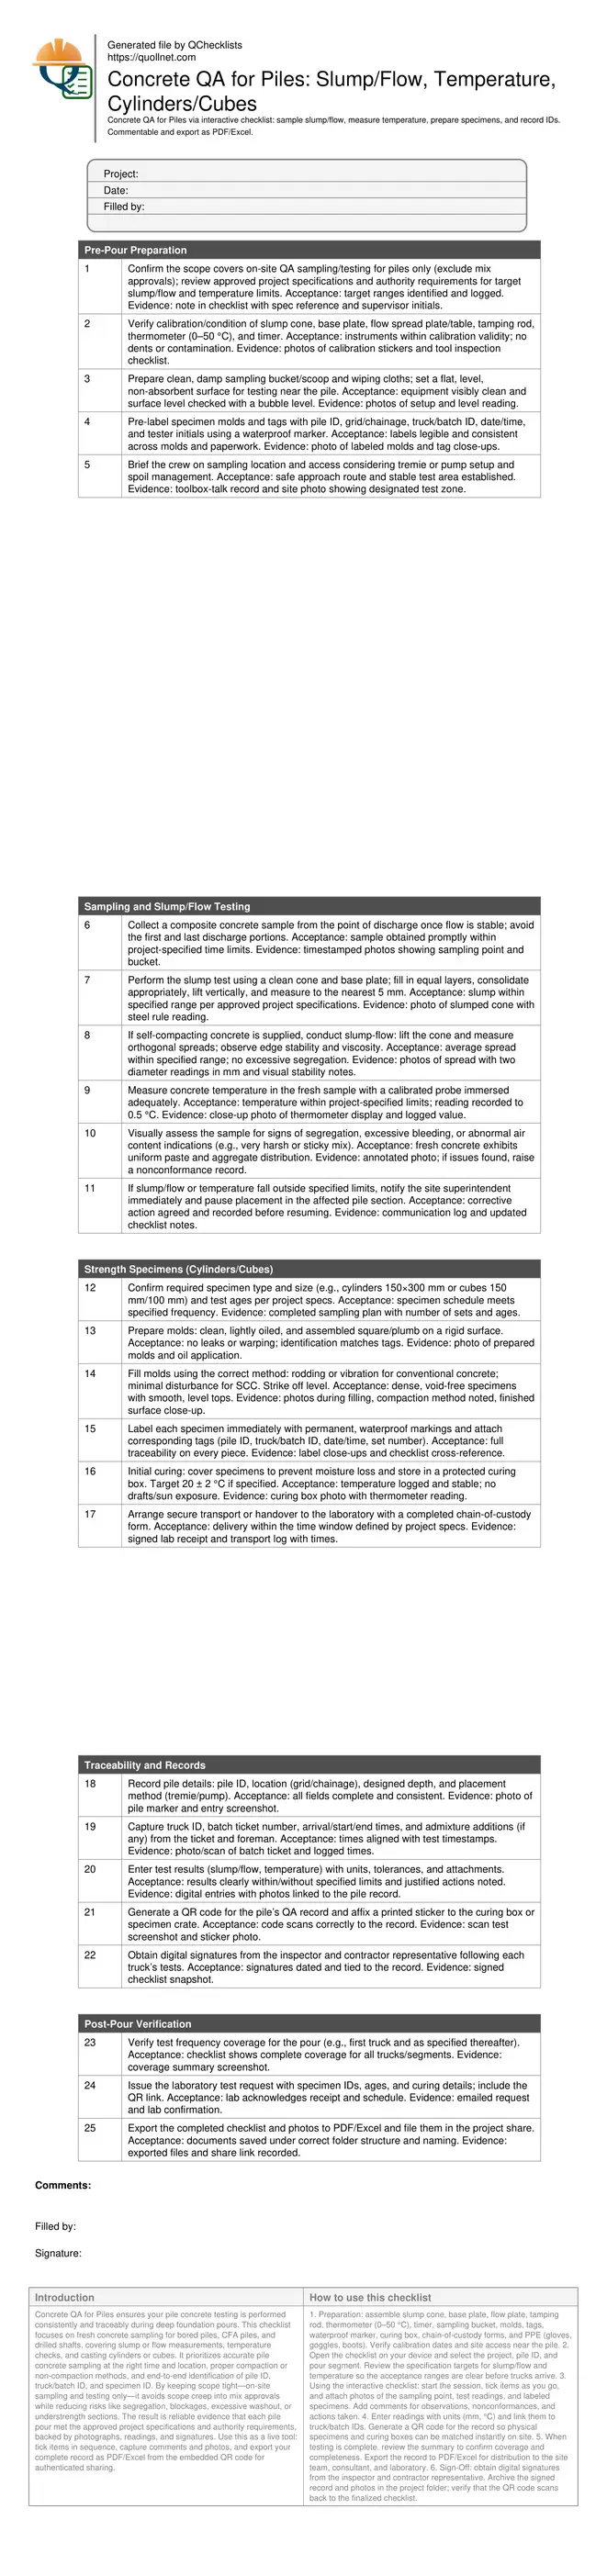
Concrete QA for Piles ensures your pile concrete testing is performed consistently and traceably during deep foundation pours. This checklist focuses on fresh concrete sampling for bored piles, CFA piles, and drilled shafts, covering slump or flow measurements, temperature checks, and casting cylinders or cubes. It prioritizes accurate pile concrete sampling at the right time and location, proper compaction or non-compaction methods, and end-to-end identification of pile ID, truck/batch ID, and specimen ID. By keeping scope tight—on-site sampling and testing only—it avoids scope creep into mix approvals while reducing risks like segregation, blockages, excessive washout, or understrength sections. The result is reliable evidence that each pile pour met the approved project specifications and authority requirements, backed by photographs, readings, and signatures. Use this as a live tool: tick items in sequence, capture comments and photos, and export your complete record as PDF/Excel from the embedded QR code for authenticated sharing.
- Confirm representative sampling at the correct time and location during pile concreting, then measure slump or flow and concrete temperature with calibrated tools. Capture clear photos and precise readings to prevent segregation, blockages, cold joints, and weak sections within deep foundation elements.
- Produce dependable compressive strength results by properly casting, labeling, and curing cylinders or cubes, then maintaining chain-of-custody to the laboratory. Every specimen links to specific pile and truck IDs, ensuring full traceability without engaging in design approvals or mix acceptance processes.
- Interactive online checklist with tick, comment, and export features secured by QR code, enabling real-time collaboration, photo uploads, and digital signatures. Generate instant PDFs/Excel, align with approved project specifications, and archive authenticated records for audits and turnover packages.
Pre-Pour Preparation
Sampling and Slump/Flow Testing
Strength Specimens (Cylinders/Cubes)
Traceability and Records
Post-Pour Verification
Sampling at Pile Concreting: Timing and Location
Correct sampling for deep foundations depends on capturing concrete representative of what enters the pile. For tremie or pump placement, sample at the discharge stream once flow stabilizes, never from washout or the first/last discharge portions. Keep the test area level, dry around the base plate, and close enough to the pour to avoid temperature drift. Use a clean bucket and scoop; test promptly per approved project specifications and authority requirements. Align the sampling moment with operational steps—before lowering the tremie into the cage, during a steady pump stroke, or when a new truck begins contributing to the pile. Take clear photos of the sampling point and the setup to prove representativeness. If the mix looks unusual—sticky, harsh, or segregated—document it immediately. Good sampling practice reduces risks of blockages, tremie breaks, cold joints, or uneven placement, and it underpins every acceptance decision you will record for slump/flow, temperature, and strength specimens.
- Sample after flow stabilizes; avoid first and last discharge.
- Keep test surface flat, clean, and close to the pour.
- Test promptly to limit temperature drift and moisture loss.
- Photograph the sampling location and equipment condition.
- Escalate immediately if visual segregation or bleeding appears.
Slump vs Flow: Methods, Acceptance, and Practical Cues
Choose the test that matches the mix and specification: conventional concretes use slump; self-compacting concretes use flow spread. For slump, ensure a clean cone and base, fill in equal layers, consolidate appropriately, then lift vertically and read to the nearest 5 mm. For flow, lift the cone, measure two perpendicular diameters, and judge edge stability. Record all readings with units and note the specified target and tolerance range. Observe workability cues: sticky mixes can mask low workability, while very wet mixes may hide segregation risk. If results fall outside the project-specified range, pause placement in the affected pile section and notify the superintendent for corrective action. Document nonconformances with photos, comments, and timestamps. These simple controls protect the pile from defects such as tremie seal loss, excessive washout, or honeycombing and provide defensible evidence for downstream strength results.
- Match test to mix type: slump or flow spread.
- Use calibrated tools; read in mm with clear photos.
- Compare to project targets and tolerances before proceeding.
- Pause and escalate if results are out of limits.
- Record comments on edge stability and visual consistency.
Specimens, Temperature, and Curing Logistics for Deep Foundations
Temperature and specimen handling drive the credibility of compressive strength results. Measure concrete temperature at the sample with a calibrated probe; record to 0.5 °C and compare with specification limits. Cast cylinders or cubes per the required size and quantity, using the correct compaction method for conventional concrete and minimal disturbance for SCC. Label every specimen with pile and truck/batch IDs, date/time, and set number. Protect specimens from sun, wind, and vibration; use a curing box and target the temperature regime specified (commonly around 20 °C) until transfer. Maintain chain-of-custody to the laboratory and include a QR link to the digital record. These steps ensure results reflect the actual pile concrete, support timely decisions, and avoid disputes caused by mishandled samples or ambiguous identification.
- Record temperature at sampling point to 0.5 °C.
- Cast the correct number and size of specimens.
- Label every specimen with full traceability IDs.
- Shield from sun/wind; use a stable curing box.
- Send with chain-of-custody and QR record link.
How to Use This Interactive Concrete QA for Piles Checklist
- Preparation: assemble slump cone, base plate, flow plate, tamping rod, thermometer (0–50 °C), timer, sampling bucket, molds, tags, waterproof marker, curing box, chain-of-custody forms, and PPE (gloves, goggles, boots). Verify calibration dates and site access near the pile.
- Open the checklist on your device and select the project, pile ID, and pour segment. Review the specification targets for slump/flow and temperature so the acceptance ranges are clear before trucks arrive.
- Using the interactive checklist: start the session, tick items as you go, and attach photos of the sampling point, test readings, and labeled specimens. Add comments for observations, nonconformances, and actions taken.
- Enter readings with units (mm, °C) and link them to truck/batch IDs. Generate a QR code for the record so physical specimens and curing boxes can be matched instantly on site.
- When testing is complete, review the summary to confirm coverage and completeness. Export the record to PDF/Excel for distribution to the site team, consultant, and laboratory.
- Sign-Off: obtain digital signatures from the inspector and contractor representative. Archive the signed record and photos in the project folder; verify that the QR code scans back to the finalized checklist.
Call to Action
- Start Checklist Tick off tasks, leave comments on items or the whole form, and export your completed report to PDF or Excel—with a built-in QR code for authenticity.
- Download Excel - Concrete QA for Piles – Sampling & Testing
- Download PDF - Concrete QA for Piles – Sampling & Testing
- View Image - Concrete QA for Piles – Sampling & Testing
Cite & Embed
“Concrete QA for Piles – Sampling & Testing by Quollnet”
with a link to
this source page.

FAQ
Question: When should I take the concrete sample for a pile?
Question: Slump or flow test for piles—how do I decide?
Question: How many cylinders or cubes should be made for each pile or truck?
Question: What if the concrete temperature or slump/flow is outside limits?
Question: Where should I store and label specimens on site?
Related Articles
Broader reading and guidance connected to this checklist topic.


Is It Important To Customize Your Qr Code And How To Do It?
Related Checklists
Keep the workflow moving with nearby templates chosen from similar checklist content.