Façade Water Management Review: Sills, Flashings, Weep Paths
Definition: Review façade water management concept for sills, flashings, and weep paths equips design and site teams to verify drainage intent, material compatibility, and unobstructed discharge at openings before procurement and installation.
- Confirm sill slopes, end dams, and pan continuity drain outward.
- Verify flashings lap, terminate, and drip clear of cladding.
- Ensure weep paths remain continuous, open, screened, and free-draining.
- Interactive, commentable checklist with export and QR code verification.
Review façade water management concept for sills, flashings, and weep paths is the structured process that validates drainage intent at window and door interfaces. This checklist frames the façade drainage strategy, including sill pans, end dams, through-wall flashings, cavity ventilation, and continuous weep systems, without drifting into unrelated roof or balcony conditions. By aligning window sill flashing details with the air/water barrier and providing clear weep discharge, teams prevent hidden moisture accumulation, staining, freeze–thaw damage, and mold risks. You will compare details against material compatibility, slope requirements, upturn heights, lap lengths, and outlet geometry to ensure water exits the assembly rather than tracking inward. The focus remains on horizontal openings and adjacent façade elements only, covering rainscreen, masonry veneer, and panelized systems where relevant. Apply these checks before fabrication, shop drawing approval, and field mockups to avoid costly rework. Start interactive mode to tick items, add comments, upload evidence, and export PDF/Excel with a QR for secure sign-off.
- Establishes a repeatable review for sill slopes, end dams, flashing laps, and open weep paths so water drains outward, not inward. Aligns details with air/water barrier continuity, substrate falls, and cladding geometry to avoid ponding, capillary bridging, and sealant over-blocking that commonly cause concealed leaks and premature façade deterioration.
- Interactive online checklist with tick, comment, and export features secured by QR code.
- Targets horizontal openings and adjacent façade interfaces only, keeping the scope tight and actionable. Applies to rainscreen, masonry veneer, and panelized façades, guiding teams through shop drawings, submittals, and mockups to validate drainage intent before procurement and installation, saving time, reducing punch lists, and protecting warranties.
- Translates performance intent into measurable criteria: minimum sill pan slope, end-dam height, lap length, weep spacing, vent area, and outlet clearance. Requires photographic evidence, dimensioned markups, product data, and sign-offs so acceptance is traceable and defensible during quality audits and handover.
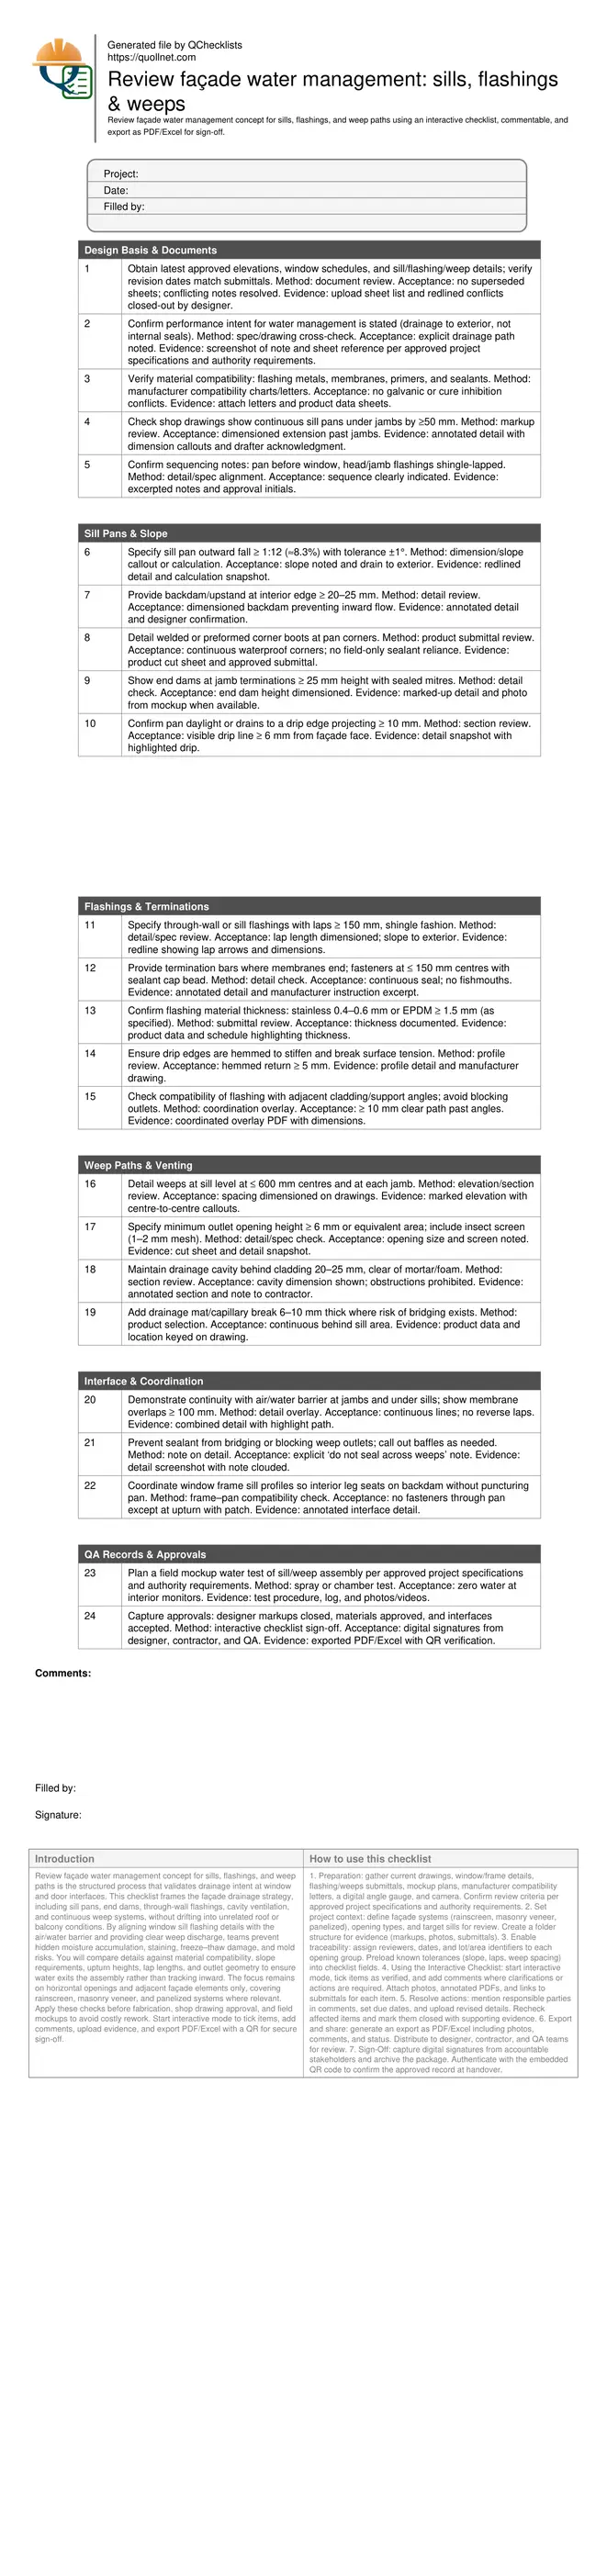
Design Basis & Documents
Sill Pans & Slope
Flashings & Terminations
Weep Paths & Venting
Interface & Coordination
QA Records & Approvals
Why Sills, Flashings, and Weeps Decide Façade Durability
Water that enters at fenestrations is expected; failure occurs when it cannot exit. A robust façade water management concept deliberately routes incidental moisture from the frame and cavity to daylight using sloped sills, continuous flashings, and open weep paths. On real projects, hidden sealant dams, reverse laps, and blocked outlets are common. They drive staining, corrosion, delamination, and freeze–thaw damage well before warranty ends. This checklist keeps the scope on horizontal openings—sills and adjacent zones—where gravity drainage is practical. It translates intent into measurable criteria: slope, lap, gap, and spacing. Use drawings, submittals, and mockups to validate the path from the wet side to the exterior. Require evidence: dimensioned markups, product datasheets, compatibility letters, and photos from mockups. Close coordination with the air/water barrier is vital so water is directed onto, not behind, flashings. The outcome is predictable drainage performance and easier commissioning.
- Design for water to exit, not rely on interior seals.
- Treat slope, lap, and gap as measurable criteria.
- Keep weep outlets open and protected from pests.
- Coordinate air/water barrier continuity at interfaces.
Sill Pans and End Dams: Details That Control Flow
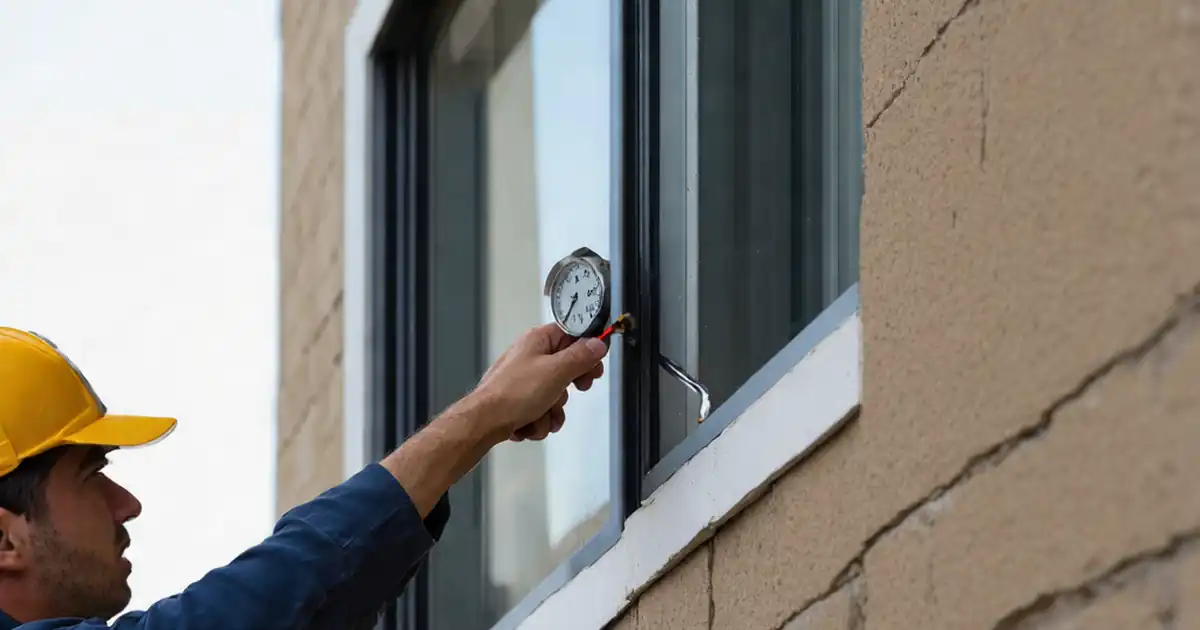
Sill pans collect water and set the direction of travel. A practical target is at least 1:12 outward fall (about 8.3%) with a 20–25 mm interior backdam to prevent reversal during wind events. Pans should extend beneath jambs by a minimum of 50 mm with preformed or welded corners so leakage cannot track into the rough opening. End dams at jambs, typically 25 mm high, prevent water from spilling into adjacent vertical joints. Discharge should daylight or drop onto a defined drip edge that projects and breaks surface tension. Avoid fasteners through the flat of the pan; if unavoidable, patch per manufacturer instructions. Field mockups often reveal where slope is lost to shims or sealant. Call these tolerances on drawings and verify during submittals and mockups so installers cannot guess. Material selection must consider stiffness so the pan holds its fall under the window weight.
- Target ≥ 1:12 outward fall with ±1° tolerance.
- Provide 20–25 mm backdam and 25 mm end dams.
- Extend pans ≥ 50 mm beneath jambs with sealed corners.
- Daylight water or discharge onto a hemmed drip.
Flashings and Weep Paths: Keep the Outlet Clear
Flashings must shed water onto the exterior face, not behind cladding. Lap lengths of 150 mm or greater, hemmed drip edges, and termination bars with sealed cap beads reduce failure points. Weep paths need continuity: provide openings at 600 mm centres or continuous slots with insect screens, and maintain a 20–25 mm drainage cavity free from mortar or foam. Drainage mats (6–10 mm) help overcome capillary bridging on absorptive substrates. In coordination meetings, overlay flashings with support angles and cladding profiles to verify a visible escape route—ideally a 10 mm clear drop and a 6 mm drip line—so water cannot bridge back. Add explicit notes prohibiting sealant across weeps. During mockups, a simple spray sequence will expose any blocked outlet; document and correct before production work proceeds.
- Lap flashings ≥ 150 mm; slope to exterior.
- Provide weeps at ≤ 600 mm centres with screens.
- Maintain 20–25 mm clear drainage cavity.
- Overlay details to prove a visible escape route.
How to Use This Interactive Checklist
- Preparation: gather current drawings, window/frame details, flashing/weeps submittals, mockup plans, manufacturer compatibility letters, a digital angle gauge, and camera. Confirm review criteria per approved project specifications and authority requirements.
- Set project context: define façade systems (rainscreen, masonry veneer, panelized), opening types, and target sills for review. Create a folder structure for evidence (markups, photos, submittals).
- Enable traceability: assign reviewers, dates, and lot/area identifiers to each opening group. Preload known tolerances (slope, laps, weep spacing) into checklist fields.
- Using the Interactive Checklist: start interactive mode, tick items as verified, and add comments where clarifications or actions are required. Attach photos, annotated PDFs, and links to submittals for each item.
- Resolve actions: mention responsible parties in comments, set due dates, and upload revised details. Recheck affected items and mark them closed with supporting evidence.
- Export and share: generate an export as PDF/Excel including photos, comments, and status. Distribute to designer, contractor, and QA teams for review.
- Sign-Off: capture digital signatures from accountable stakeholders and archive the package. Authenticate with the embedded QR code to confirm the approved record at handover.
Call to Action
- Start Checklist Tick off tasks, leave comments on items or the whole form, and export your completed report to PDF or Excel—with a built-in QR code for authenticity.
- Download Excel - Façade Water Management Review – Sills, Flashings, Weeps
- Download PDF - Façade Water Management Review – Sills, Flashings, Weeps
- View Image - Façade Water Management Review – Sills, Flashings, Weeps
Cite & Embed
“Façade Water Management Review – Sills, Flashings, Weeps by Quollnet”
with a link to
this source page.

FAQ
Question: What minimum sill slope should I call out, and why does it matter?
Question: How should we place and size weeps at façade sills?
Question: How do flashings tie into the air/water barrier without leaks?
Question: What evidence is acceptable to close the design review before fabrication?
Related Articles
Broader reading and guidance connected to this checklist topic.


Open Ncrs At Taking-over / Dlp: What Happens At Handover And How To Escalate


Related Checklists
Keep the workflow moving with nearby templates chosen from similar checklist content.