Install Utility Manholes Checklist: Base, Walls, Covers, Steps
Definition: Install utility manholes checklist guides contractors through base, walls, covers, steps, watertightness, and benching for watertight, durable chambers, excluding networks and external pipelines.
- Scope-limited to manhole structure: base, walls, steps, covers, benching
- Clear tolerances, tools, and acceptance evidence for each activity
- Reduces leaks, mislevels, rework, and safety risks on site
- Interactive, commentable, export-ready with QR code verification
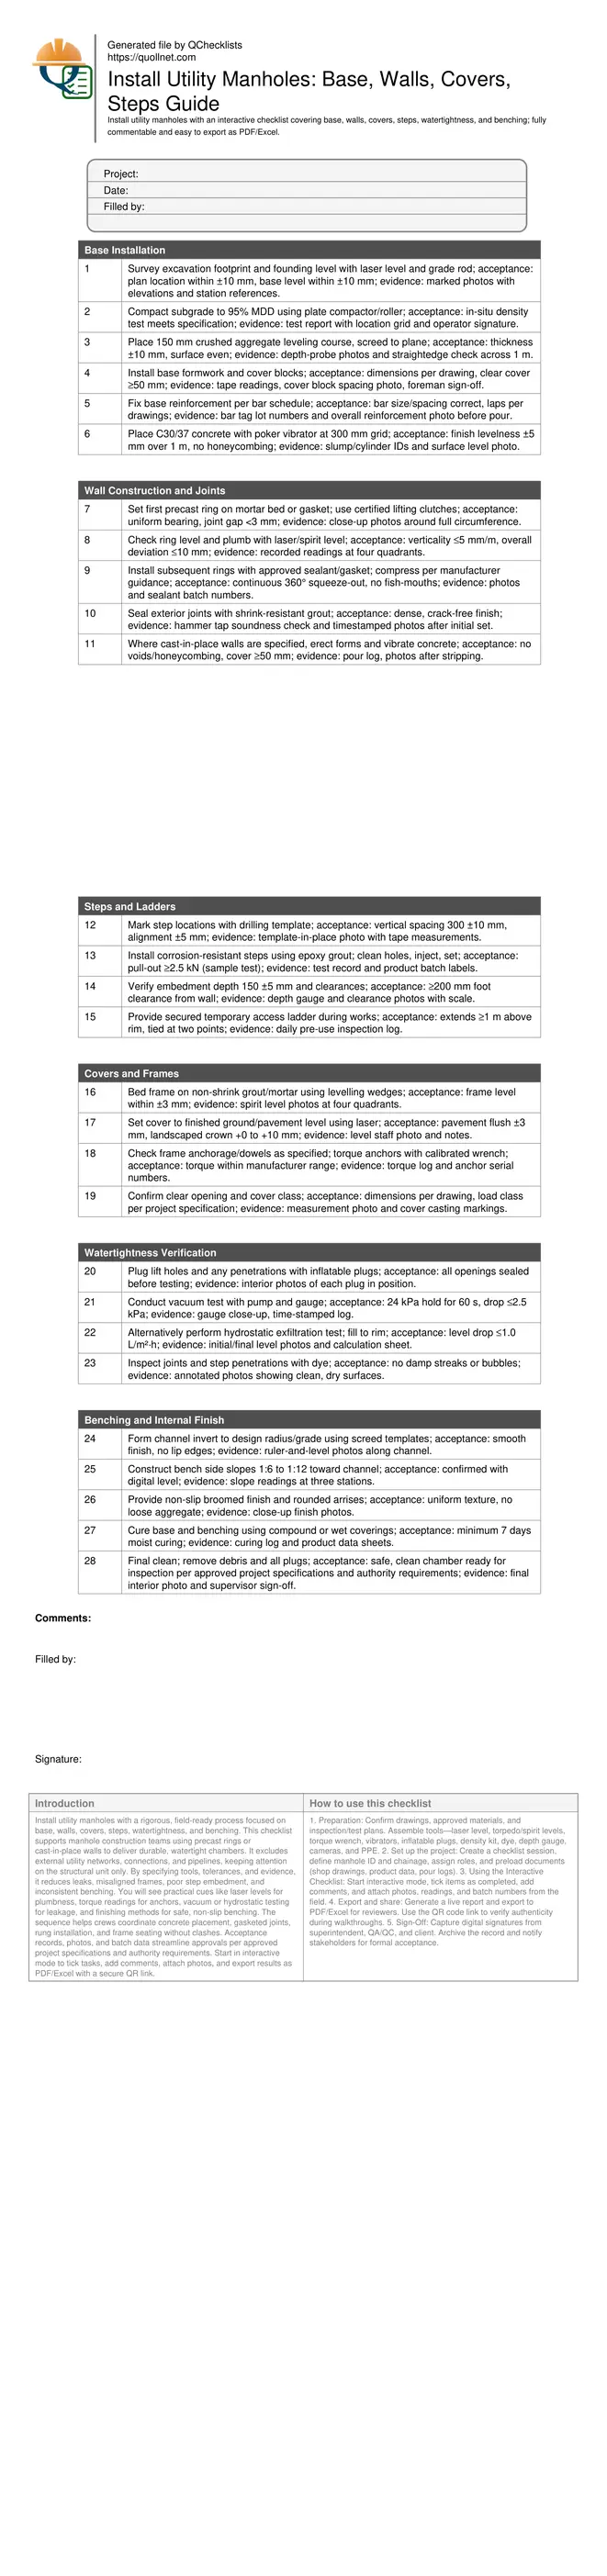
Install utility manholes with a rigorous, field-ready process focused on base, walls, covers, steps, watertightness, and benching. This checklist supports manhole construction teams using precast rings or cast-in-place walls to deliver durable, watertight chambers. It excludes external utility networks, connections, and pipelines, keeping attention on the structural unit only. By specifying tools, tolerances, and evidence, it reduces leaks, misaligned frames, poor step embedment, and inconsistent benching. You will see practical cues like laser levels for plumbness, torque readings for anchors, vacuum or hydrostatic testing for leakage, and finishing methods for safe, non-slip benching. The sequence helps crews coordinate concrete placement, gasketed joints, rung installation, and frame seating without clashes. Acceptance records, photos, and batch data streamline approvals per approved project specifications and authority requirements. Start in interactive mode to tick tasks, add comments, attach photos, and export results as PDF/Excel with a secure QR link.
- Follow a disciplined sequence for base, walls, steps, covers, watertightness, and benching to reduce rework. Practical tolerances, tool choices, and acceptance cues help teams install robust, compliant manholes while documenting evidence for approvals and stakeholder confidence.
- Ensure level bases, plumb rings, correctly embedded steps, and accurately seated frames to achieve durable, inspectable structures. Watertightness verification via vacuum or hydrostatic testing prevents infiltration/exfiltration, extending service life and lowering total ownership costs.
- Interactive online checklist with tick, comment, and export features secured by QR code.
- Capture photos, readings, batch numbers, torque logs, and sign-offs directly in the field. The structured records support per approved project specifications and authority requirements, simplifying handover, enabling traceability, and reinforcing quality assurance across teams and shifts.
Base Installation
Wall Construction and Joints
Steps and Ladders
Covers and Frames
Watertightness Verification
Benching and Internal Finish
Base Foundations and Level Control
A stable, level base underpins durable manhole performance. Begin with precise surveying to locate the excavation and founding level, then compact the subgrade to the specified density to prevent settlement. A crushed aggregate leveling course helps achieve plane support and fine elevation control before placing reinforcement and concrete. Rigid formwork, correct cover blocks, and consistent vibration contribute to a dense, level base slab. Mistakes at this stage—poor compaction, uneven bedding, inadequate cover, or honeycombing—propagate into ring misalignment, frame rocking, and leakage risks. Use straightforward acceptance cues: laser or staff for elevation, in-situ density tests, straightedge checks, and cylinder/slump documentation. Record photos with scales and mark stations to improve traceability and speed approvals per approved project specifications and authority requirements.
- Survey and mark elevations before any placement.
- Confirm subgrade density with field test results.
- Use straightedges to verify slab levelness.
- Maintain concrete cover with proper spacers.
- Capture photos with visible scales and notes.
Walls, Joints, and Step Installation
Precast rings install quickly but demand accurate bedding and centered compression of gaskets or mortar to achieve watertight joints. After setting the first ring, verify level and plumb, then continue stacking with consistent squeeze-out, sealing external joints to protect against infiltration. If cast-in-place walls are specified, well-braced forms and thorough vibration eliminate voids. Steps or rungs should be laid out with templates, installed with epoxy or grout, and verified for embedment, spacing, and pull-out resistance to ensure safe access. Temporary ladders must be secured and inspected daily. Acceptance is practical: measure verticality, observe continuous sealant squeeze, perform soundness checks, confirm step embedment and clearance, and record batch numbers and test results for future audits and maintenance planning.
- Check plumb within 5 mm per metre.
- Seal joints 360° with continuous squeeze-out.
- Template step spacing at 300 ±10 mm.
- Verify embedment depth with a gauge.
- Retain product batches and test results.
Covers, Watertightness, and Benching
Frame and cover seating dictates safety, serviceability, and longevity. Bed frames on non-shrink grout and set levels to suit pavement or landscape finishes so the cover neither rocks nor protrudes. Anchor or dowel frames where detailed, recording torque values. Watertightness is verified with a vacuum test or hydrostatic exfiltration test, documented with gauge photos and time-stamped logs. Inside, shape the channel invert to the design radius and finish benching with consistent falls toward the flow path, adding a non-slip texture and curing for durability. Avoid thin, uneven benching that traps water or debris. On completion, remove plugs and debris and present a clean, safe chamber for inspection and sign-off per approved project specifications and authority requirements.
- Level frames within ±3 mm tolerance.
- Document torque values and serials.
- Use vacuum or hydrostatic testing.
- Bench slopes 1:6 to 1:12 toward channel.
- Cure concrete for at least 7 days.
How to Use This Interactive Utility Manhole Installation Checklist
- Preparation: Confirm drawings, approved materials, and inspection/test plans. Assemble tools—laser level, torpedo/spirit levels, torque wrench, vibrators, inflatable plugs, density kit, dye, depth gauge, cameras, and PPE.
- Set up the project: Create a checklist session, define manhole ID and chainage, assign roles, and preload documents (shop drawings, product data, pour logs).
- Using the Interactive Checklist: Start interactive mode, tick items as completed, add comments, and attach photos, readings, and batch numbers from the field.
- Export and share: Generate a live report and export to PDF/Excel for reviewers. Use the QR code link to verify authenticity during walkthroughs.
- Sign-Off: Capture digital signatures from superintendent, QA/QC, and client. Archive the record and notify stakeholders for formal acceptance.
Call to Action
- Start Checklist Tick off tasks, leave comments on items or the whole form, and export your completed report to PDF or Excel—with a built-in QR code for authenticity.
- Download Excel - Utility Manhole Installation Inspection
- Download PDF - Utility Manhole Installation Inspection
- View Image - Utility Manhole Installation Inspection
Cite & Embed
“Utility Manhole Installation Inspection by Quollnet”
with a link to
this source page.
FAQ
Question: Which test should I use to verify manhole watertightness?
Question: How do I decide between precast rings and cast-in-place walls?
Question: What is the best practice for setting frame and cover levels?
Question: What records should be captured for handover and traceability?
Related Articles
Broader reading and guidance connected to this checklist topic.


Concrete Cube Test Register Excel Format – Pdf & Excel Sample

Is It Important To Customize Your Qr Code And How To Do It?

Related Checklists
Keep the workflow moving with nearby templates chosen from similar checklist content.