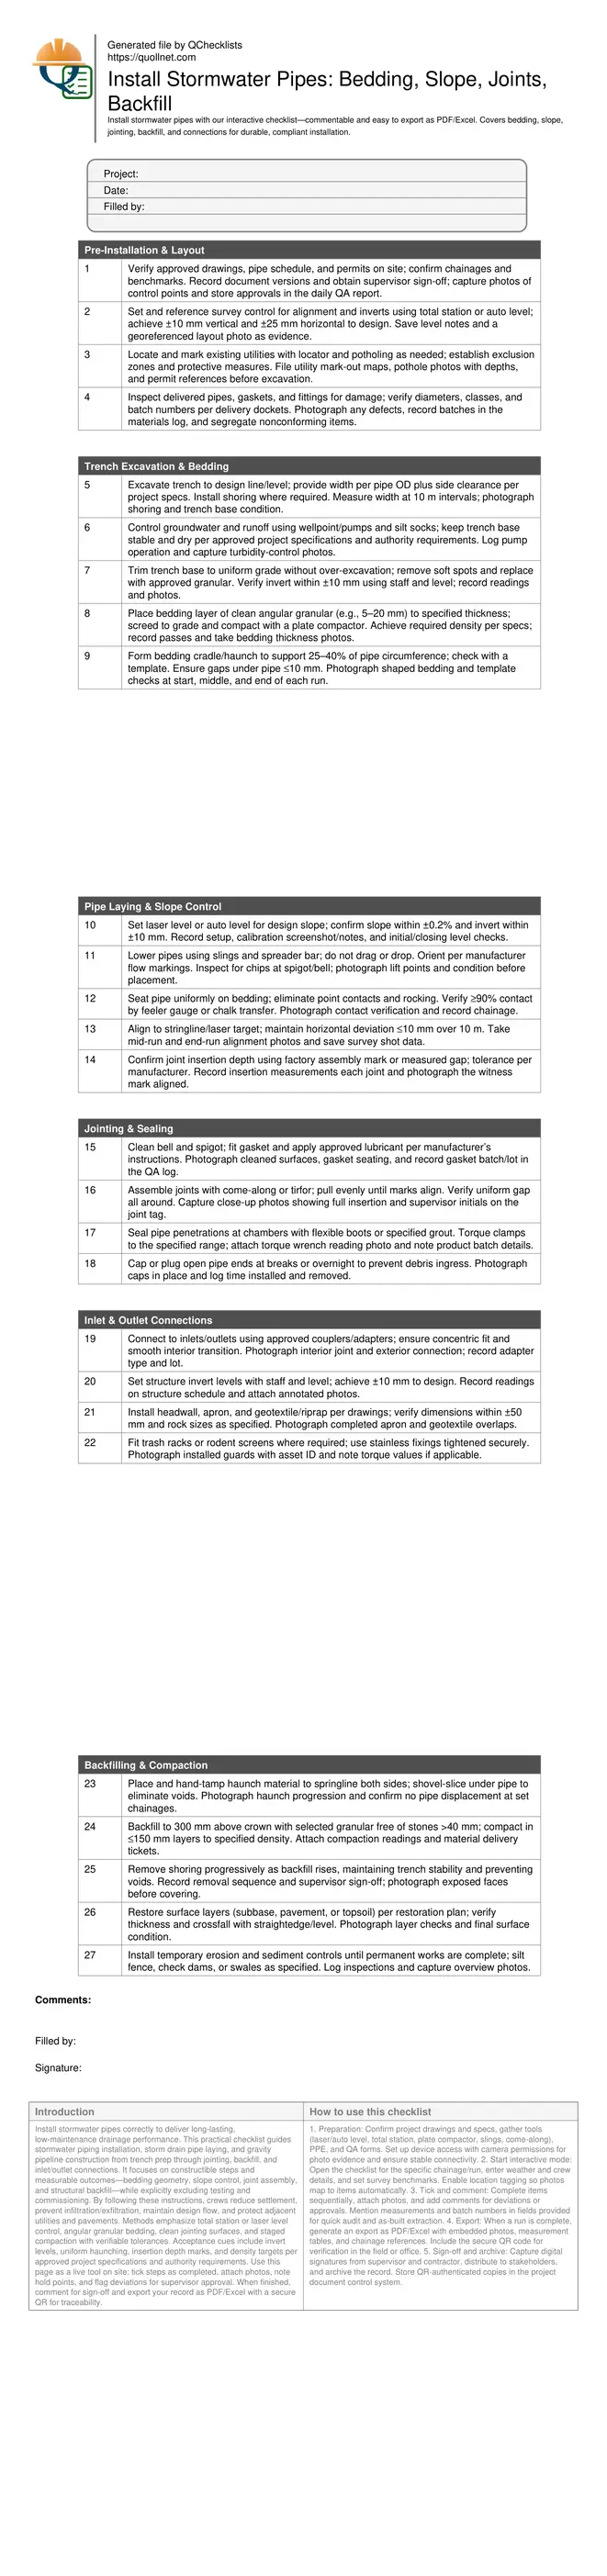
Install Stormwater Pipes: Bedding, Slope, Jointing, Backfill
Definition: Install stormwater pipes with correct bedding, slope, jointing, backfill, and inlet/outlet connections for civil site crews, ensuring durable gravity drainage installation per approved project specifications and authority requirements.
- Defines bedding, grade control, joints, connections, and backfill sequence.
- Improves durability, flow capacity, and maintenance access over system life.
- Uses survey controls, laser levels, and templates for measurable accuracy.
- Interactive, commentable, export, QR code for audit-ready documentation.
Install stormwater pipes correctly to deliver long-lasting, low-maintenance drainage performance. This practical checklist guides stormwater piping installation, storm drain pipe laying, and gravity pipeline construction from trench prep through jointing, backfill, and inlet/outlet connections. It focuses on constructible steps and measurable outcomes—bedding geometry, slope control, joint assembly, and structural backfill—while explicitly excluding testing and commissioning. By following these instructions, crews reduce settlement, prevent infiltration/exfiltration, maintain design flow, and protect adjacent utilities and pavements. Methods emphasize total station or laser level control, angular granular bedding, clean jointing surfaces, and staged compaction with verifiable tolerances. Acceptance cues include invert levels, uniform haunching, insertion depth marks, and density targets per approved project specifications and authority requirements. Use this page as a live tool on site: tick steps as completed, attach photos, note hold points, and flag deviations for supervisor approval. When finished, comment for sign-off and export your record as PDF/Excel with a secure QR for traceability.
- End-to-end installation sequence covering trenching, bedding, grade control, jointing, inlet/outlet connections, and backfilling. Each step specifies tools, measurable tolerances, and required evidence, helping crews avoid settlement, misalignment, and infiltration while staying aligned with project specifications and authority requirements.
- Built for field productivity: repeatable groupings, plain-language acceptance criteria, and photo/signature prompts. Capture survey shots, insertion marks, and compaction records, then tag chainages and structure numbers for quick as-built integration and defensible quality documentation.
- Interactive online checklist with tick, comment, and export features secured by QR code.
- Reduces rework by standardizing bedding geometry, joint cleanliness, and staged backfill practices. The checklist clarifies slope tolerances, typical layer thicknesses, and permitted materials, helping foremen brief crews and verify results before covering works or removing temporary supports.
Pre-Installation & Layout
Trench Excavation & Bedding
Pipe Laying & Slope Control
Jointing & Sealing
Inlet & Outlet Connections
Backfilling & Compaction
Bedding and Trench Preparation That Prevents Settlement
Most performance issues originate in the trench base. Keep it dry and uniform so bedding can transfer loads evenly. Angular granular bedding (often 5–20 mm) interlocks and resists migration, and shaping the cradle supports the pipe without point loads. Over-excavation creates soft pockets; replace with approved material and compact before bedding. Laser or auto level control ensures invert targets are met across the run, while templates verify haunch geometry. In practice, crews screed the bedding to grade, trial-fit the first pipe, and adjust before committing to a longer run. Where groundwater appears, stabilize first—pumping and filtration prevent fines loss. Photographs, level notes, and material tickets become your audit trail, proving you met the specification and authority requirements. If soils vary, tighten checks at transitions and brace shoring to avoid trench movement during backfill.
- Keep trench base dry, firm, and uniformly graded.
- Use angular bedding and verify thickness at intervals.
- Template the haunch to confirm continuous support.
- Survey invert levels; target ±10 mm to design.
- Replace soft spots before placing bedding.
Reliable Slope and Alignment Control for Gravity Flow
Gravity systems demand consistent grade. Set a calibrated laser with visible targets and confirm set-up against benchmarks at start and close of shift. Maintain invert within ±10 mm and slope within ±0.2% to preserve capacity and self-cleansing velocity. Handle pipes with slings to prevent spigot/bell damage, and keep jointing surfaces immaculate. Use assembly marks to confirm full insertion and avoid steps that catch debris. For long straight runs, a stringline plus periodic survey shots catch drift early. Document insertion depths, chainages, and alignment photos; these become key as-built references. On curves built from short pipes, increase frequency of checks and use manufacturer-recommended deflection limits.
- Calibrate laser or level each shift.
- Control invert within ±10 mm, slope ±0.2%.
- Protect joint ends; keep surfaces clean.
- Use marks to verify full joint insertion.
- Survey and photograph at regular intervals.
Joint Integrity, Connections, and Backfill That Lasts
Cleanliness and correct gasket seating prevent infiltration and exfiltration. Pull joints evenly with a come-along, verifying uniform gaps and assembly marks. At structures, use approved boots/adapters and torque clamps as specified; interior transitions should be smooth to reduce snagging. After jointing, build haunches symmetrically to the springline and compact in thin lifts, shovel-slicing to remove voids. Backfill with select granular to at least 300 mm above crown, compacting in layers to achieve the specified density. Remove shoring in stages to avoid sloughing, then reinstate surface layers to the restoration plan. Headwalls, aprons, and trash racks at outlets protect embankments and wildlife. Photographs, torque readings, compaction data, and level notes provide clear proof of compliance.
- Clean, lubricate, and seat gaskets correctly.
- Use adapters/boots for structure penetrations.
- Symmetric haunching prevents pipe rotation.
- Layered compaction achieves target density.
- Document torque, density, and level checks.
How to Use This Interactive Checklist
- Preparation: Confirm project drawings and specs, gather tools (laser/auto level, total station, plate compactor, slings, come-along), PPE, and QA forms. Set up device access with camera permissions for photo evidence and ensure stable connectivity.
- Start interactive mode: Open the checklist for the specific chainage/run, enter weather and crew details, and set survey benchmarks. Enable location tagging so photos map to items automatically.
- Tick and comment: Complete items sequentially, attach photos, and add comments for deviations or approvals. Mention measurements and batch numbers in fields provided for quick audit and as-built extraction.
- Export: When a run is complete, generate an export as PDF/Excel with embedded photos, measurement tables, and chainage references. Include the secure QR code for verification in the field or office.
- Sign-off and archive: Capture digital signatures from supervisor and contractor, distribute to stakeholders, and archive the record. Store QR-authenticated copies in the project document control system.
Call to Action
- Start Checklist Tick off tasks, leave comments on items or the whole form, and export your completed report to PDF or Excel—with a built-in QR code for authenticity.
- Download Excel - Stormwater Pipe Installation Checklist
- Download PDF - Stormwater Pipe Installation Checklist
- View Image - Stormwater Pipe Installation Checklist
Cite & Embed
“Stormwater Pipe Installation Checklist by Quollnet”
with a link to
this source page.

FAQ
Question: What bedding material is recommended for stormwater pipes and why?
Question: How much cover do I need above the pipe before equipment can traverse?
Question: What slope tolerance should I hold for gravity stormwater runs?
Question: How do I handle groundwater in the trench without compromising bedding?
Question: Are tests like CCTV or mandrel pulls required after installation?
Related Articles
Broader reading and guidance connected to this checklist topic.


Improve Your Project Handover Process With Snag List Tracking App


Related Checklists
Keep the workflow moving with nearby templates chosen from similar checklist content.