Install Horizontal PVC/Bituminous Membranes: Pro Field Checklist
Definition: Install horizontal PVC/bituminous membranes using this field-ready checklist for contractors and inspectors, focusing on substrate verification, laps, penetrations, terminations, and protection layers on roofs, podiums, and slabs.
- Verify substrate condition, moisture, and levelness before membrane work.
- Control lap widths, weld quality, and seam testing for watertightness.
- Detail penetrations and edge terminations to prevent capillary ingress.
- Interactive, commentable, export options with QR code-secured records.
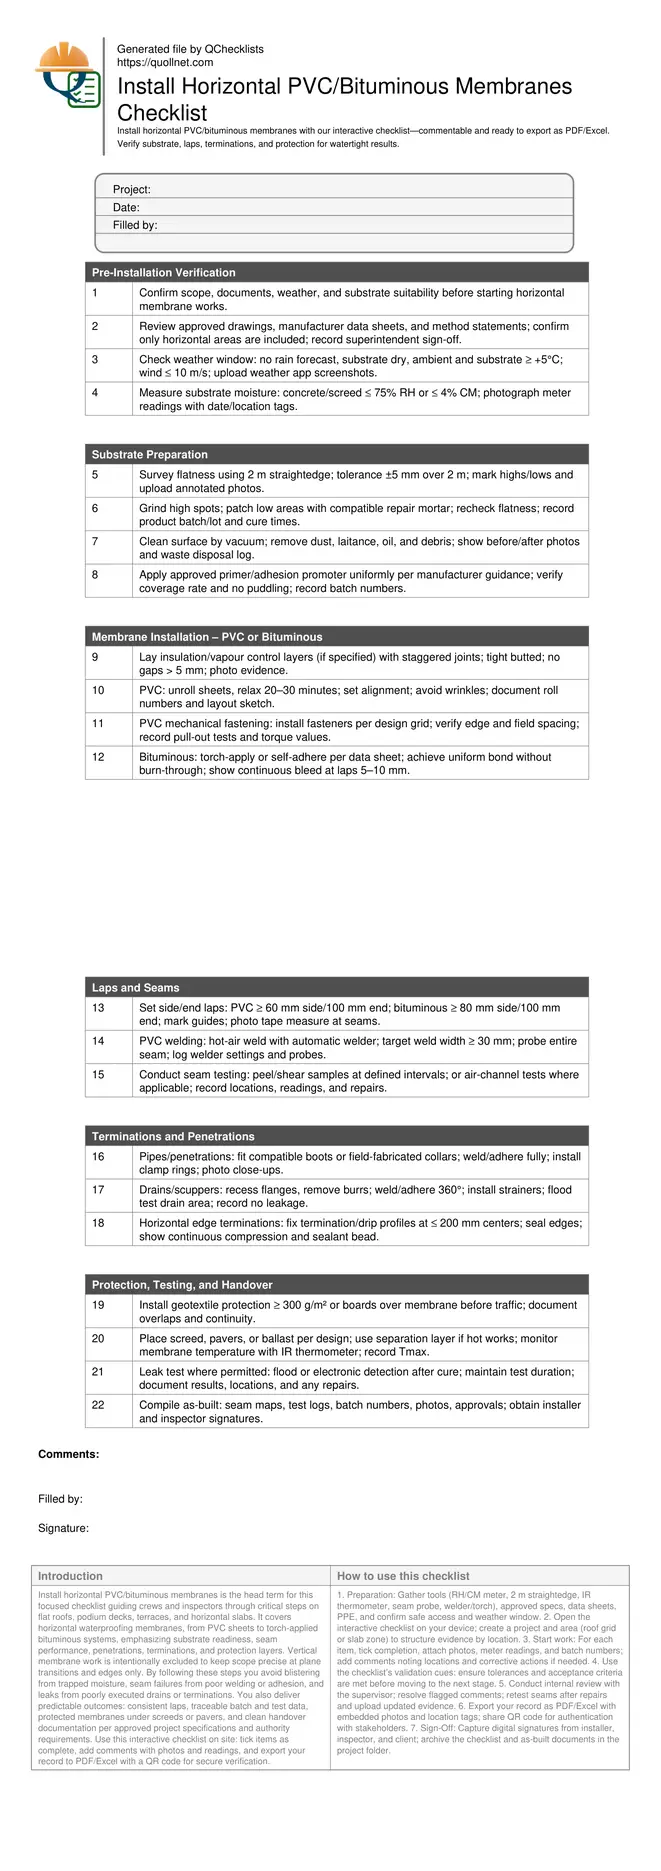
Install horizontal PVC/bituminous membranes is the head term for this focused checklist guiding crews and inspectors through critical steps on flat roofs, podium decks, terraces, and horizontal slabs. It covers horizontal waterproofing membranes, from PVC sheets to torch-applied bituminous systems, emphasizing substrate readiness, seam performance, penetrations, terminations, and protection layers. Vertical membrane work is intentionally excluded to keep scope precise at plane transitions and edges only. By following these steps you avoid blistering from trapped moisture, seam failures from poor welding or adhesion, and leaks from poorly executed drains or terminations. You also deliver predictable outcomes: consistent laps, traceable batch and test data, protected membranes under screeds or pavers, and clean handover documentation per approved project specifications and authority requirements. Use this interactive checklist on site: tick items as complete, add comments with photos and readings, and export your record to PDF/Excel with a QR code for secure verification.
- This checklist standardizes horizontal PVC and bituminous membrane installation by verifying substrate moisture, levelness, and compatibility, then controlling seams, penetrations, and terminations. It helps teams prevent trapped moisture, fish-mouths, poor welds, and damage before protection layers go down.
- Actionable, tool-based steps define acceptance criteria, tolerances, and evidence capture. Crews document meter readings, pull-out tests, seam probes, and destructive peels while logging batch numbers and locations, ensuring traceable, repeatable waterproofing outcomes across roofs, podiums, and slabs.
- Interactive online checklist with tick, comment, and export features secured by QR code.
- The process culminates with protection layers, temporary traffic control, and leak testing where permitted, followed by consolidated as-built records. Stakeholders gain consistent quality assurance and faster closeout, aligned with approved project specifications and authority requirements.
Pre-Installation Verification
Substrate Preparation
Membrane Installation – PVC or Bituminous
Laps and Seams
Terminations and Penetrations
Protection, Testing, and Handover
Get the Substrate Right: Moisture, Flatness, and Compatibility
Successful horizontal waterproofing starts with a dry, sound, and even substrate. Excess residual moisture in concrete or screeds drives blistering and adhesion loss, so verify with calibrated RH or CM meters and record the readings at agreed grid points. Flatness is equally vital; high points telegraph and cut, while lows pond water and stress seams. Use a 2 m straightedge and mark deviations beyond ±5 mm, then grind or patch to tolerance. Cleanliness sets the bond: vacuum dust, remove laitance and oil, and apply compatible primers at the manufacturer’s stated coverage, logging batch numbers. Where insulation or vapour control layers are specified, stagger joints and close gaps to prevent thermal bridging and indentations. Before rolling out any sheet, confirm weather conditions are stable—no rain forecast, substrate and ambient temperatures at or above +5°C, and manageable wind. Capture photos and approvals to lock in traceability per approved project specifications and authority requirements.
- Record moisture readings with photos and location tags.
- Achieve ±5 mm over 2 m flatness before membrane work.
- Clean, dry, primed surfaces ensure durable adhesion.
- Stagger insulation joints; eliminate gaps and rocking.
- Confirm weather window and supervisor approval.
Seams, Laps, and Details: Where Waterproofing Succeeds or Fails
Most leaks originate at laps, penetrations, and edges. Establish consistent lap widths—PVC typically ≥ 60 mm at sides and 100 mm at ends; bituminous ≥ 80 mm and 100 mm respectively—and mark guides before welding or bonding. For PVC, hot-air weld with a calibrated automatic welder, then probe 100% of seams and perform scheduled peel tests, logging parameters and results. For bituminous membranes, achieve uniform bonding without burn-through and maintain a neat 5–10 mm bleed at laps. Detail penetrations with compatible boots or collars, 360° welded or bonded, and clamp rings where appropriate. Drains and scuppers require clean, recessed flanges, full bond, strainers, and water testing. Edge terminations on horizontal planes must achieve mechanical restraint and sealed leading edges while avoiding vertical scope. Maintain a repair protocol: mark, cut, heat/clean, overlay, retest, and document.
- Pre-mark lap lines for uniform widths.
- Probe 100% of PVC welds; schedule peel tests.
- Target neat, continuous bleed at bitumen laps.
- Detail penetrations with compatible accessories.
- Seal and mechanically restrain horizontal terminations.
Protect, Test, and Hand Over with Evidence
A flawless membrane can still fail if left unprotected. Install geotextile or protection boards before traffic, then place screeds, pavers, or ballast per design, introducing separation layers when heat or solvents are involved. Monitor membrane temperatures with an infrared thermometer to stay within manufacturer limits. Where regulations and design allow, perform a flood test or use electronic leak detection after suitable cure. Document test durations, extents, and outcomes, and repair and retest any defects immediately. Maintain clean outlets and verify drainage falls prevent ponding. Closeout requires as-built seam maps, photo logs, test records, product batch numbers, and signatures from installers and inspectors. These deliver traceability and accelerate approvals per approved project specifications and authority requirements. Finally, brief maintenance teams about protection layers and access routes to avoid future damage during service.
- Install protection before construction traffic.
- Monitor temperatures with an infrared thermometer.
- Leak test where permitted and document results.
- Compile as-built records with batch and test data.
- Brief maintenance teams on safe access routes.
How to Use This Checklist On Site
- Preparation: Gather tools (RH/CM meter, 2 m straightedge, IR thermometer, seam probe, welder/torch), approved specs, data sheets, PPE, and confirm safe access and weather window.
- Open the interactive checklist on your device; create a project and area (roof grid or slab zone) to structure evidence by location.
- Start work: For each item, tick completion, attach photos, meter readings, and batch numbers; add comments noting locations and corrective actions if needed.
- Use the checklist’s validation cues: ensure tolerances and acceptance criteria are met before moving to the next stage.
- Conduct internal review with the supervisor; resolve flagged comments; retest seams after repairs and upload updated evidence.
- Export your record as PDF/Excel with embedded photos and location tags; share QR code for authentication with stakeholders.
- Sign-Off: Capture digital signatures from installer, inspector, and client; archive the checklist and as-built documents in the project folder.
Call to Action
- Start Checklist Tick off tasks, leave comments on items or the whole form, and export your completed report to PDF or Excel—with a built-in QR code for authenticity.
- Download Excel - Horizontal PVC/Bituminous Membrane Installation
- Download PDF - Horizontal PVC/Bituminous Membrane Installation
- View Image - Horizontal PVC/Bituminous Membrane Installation
Cite & Embed
“Horizontal PVC/Bituminous Membrane Installation by Quollnet”
with a link to
this source page.
FAQ
Question: Which substrates are suitable for horizontal PVC or bituminous membranes?
Question: How do I choose between PVC and bituminous membranes for a horizontal area?
Question: What are reliable methods to verify seam integrity on site?
Question: Can I perform a flood test on all horizontal waterproofing installations?
Related Articles
Broader reading and guidance connected to this checklist topic.


Is It Important To Customize Your Qr Code And How To Do It?

Download Excel Format Snag List

Master Construction Project Cashflow With Cashflowpot
Related Checklists
Keep the workflow moving with nearby templates chosen from similar checklist content.