Vertical Drainage Composite/Protection Board Installation Checklist
Definition: Vertical drainage composite/protection board installation is a field-ready QA/QC checklist for vertical drains and protection boards ensuring continuous coverage, protected membranes, and connected discharge outlets on walls and shafts.
- Confirms continuous vertical drainage paths without voids or blockages.
- Verifies protected waterproofing membranes during fixing and backfilling.
- Checks outlet connectivity, discharge capacity, and secure terminations.
- Interactive, commentable, export, QR code for authenticated field records.
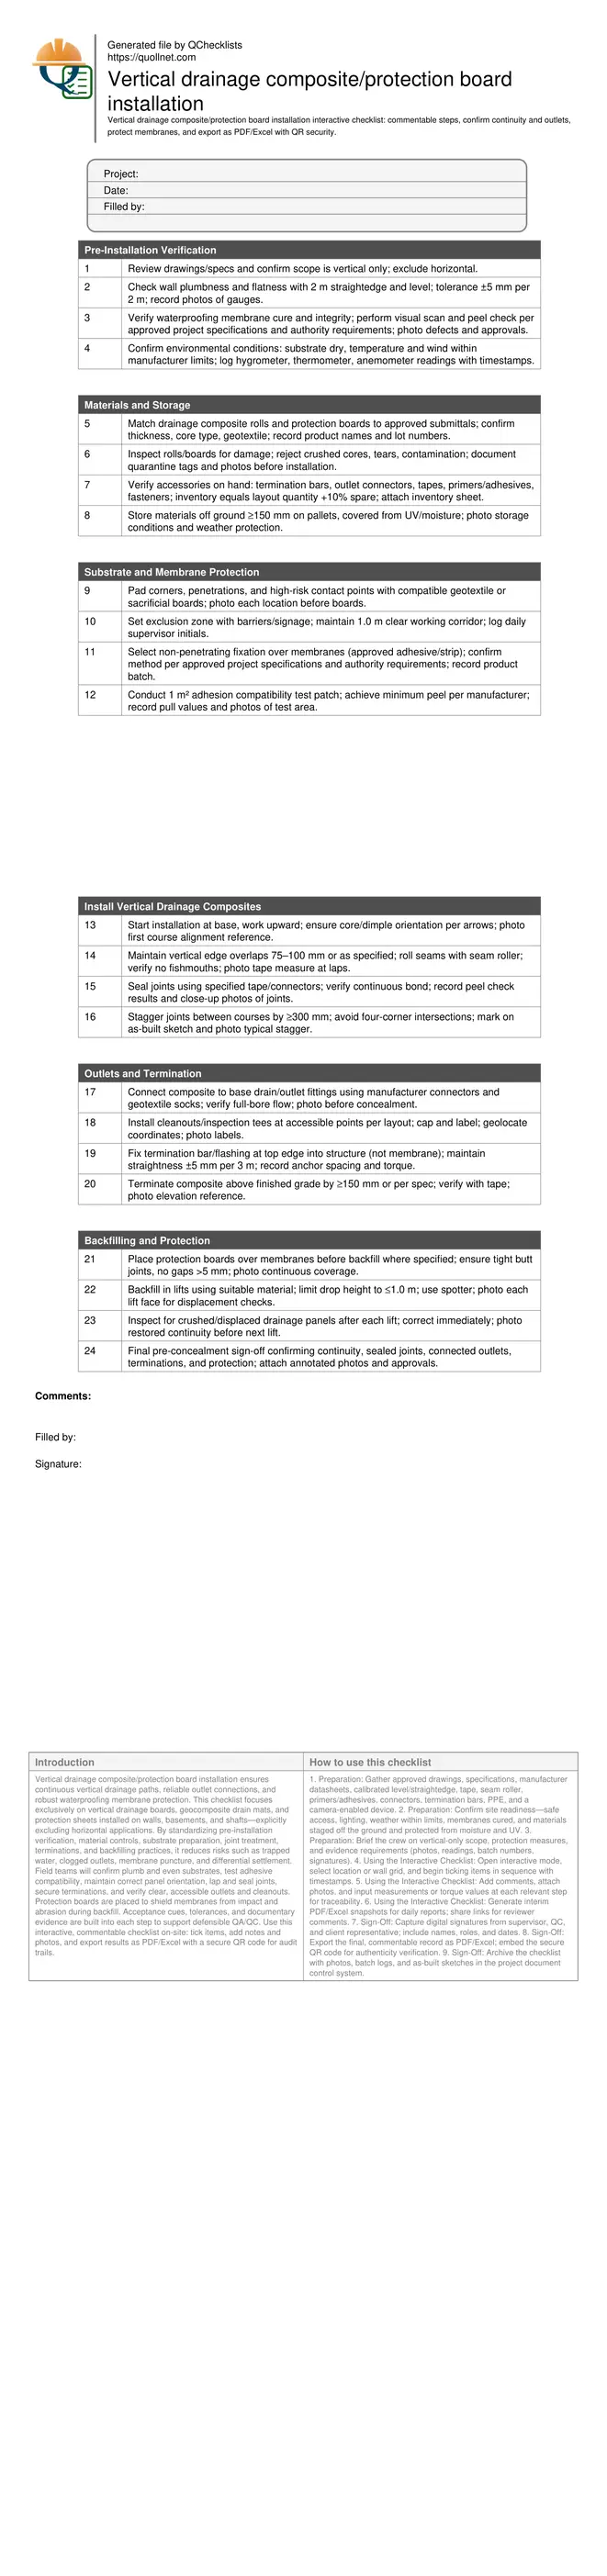
Vertical drainage composite/protection board installation ensures continuous vertical drainage paths, reliable outlet connections, and robust waterproofing membrane protection. This checklist focuses exclusively on vertical drainage boards, geocomposite drain mats, and protection sheets installed on walls, basements, and shafts—explicitly excluding horizontal applications. By standardizing pre-installation verification, material controls, substrate preparation, joint treatment, terminations, and backfilling practices, it reduces risks such as trapped water, clogged outlets, membrane puncture, and differential settlement. Field teams will confirm plumb and even substrates, test adhesive compatibility, maintain correct panel orientation, lap and seal joints, secure terminations, and verify clear, accessible outlets and cleanouts. Protection boards are placed to shield membranes from impact and abrasion during backfill. Acceptance cues, tolerances, and documentary evidence are built into each step to support defensible QA/QC. Use this interactive, commentable checklist on-site: tick items, add notes and photos, and export results as PDF/Excel with a secure QR code for audit trails.
- Deliver consistent, verifiable installation quality for vertical drainage composites and protection boards by controlling substrates, materials, joint treatments, terminations, and backfill interfaces. Capture measurements, readings, and photographic evidence to prevent rework and warranty exposure.
- Strengthen waterproofing performance by safeguarding membranes from puncture, abrasion, and chemical incompatibility. Adhesive compatibility tests, non-penetrating fixation methods, and continuous protection board coverage maintain barrier integrity during installation and staged backfilling.
- Interactive online checklist with tick, comment, and export features secured by QR code.
- Assure long-term drainage function by proving continuous vertical flow paths and unobstructed outlets. Verify laps, connected outlet fittings, cleanouts for maintenance, and inspection photos before concealment, then archive digitally with stakeholder approvals and batch traceability.
Pre-Installation Verification
Materials and Storage
Substrate and Membrane Protection
Install Vertical Drainage Composites
Outlets and Termination
Backfilling and Protection
Plan, verify substrates, and protect the membrane before installation
Successful vertical drainage composite and protection board installation begins with disciplined planning and substrate verification. Confirm the scope is strictly vertical, review approved drawings, and align materials to submittals. Validate wall plumbness and flatness with a 2 m straightedge (±5 mm per 2 m typical) to prevent bridging or voids. Verify waterproofing membranes are fully cured and defect-free; then test adhesion compatibility on a 1 m² patch using the specified primers or adhesives. Establish an exclusion zone to protect the membrane from impact and scaffolding collisions, and pad high-risk details—corners, penetrations, and offsets—with compatible geotextile or sacrificial boards. Opt for non-penetrating fixation methods authorized for the membrane system to avoid compromising the barrier. Meticulous documentation—readings, photos, batch numbers—creates defensible records. These early controls reduce rework, safeguard warranties, and lay the foundation for continuous vertical flow paths and durable backfill interfaces.
- Confirm vertical-only scope; exclude horizontal drainage activities.
- Check plumbness/flatness with 2 m straightedge; ±5 mm per 2 m.
- Adhesion test patch 1 m²; record peel values and photos.
- Use non-penetrating fixation compatible with the membrane.
- Pad corners and penetrations with geotextile or boards.
Ensure continuity, sealed joints, and reliable outlet terminations
Continuity is achieved by correct orientation, measured laps, sealed joints, and carefully detailed terminations. Begin at the base and advance upward, keeping dimples/cores oriented to direct water to drains. Overlap vertical edges 75–100 mm or as specified, roll seams, and seal with compatible tapes or connectors. Stagger joints by at least 300 mm to avoid aligned pathways for soil intrusion. At the base, attach outlet connectors or boots to the collection drain, maintaining full-bore capacity and installing geotextile socks to resist fines. Provide cleanouts or inspection tees at accessible points and label them for future maintenance. Finish with a straight termination bar or flashing at the top, fixed into the structure—not the membrane—with documented torque and spacing. Verify terminations sit above finished grade to prevent splash-back.
- Orient panels per manufacturer arrows; photo first course.
- Laps 75–100 mm; roll and seal all joints.
- Stagger joints ≥300 mm between courses.
- Full-bore outlet connections with geotextile socks.
- Termination above grade and anchored into structure.
Protect during backfill and verify performance before concealment
Protection boards prevent puncture and abrasion during backfilling, preserving the waterproofing system and composite structure. Install full-coverage protection boards with tight butt joints, limiting gaps to under 5 mm to avoid point loads. Backfill in controlled lifts, using suitably graded material and a spotter to manage equipment movements. Limit drop heights to 1.0 m to reduce impact energy. After each lift, visually inspect the exposed face to catch crushed cores or displaced panels, then correct immediately. Before final concealment, conduct a comprehensive inspection confirming continuous flow paths, sealed laps, connected outlets, labeled cleanouts, and straight terminations. Capture geo-tagged photos, batch numbers, and measurement records, and obtain formal sign-offs. These steps produce a traceable, auditable installation ready for long-term service.
- Install protection boards with gaps ≤5 mm.
- Control backfill lifts; limit drop height to 1.0 m.
- Inspect after each lift; correct displacement immediately.
- Photo-document outlets, cleanouts, and terminations.
- Complete final sign-off before concealment.
How to use the interactive vertical drainage installation checklist
- Preparation: Gather approved drawings, specifications, manufacturer datasheets, calibrated level/straightedge, tape, seam roller, primers/adhesives, connectors, termination bars, PPE, and a camera-enabled device.
- Preparation: Confirm site readiness—safe access, lighting, weather within limits, membranes cured, and materials staged off the ground and protected from moisture and UV.
- Preparation: Brief the crew on vertical-only scope, protection measures, and evidence requirements (photos, readings, batch numbers, signatures).
- Using the Interactive Checklist: Open interactive mode, select location or wall grid, and begin ticking items in sequence with timestamps.
- Using the Interactive Checklist: Add comments, attach photos, and input measurements or torque values at each relevant step for traceability.
- Using the Interactive Checklist: Generate interim PDF/Excel snapshots for daily reports; share links for reviewer comments.
- Sign-Off: Capture digital signatures from supervisor, QC, and client representative; include names, roles, and dates.
- Sign-Off: Export the final, commentable record as PDF/Excel; embed the secure QR code for authenticity verification.
- Sign-Off: Archive the checklist with photos, batch logs, and as-built sketches in the project document control system.
Call to Action
- Start Checklist Tick off tasks, leave comments on items or the whole form, and export your completed report to PDF or Excel—with a built-in QR code for authenticity.
- Download Excel - Vertical Drainage Composite/Protection Board Installation
- Download PDF - Vertical Drainage Composite/Protection Board Installation
- View Image - Vertical Drainage Composite/Protection Board Installation
Cite & Embed
“Vertical Drainage Composite/Protection Board Installation by Quollnet”
with a link to
this source page.

FAQ
Question: What is the difference between a drainage composite and a protection board?
Question: How do I confirm continuity of vertical drainage on blindside or tight-access walls?
Question: What overlaps and fixings are typical without puncturing the membrane?
Question: How should outlets at the base be detailed to avoid clogging or flow restriction?
Question: Does this checklist include horizontal drainage installations?
Related Articles
Broader reading and guidance connected to this checklist topic.


Is It Important To Customize Your Qr Code And How To Do It?


Related Checklists
Keep the workflow moving with nearby templates chosen from similar checklist content.