G
Guest

How QArticles Works: WYSIWYG Editor, HTML Editing, Attachments and SEO Publishing

Learn how QArticles works: a WYSIWYG article editor with HTML editing, attachments, hero images, and automatic SEO metadata including JSON-LD, Open Graph, and Twitter cards.

How Qarticles Works
How Qarticles Works
English version

How QArticles Works: WYSIWYG Editor, Attachments, and SEO Publishing

This page explains how the QArticles WYSIWYG editor, HTML editor, attachment manager, and publishing system work.

QArticles is a WYSIWYG article editor and publishing tool designed for structured content creation. It combines a rich text editor, attachment management, and automatic SEO metadata generation including JSON-LD schema, Open Graph tags, and Twitter cards. This page explains how QArticles works, how articles are created and published, and how images, files, and HTML editing are handled.

What QArticles Is

QArticles is an article publishing system built by Quollnet for writing structured articles optimized for search engines and social media.

The platform allows users to:

  • write articles using a WYSIWYG text editor

  • attach images and documents

  • insert media into the content

  • define SEO metadata

  • generate structured data automatically

  • publish or unpublish articles dynamically

Articles remain stored in the database and can be edited at any time.

How QArticles Works

The workflow for publishing an article in QArticles follows a simple sequence.

Step 1 — Create the Article Metadata

Users start by creating a new article and filling the main fields:

  • Subject (SEO title)

  • Path / slug (URL)

  • Meta description

  • Meta keywords

  • FAQ section

Example slug:
construction/equipment/excavators-2026

FAQ format:
q: question
a: answer

This FAQ format is automatically converted into structured FAQ schema.

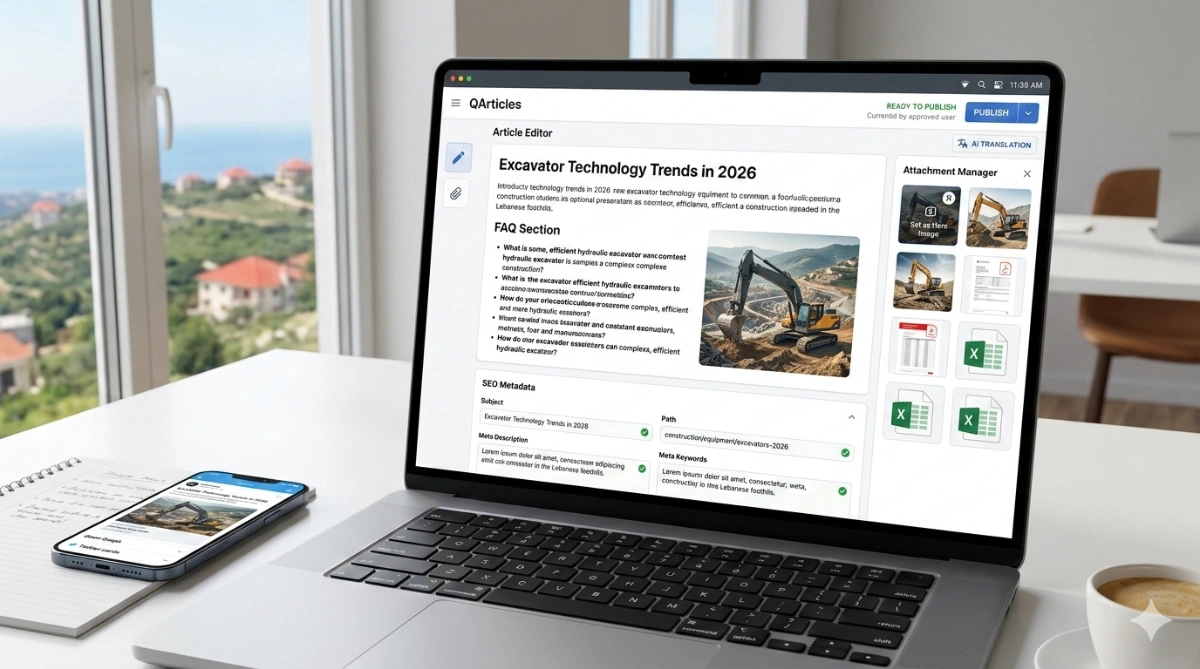
Step 2 — Write the Article Content (WYSIWYG)

The article body is written using a Google-Docs-style WYSIWYG editor.

Users can apply formatting such as:

  • headings

  • bold and italic

  • bullet lists

  • alignment

  • links

  • indentation

  • font size and style

The editor stores content as structured HTML.

Step 3 — Upload Attachments

Attachments are managed using the attachment button at the bottom right of the editor.

When clicked, an attachment panel slides up from the bottom of the screen.

Users can upload:

  • images

  • PDF documents

  • DOCX files

  • XLSX files

Upload sources can include:

  • camera

  • gallery

  • file storage

  • clipboard

Step 4 — Insert Images and Files

After uploading attachments, users can insert content into the article at the cursor position.

Images can be:

  • inserted into the article (renders as an HTML img element)

  • inserted as a link

  • copied as a link

Files (such as PDF/DOCX/XLSX) are inserted as hyperlinks.

Step 5 — Set the Hero Image

A hero image defines the main visual representation of the article.

To set the hero image:

  1. Upload an image

  2. Select the image

  3. Click the Set as Hero Image (cloud) icon

The hero image is automatically used for:

  • Open Graph previews

  • Twitter card previews

  • article previews

Step 6 — Publish the Article

Articles can exist in multiple states:

Draft
The article is saved but not ready for publication.

Ready to Publish
New users typically submit articles for approval before publication.

Published
Once approved, the article becomes publicly accessible.

Editing Published Articles

To modify a published article:

  1. Unpublish the article

  2. Edit the content

  3. Publish the article again

HTML Editing Mode (Advanced)

QArticles provides an HTML editing mode for advanced users.

This allows direct editing of the article HTML and is useful for:

  • adjusting complex formatting

  • embedding custom HTML

  • fine-tuning markup

Even when HTML is edited manually, QArticles still generates metadata automatically.

Automatic Metadata Generation

When an article is saved or published, QArticles automatically generates:

  • JSON-LD article schema

  • publisher structured data

  • Open Graph metadata

  • Twitter card metadata

These metadata help search engines and social platforms display the article correctly.

AI Translation (Optional)

QArticles supports an optional AI translation feature powered by GPT-5.

The system uses version tracking to detect when translations become outdated.

AI translation is available on request:
contact@quollnet.com

Related

Full tutorial:
https://quollnet.com/information/qarticles/how-to-use-qarticles-editor


Elie Saad's photo
Elie Saad
Mar 05, 2026
0
0
105
10

How Qarticles Works

Frequently Asked Questions


FAQ

Q: What is QArticles?

A: QArticles is a WYSIWYG article editor and publishing platform by Quollnet that automatically generates SEO metadata, JSON-LD structured data, Open Graph tags, and Twitter cards.

FAQ

Q: Does QArticles support a WYSIWYG editor?

A: Yes. QArticles uses a Google-Docs-style rich text editor with formatting tools such as headings, lists, alignment, links, and font styling.

FAQ

Q: Can users edit raw HTML?

A: Yes. QArticles includes an HTML editing mode for advanced users to view and modify the article HTML directly.

FAQ

Q: How do users upload images and files?

A: Users click the attachment button in the bottom-right corner. A panel slides up from the bottom where users can upload from camera, gallery, file storage, or clipboard.

FAQ

Q: How do users insert images?

A: Uploaded images can be inserted into the article at the cursor position (as an HTML img element) or inserted as a link using attachment tools.

FAQ

Q: How do users insert files like PDF or DOCX?

A: Uploaded files are inserted as hyperlinks. Users can also copy the file link and paste it anywhere.

FAQ

Q: What is a hero image in QArticles?

A: A hero image is the main image for an article. It is used automatically for Open Graph previews, Twitter cards, and article previews.

FAQ

Q: How do users set a hero image?

A: Upload an image in the attachment panel, select it, then click the cloud icon to set it as the article’s hero image.

FAQ

Q: Are articles stored as static pages?

A: No. Articles remain dynamic and stored in the database, allowing edits and republishing.

FAQ

Q: Can published articles be edited?

A: Yes, but the article must be unpublished first, edited, then published again.

FAQ

Q: What SEO metadata does QArticles generate automatically?

A: QArticles generates JSON-LD schema - article and publisher -, Open Graph metadata, and Twitter card metadata.

FAQ

Q: Does QArticles support AI features?

A: Yes. AI translation powered by GPT-5 is available on request and uses version tracking to detect stale translations.

Related Checklists


Shaft Camera Inspection: Verify Sidewalls, Base, and Debris
✅ 22 items
Shaft camera inspection provides a direct, visual method to verify sidewall and base conditions and identify debris before concreting. Also known as a borehole video inspection or downhole camera survey, this process focuses on cleanout confirmation, sidewall stability, and bearing surface readiness while deliberately excluding NDT analyses such as sonic integrity testing. Using a high-resolution camera with integrated lighting and depth overlay, inspectors document sloughing, cavities, soft seams, sediment thickness, and foreign objects. By capturing clear evidence at defined intervals, the team reduces risks of inclusions, laitance, and compromised load transfer. The scope is strictly visual: observe, measure with simple tools (marked rod), and document; any structural capacity assessment remains out of scope and must follow per approved project specifications and authority requirements. Use this interactive checklist to standardize preparation, execution, and documentation; tick off steps, leave comments at anomalies, and export your record as PDF/Excel with a QR code for traceable approval.
Place Raft Concrete (Horizontal) – Inspection Checklist
✅ 26 items
Place raft concrete (horizontal) work demands disciplined planning and execution. This field-ready checklist helps teams deliver a defect-free raft slab pour, also known as mat foundation concrete placement or a horizontal foundation pour, by focusing on pour plan validation, controlled placement, effective vibration, joint management, and curing. It intentionally excludes reinforcement inspections to maintain tight scope on concrete placement operations. By following these steps, you minimize risks like honeycombing, segregation, cold joints, excessive bleeding, surface cracking, and uneven levelness, while improving density, durability, and schedule certainty. You will verify plant logistics, equipment readiness, layer thickness, vibrator coverage, discharge height, joint preparation, finishing tolerances, and curing duration—capturing photos, readings, and sign-offs as evidence. Use this checklist to streamline pre-pour meetings, guide site supervision, and document compliance per approved project specifications and authority requirements. Start interactive mode to tick items, add comments, attach evidence, and export PDF/Excel with a QR-secured record.
Drill bored piles ≤ 600 mm checklist – no concreting
✅ 21 items
Drill bored piles ≤ 600 mm require disciplined verification of verticality, base cleanliness, groundwater control, and diameter to ensure a stable, compliant bore prior to any placement activities. This focused bored pile inspection checklist excludes concreting steps and concentrates on the most risk‑sensitive attributes: verticality checking, sediment thickness confirmation, fluid or casing stability, and borehole geometry. By validating instrument calibration, continuously logging mast inclination, maintaining a safe head above groundwater, and confirming diameter via caliper or template checks, you reduce risks of misalignment, soft toe, underbreak, or wall collapse. Acceptance criteria are referenced per approved project specifications and authority requirements, while practical evidence—photos, logs, and signatures—confirms compliance. Use this interactive tool to standardize quality outcomes, avoid rework, and provide transparent, auditable records for stakeholders. Start in interactive mode to tick items, add comments for variances, and export as PDF/Excel with an embedded QR to authenticate field data.
Static Lateral Load Test: Checklist for Setup and Acceptance
✅ 25 items
Static Lateral Load Test confirms how a foundation or pile responds to controlled horizontal loading. This checklist supports site engineers conducting a horizontal load test, also called a lateral pile test or static horizontal loading, by detailing reaction setup, instrumentation, data capture, and acceptance evaluation. The scope is strictly lateral; tension or uplift testing is excluded. Following these steps helps avoid common risks: inadequate reaction capacity, misaligned jacks inducing unintended moments, under-embedded reaction piles, instrument drift, and incomplete time–movement records. You will configure reaction frames or piles, align the hydraulic jack and load cell, measure deflection with LVDTs and rotation with an inclinometer, and document hold periods until movement rates stabilize. Acceptance is determined against project criteria for maximum movement, residual movement, and rotational limits at service and factored loads. Use this interactive checklist during planning and execution; tick items as you go, add comments or photos for evidence, and export your filled record to PDF/Excel with a QR for secure verification.
Survey and mark pile cut-off levels: field checklist
✅ 22 items
Survey and mark pile cut-off levels is a focused field task ensuring every pile head receives an accurate, durable elevation mark before any trimming activities. This checklist guides pile cut-off elevation marking and pile head level survey using reliable datums, TBMs, and total station or digital level workflows. You will establish a clear cut-off datum, tie temporary benchmarks to primary control, and apply protection so marks remain legible through weather and site traffic. The scope deliberately excludes head breaking or chipping; it concentrates on setting tolerances, references, documentation, and mark protection so downstream teams can execute with confidence. By standardizing methods and acceptance criteria, you reduce rework, avoid uneven pile caps, and maintain consistent concrete cover and reinforcement seating. Use this interactive checklist to tick tasks, add field comments, attach photos or instrument logs, and export to PDF/Excel with a secure QR for verification.

Related Articles


Ncr At Handover
⏳ 5 min read
Open Ncrs At Taking-over / Dlp: What Happens At Handover And How To Escalate
Can taking-over happen with open NCRs? Learn when handover is allowed, when it must be blocked, how to document outstanding NCRs, and when to escalate to contractual notices (e.g., Notice to Correct) through common contract authorities.
How To Use Qarticles Editor
⏳ 3 min read
How To Use Qarticles: Complete Guide To Writing And Publishing Seo-optimized Articles
QArticles by Quollnet is a WYSIWYG article publishing tool that automatically generates SEO metadata, JSON-LD schema, Open Graph tags, and Twitter cards. Write content using a rich text editor, attach images and files, set hero images, and publish structured articles optimized for search engines and social media.
Construction Defects
⏳ 5 min read
Major Construction Defects That Needs Immediate Attention
This article provides a comprehensive guide to common home maintenance issues, including poorly built foundations, cracked concrete, leaking pipes, faulty wiring, unstable roofs, defective windows, and improperly installed doors. It offers valuable information on identifying these problems, understanding their potential consequences, and taking necessary steps to address them. Whether you're a homeowner looking to maintain the value of your property or a DIY enthusiast seeking practical advice, this article is an essential resource.
Customize Your Company Qr Code
⏳ 1 min read
Is It Important To Customize Your Qr Code And How To Do It?
his article discusses the importance of including a company logo in a QR code for better recognition, branding, and aesthetics. It showcases samples created by Quollnet's QR code designer and provides a step-by-step guide on customizing and generating a QR code using Quollnet's QR code generator. The guide includes uploading a logo, selecting colors and shapes, and generating the final code.
How To Create a Project Cash Flow For Contractors
⏳ 6 min read
Learn How To Create a Comprehensive Cash Flow For Construction Projects. Introducing Cashflowpot
Learn how to create a comprehensive cash flow for construction projects, including key contract conditions, subcontractor retention, work in excess of billing (WIEB), advance payments, and indirect costs. This step-by-step guide helps contractors manage project cash flows efficiently.