Wall-Slab Construction Joint Preparation Checklist (No Pour)
Definition: Wall-Slab Construction Joint Preparation details how to roughen, clean, bond, and install waterstops at wall–slab interfaces before concreting, for engineers and supervisors; concrete pours are specifically excluded.
- Target consistent roughness, cleanliness, and bonding readiness at the interface.
- Install and splice waterstops accurately to prevent leakage at joints.
- Record methods, measurements, photos, and batch numbers for traceable compliance.
- Use interactive, commentable, export options with QR code verification.
Wall-Slab Construction Joint Preparation ensures the wall–slab interface is roughened, cleaned, bonded, and waterstopped before concreting, while explicitly excluding pours. This checklist focuses on the construction joint interface between a cast-in-place wall and slab, guiding cold joint preparation, bonding interface treatment, and accurate waterstop installation. By standardizing surface roughening, dust-free cleaning, saturated surface-dry (SSD) conditioning, and correct bonding agent application, it minimizes laitance, bond failures, and leakage paths. The sequence also covers splice quality and positioning tolerances for PVC/TPV waterstops, plus readiness checks prior to the pre-pour inspection. Outcomes include durable shear transfer, secure watertightness, and a clean, documented release for concreting. Risks avoided include delamination, grout loss, rework, and infiltration at service life. Use this interactive page to tick steps, attach photos and readings, leave comments, and export the record as PDF/Excel with a QR code link for fast verification.
- Establishes a clear, repeatable sequence for wall–slab joint interface preparation: safe access, target roughness, deep cleaning, SSD control, bonding coat application, and accurate waterstop centering and splicing. Captures evidence to support release for concreting without rework.
- Defines practical acceptance cues: surface profile with exposed aggregate 3–5 mm, white-cloth dust checks, water-break-free surfaces, wet film thickness for epoxy bonding coats, and controlled waterstop alignment. These checks reduce leakage and improve long-term bond performance.
- Strengthens accountability with batch tracking for bonding agents, splicing records for waterstops, and dated geo-tagged photos. The process aligns with approved project specifications and authority requirements, ensuring consistent quality and streamlined pre-pour inspections.
- Interactive online checklist with tick, comment, and export features secured by QR code.
Pre-Work Controls
Surface Roughening
Cleaning and Drying
Bonding Interface
Waterstop Installation
Readiness and Handover
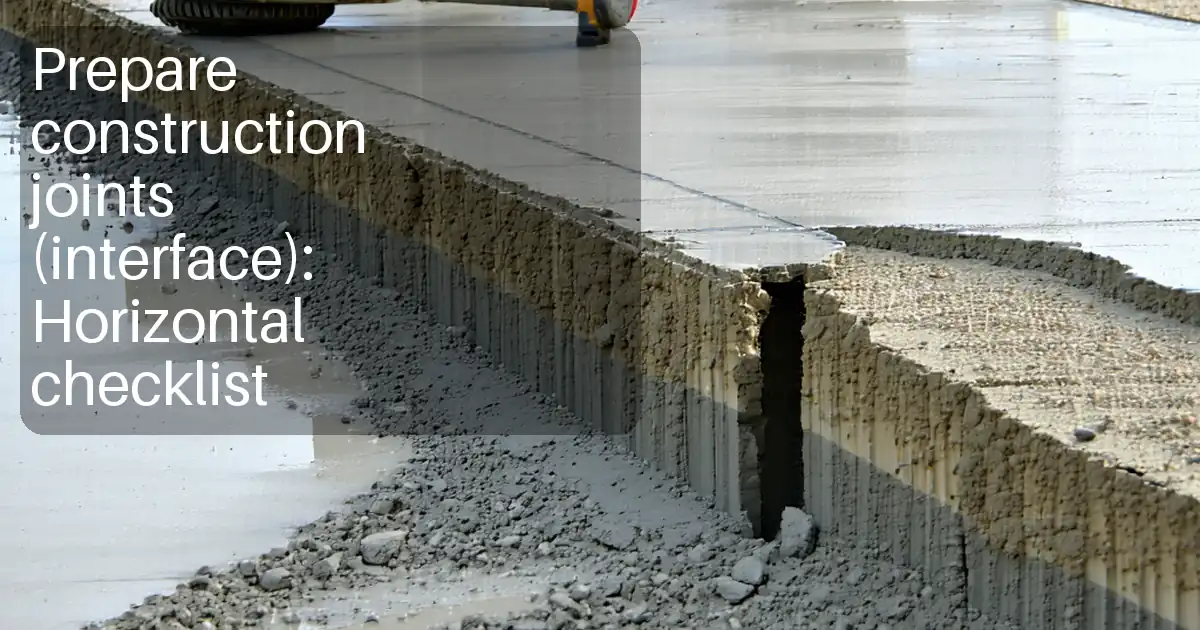
Achieving Robust Roughness Without Damaging the Substrate
Roughening is about removing laitance and exposing sound aggregate so the new concrete achieves mechanical interlock across the wall–slab interface. Light bush hammering or mechanical scabbling typically delivers a profile comparable to CSP 5–7, revealing 3–5 mm of coarse aggregate without crushing. Over-enthusiastic scabbling can bruise aggregate and create weak zones; under-roughening leaves slick paste that inhibits bond. Work methodically in lanes, then verify with close-up photos against a ruler for scale. Where specified, spot pull-off adhesion tests help confirm adequate tensile bond potential (≥ 1.5 MPa indicative). Maintain dust control with wetting or on-tool extraction to protect workers and keep pores open. Record any spalls and obtain patch repair approvals before proceeding, ensuring a consistent substrate. The goal is a uniform, clean texture that accepts bonding agents and resists delamination when the slab is poured later.
- Expose 3–5 mm of sound aggregate uniformly.
- Avoid bruised aggregate and feather edges.
- Document profile with ruler-scale photos.
- Use dust control to keep pores open.
- Repair and approve spalls before continuing.
Cleanliness, Moisture Condition, and Bonding Readiness
After roughening, deep cleaning prevents dust from acting as a bond breaker. Brush vigorously, HEPA vacuum, and if permitted, pressure-wash to flush fines from pores. Aim for saturated surface-dry (SSD) before cementitious bonding coats—damp substrate but no free water film—to avoid starving the interface or diluting the slurry. Use a simple tissue press to check that the surface is sheen-free. For epoxy bonding agents, ensure the surface is clean and dry per the data sheet; measure wet film thickness (WFT) during application to achieve full coverage without pinholes. Remove curing agents and oils with approved degreasers, verifying a water-break-free result. Keep the prepared interface protected from rain, overspray, and dust under taped plastic sheeting. Meticulous moisture and cleanliness control sharply reduces cold-joint failures and improves long-term watertightness and shear transfer at the wall–slab connection.
- HEPA vacuum until cloth shows minimal dust.
- SSD for slurry; dry, clean for epoxies.
- Confirm water-break-free surface visually.
- Measure WFT to ensure full coverage.
- Protect interfaces from weather and dust.
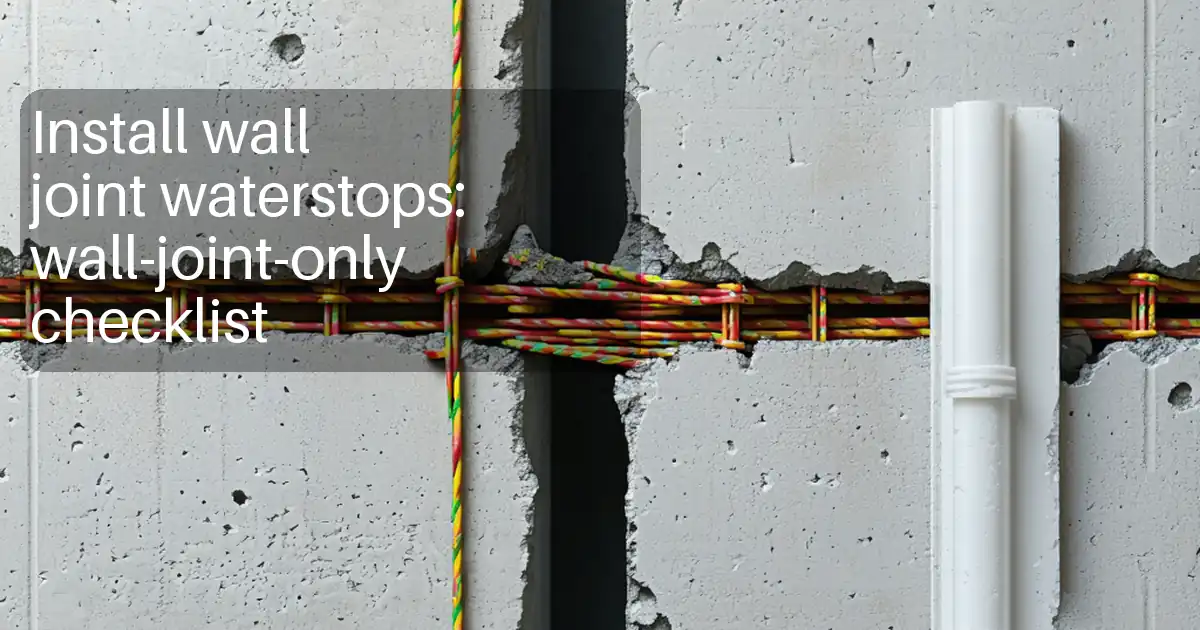
Waterstop Placement and Final Readiness Checks
Waterstops must sit true on the joint centerline to block seepage paths. Verify the approved profile, then secure it at 200–300 mm centres so it resists displacement during reinforcement and formwork adjustments. Splice only with compatible heat welding and confirm a continuous, void-free bead. Measure location tolerances: centerline within ±10 mm and embedment about 50 ±5 mm each side unless otherwise specified. Before calling for inspection, re-check cleanliness, SSD or epoxy tack, sealing around sleeves, and stop-ends alignment. Photograph each key feature at regular intervals with a scale reference. Finalize documentation: batch numbers, weld logs, WFT readings, and sign-offs. This disciplined handover ensures the joint is ready for concreting without surprises, minimizing leakage risk and rework while aligning with approved project specifications and authority requirements.
- Center waterstop within ±10 mm tolerance.
- Secure clips each 200–300 mm spacing.
- Heat-weld splices with continuous bead.
- Verify embedment 50 ±5 mm each side.
- Document photos, weld and WFT logs.
How to Use This Interactive Checklist
- Prepare resources: approved drawings, ITP, manufacturer data sheets, PPE, HEPA vacuum, roughening tools, WFT gauge, welding kit, camera, and a light meter.
- Open the checklist in interactive mode on a tablet or phone; enable location and time-stamp for evidence capture.
- Tick each step as completed, attach photos/readings, and note batch numbers or measurements directly in the comment field.
- Use comments to flag issues, assign actions, and tag responsible parties; track resolutions before moving to the next section.
- Generate a live QR code to share the in-progress record with supervisors and inspectors for real-time review.
- Export the finalized record as PDF/Excel with all attachments for submittal; store it in the project’s document control system.
- Collect digital signatures from the contractor, QA/QC, and the engineer to close the hold point and archive the checklist.

Call to Action
- Start Checklist Tick off tasks, leave comments on items or the whole form, and export your completed report to PDF or Excel—with a built-in QR code for authenticity.
- Download Excel - Wall-Slab Construction Joint Preparation
- Download PDF - Wall-Slab Construction Joint Preparation
- View Image - Wall-Slab Construction Joint Preparation
Cite & Embed
“Wall-Slab Construction Joint Preparation by Quollnet”
with a link to
this source page.

FAQ
Question: What roughening method is best for a wall–slab construction joint?
Question: Should the interface be dry or SSD before applying a bonding coat?
Question: How do I ensure waterstops stay centered and watertight at the joint?
Question: What documentation is needed before the pre-pour inspection release?
Related Articles
Broader reading and guidance connected to this checklist topic.

Construction Tender Preparation Guide | Step-by-step Bidding Process

Is It Important To Customize Your Qr Code And How To Do It?

What Is a Snag List Or Punch List

Related Checklists
Keep the workflow moving with nearby templates chosen from similar checklist content.