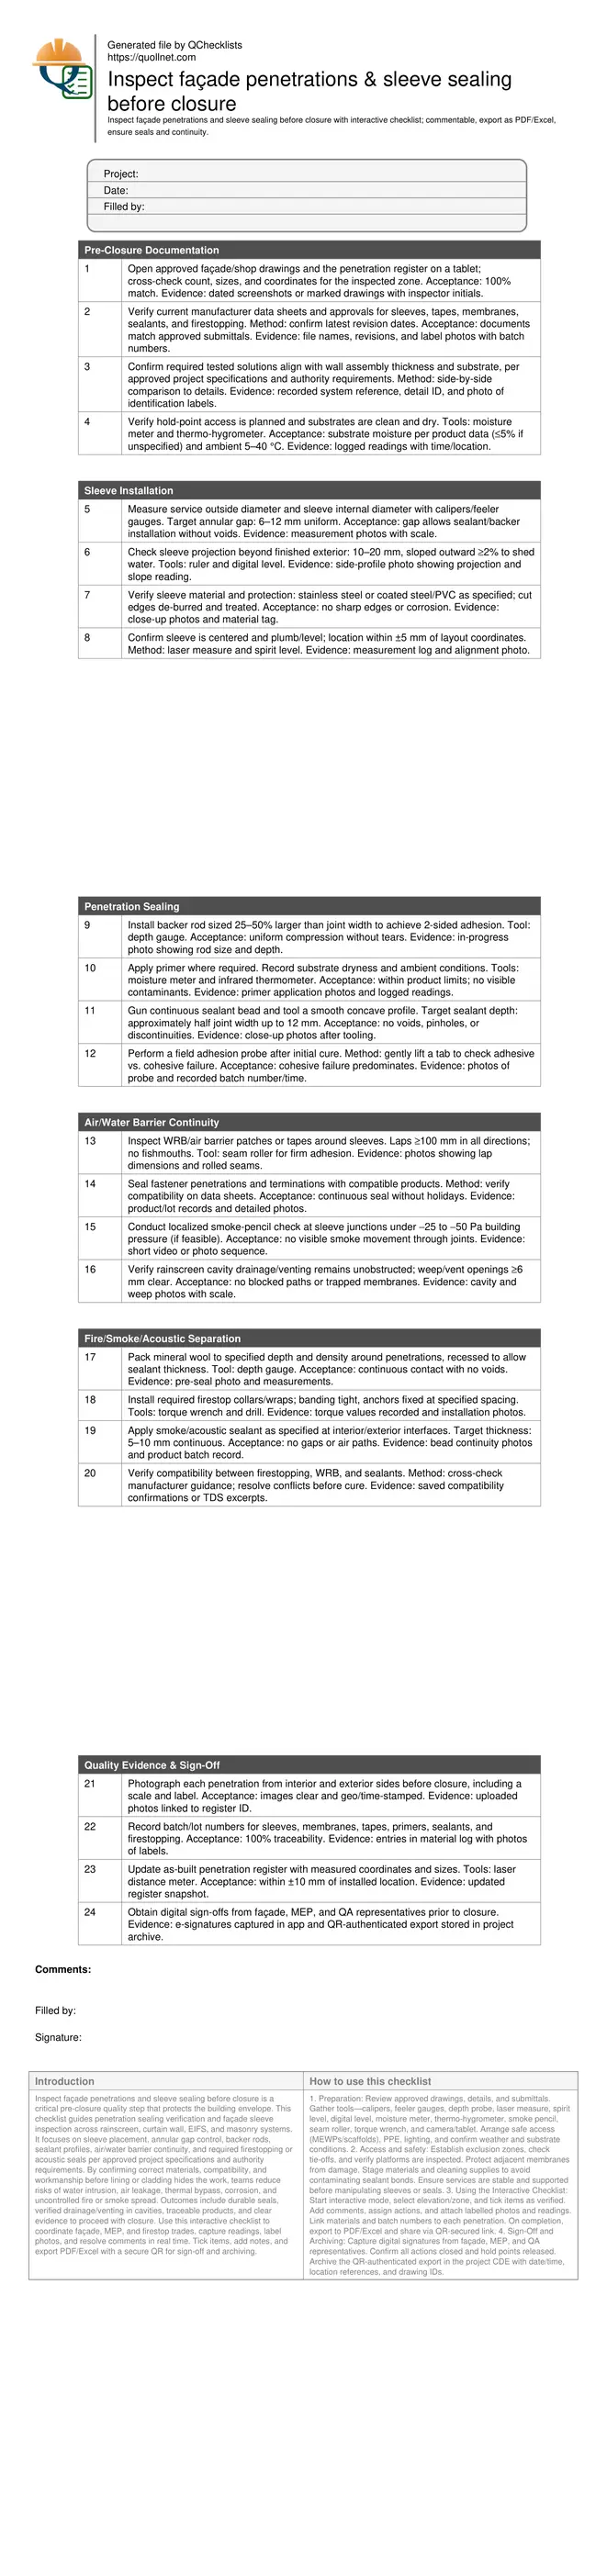
Inspect façade penetrations & sleeve sealing before closure
Definition: Inspect façade penetrations and sleeve sealing before closure defines a focused pre-closure inspection for façade coordinators, QA managers, and MEP leads, verifying sleeves, annular gaps, fire/air/water sealing, and documentation.
- Verify sleeves, annular gaps, and seals meet approved specifications
- Prevent water ingress, air leakage, and fire/smoke transmission risks
- Document materials, batch numbers, photos, and field adhesion checks
- Interactive, commentable, export, QR code for authenticated records
Inspect façade penetrations and sleeve sealing before closure is a critical pre-closure quality step that protects the building envelope. This checklist guides penetration sealing verification and façade sleeve inspection across rainscreen, curtain wall, EIFS, and masonry systems. It focuses on sleeve placement, annular gap control, backer rods, sealant profiles, air/water barrier continuity, and required firestopping or acoustic seals per approved project specifications and authority requirements. By confirming correct materials, compatibility, and workmanship before lining or cladding hides the work, teams reduce risks of water intrusion, air leakage, thermal bypass, corrosion, and uncontrolled fire or smoke spread. Outcomes include durable seals, verified drainage/venting in cavities, traceable products, and clear evidence to proceed with closure. Use this interactive checklist to coordinate façade, MEP, and firestop trades, capture readings, label photos, and resolve comments in real time. Tick items, add notes, and export PDF/Excel with a secure QR for sign-off and archiving.
- Pre-closure inspection ensures sleeves are correctly sized and projected, annular gaps are controlled, and sealants are installed with proper backing, adhesion, and tooling—avoiding concealed defects that lead to leaks, corrosion, and rework.
- The checklist verifies continuity of air and water barriers, correct laps and terminations, and unobstructed drainage paths in rainscreen cavities. Localized smoke-pencil checks help reveal air leakage at sleeves before façade closure proceeds.
- Fire, smoke, and acoustic separation measures are confirmed where required, including mineral wool packing, collars or wraps, and compatible sealants. Labels, batch numbers, and material photos provide full traceability against approved submittals.
- Interactive online checklist with tick, comment, and export features secured by QR code. Attach geo-tagged photos, log measurements, and capture digital signatures, creating an auditable record to authorize façade closure with confidence.
Pre-Closure Documentation
Sleeve Installation
Penetration Sealing
Air/Water Barrier Continuity
Fire/Smoke/Acoustic Separation
Quality Evidence & Sign-Off
Why pre-closure inspection protects the façade envelope
Penetrations are the most vulnerable points in any façade. Before cladding, liners, or insulation hide the work, targeted inspection confirms sleeves are correctly placed, gaps are controlled, and seals integrate with the air/water barrier. This prevents hidden defects that later drive rainwater into cavities, bypass insulation with uncontrolled air, or create corrosion points. It also validates that fire, smoke, and acoustic measures are in place where required, avoiding costly reopening and rework. Practical acceptance cues include sleeve projections that shed water, compatible materials, continuous laps, and tooled sealant profiles without voids. Localized smoke-pencil checks at negative pressure help reveal air leakage. Thorough photographic documentation and batch-number capture build a defensible record to proceed with closure. Use the checklist to coordinate trades, time wet works within temperature limits, and sequence access while scaffolds or platforms remain available.
- Inspect before boards, panels, or insulation conceal penetrations
- Confirm weather and substrate meet product limits
- Coordinate façade, MEP, and firestop trade interfaces
- Capture labelled photos and material batch numbers
- Hold closure until acceptance evidence is complete
Materials, tolerances, and workmanship that avoid rework
Quality outcomes rely on sizing and compatibility. Sleeves should provide a uniform 6–12 mm annular gap to suit backer rods and sealants. Stainless or protected sleeves resist corrosion; edges must be de-burred. Backer rod should be 25–50% larger than joint width for two-sided adhesion, with sealant depth about half the width up to 12 mm. Primers and membranes must be applied to clean, dry substrates within the manufacturer’s temperature and humidity ranges. WRB/air barrier patches require tight rolling and minimum 100 mm laps without fishmouths. In rainscreens, ensure drainage and vent openings remain clear. For fire or acoustic needs, mineral wool packing should fully contact substrates and collars be securely anchored. Field adhesion probes after initial cure confirm bond quality. Each tolerance and cue helps prevent overfilled joints, crushed backer rods, delamination, and early cracking.
- Target 6–12 mm annular gap, consistent around services
- Backer rod 25–50% larger than joint width
- Sealant depth about half joint width, max 12 mm
- WRB laps ≥100 mm, rolled tight with no fishmouths
- Outward sleeve slope ≥2% to shed water
Documentation, traceability, and common pitfalls to catch
Traceable records close the loop between drawings, submittals, and installed work. Capture clear photos of each penetration from both sides with labels, scales, and context. Log batch numbers for sleeves, membranes, primers, tapes, sealants, and firestopping to support warranty and future maintenance. Keep the as-built penetration register updated with measured coordinates and sizes. Typical pitfalls include missing primer, incompatible sealant over membranes, over-tooled beads that thin the seal, crushed or undersized backer rod, blocked cavity vents, and unlabeled firestop installations. Early coordination prevents trades from damaging membranes while fixing sleeves. Use the interactive checklist to assign actions, timestamp comments, and hold closure until acceptance evidence is complete. Export the signed record to PDF/Excel with a QR for verification during audits or handover.
- Photograph both sides with scale and labels
- Record batch numbers for all wet and tape products
- Update the as-built penetration register live
- Verify compatibility across sealants, WRB, and firestops
- Hold closure until issues are closed out
How to Use This Pre-Closure Inspection Checklist
- Preparation: Review approved drawings, details, and submittals. Gather tools—calipers, feeler gauges, depth probe, laser measure, spirit level, digital level, moisture meter, thermo-hygrometer, smoke pencil, seam roller, torque wrench, and camera/tablet. Arrange safe access (MEWPs/scaffolds), PPE, lighting, and confirm weather and substrate conditions.
- Access and safety: Establish exclusion zones, check tie-offs, and verify platforms are inspected. Protect adjacent membranes from damage. Stage materials and cleaning supplies to avoid contaminating sealant bonds. Ensure services are stable and supported before manipulating sleeves or seals.
- Using the Interactive Checklist: Start interactive mode, select elevation/zone, and tick items as verified. Add comments, assign actions, and attach labelled photos and readings. Link materials and batch numbers to each penetration. On completion, export to PDF/Excel and share via QR-secured link.
- Sign-Off and Archiving: Capture digital signatures from façade, MEP, and QA representatives. Confirm all actions closed and hold points released. Archive the QR-authenticated export in the project CDE with date/time, location references, and drawing IDs.
Call to Action
- Start Checklist Tick off tasks, leave comments on items or the whole form, and export your completed report to PDF or Excel—with a built-in QR code for authenticity.
- Download Excel - Façade Penetrations & Sleeve Sealing Inspection
- Download PDF - Façade Penetrations & Sleeve Sealing Inspection
- View Image - Façade Penetrations & Sleeve Sealing Inspection
Cite & Embed
“Façade Penetrations & Sleeve Sealing Inspection by Quollnet”
with a link to
this source page.

FAQ
Question: What tolerances should I use for sleeve gaps and projection?
Question: How do I verify sealant adhesion before closing the façade?
Question: When is a smoke-pencil check appropriate for these penetrations?
Question: How do I manage compatibility between WRB, sealants, and firestopping?
Related Articles
Broader reading and guidance connected to this checklist topic.


Related Checklists
Keep the workflow moving with nearby templates chosen from similar checklist content.