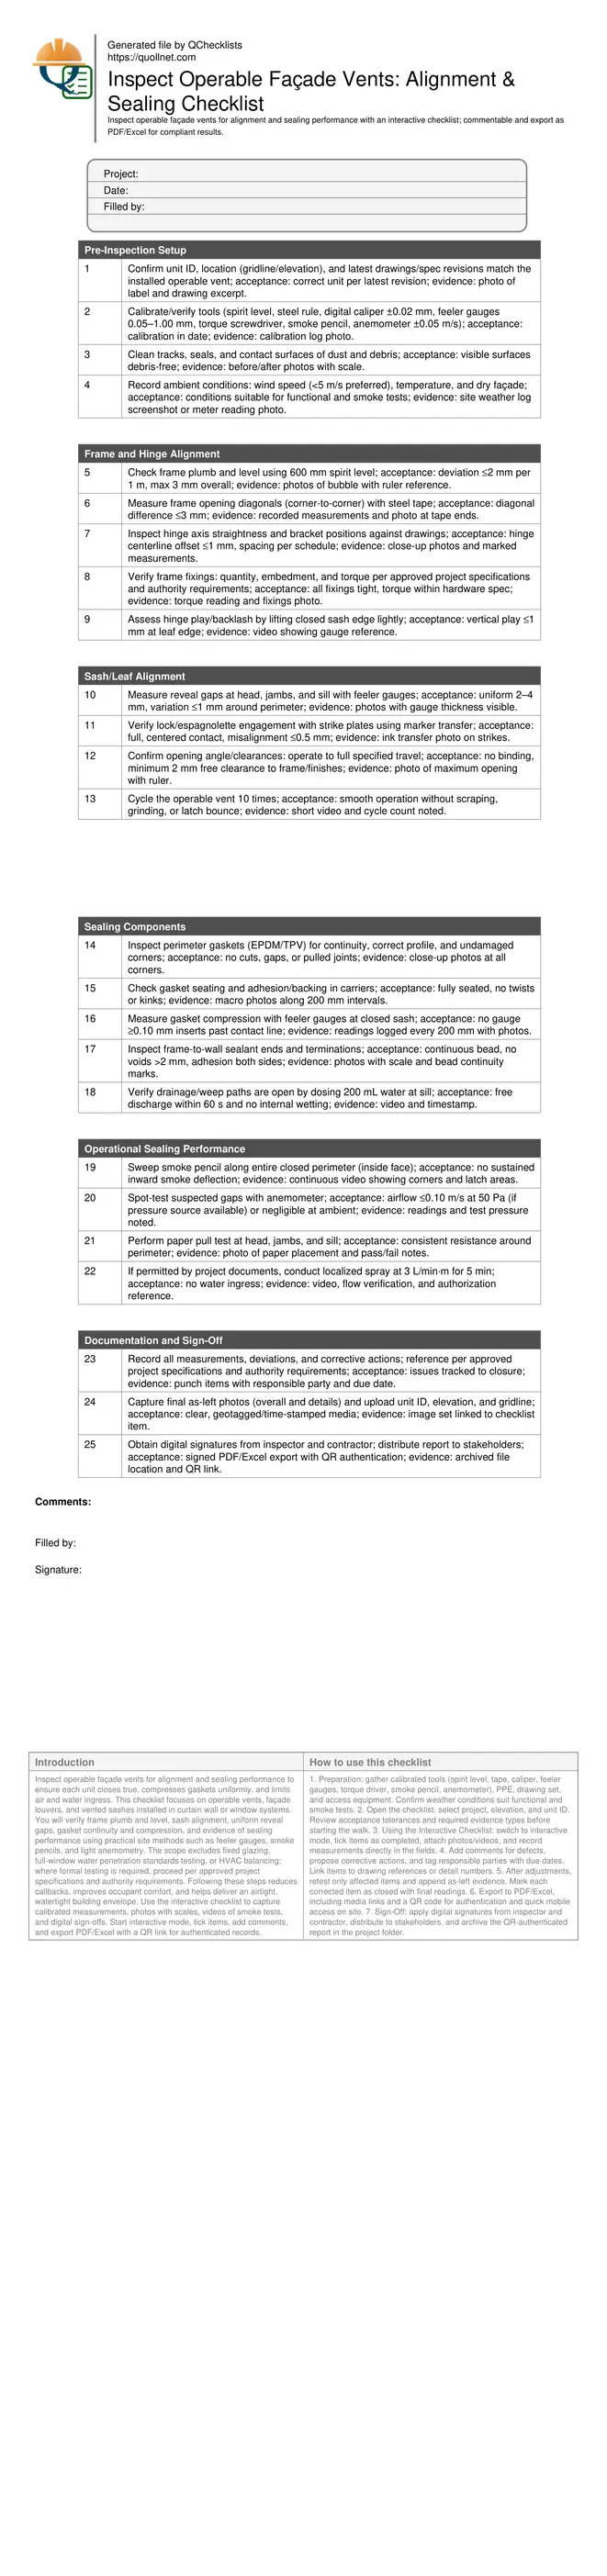
Inspect Operable Façade Vents for Alignment and Sealing Performance
Definition: Inspect operable façade vents for alignment and sealing performance on new or refurbished building envelopes, guiding site inspectors, façade engineers, and QA managers through dimensional alignment checks and seal integrity verification.
- Why alignment and seal integrity prevent drafts, leaks, and callbacks.
- Measure plumb, reveal gaps, and gasket compression with calibrated tools.
- Assess air leakage with smoke pencil, anemometer, and paper pull tests.
- Interactive, commentable checklist; export and authenticate via QR code.
Inspect operable façade vents for alignment and sealing performance to ensure each unit closes true, compresses gaskets uniformly, and limits air and water ingress. This checklist focuses on operable vents, façade louvers, and vented sashes installed in curtain wall or window systems. You will verify frame plumb and level, sash alignment, uniform reveal gaps, gasket continuity and compression, and evidence of sealing performance using practical site methods such as feeler gauges, smoke pencils, and light anemometry. The scope excludes fixed glazing, full-window water penetration standards testing, or HVAC balancing; where formal testing is required, proceed per approved project specifications and authority requirements. Following these steps reduces callbacks, improves occupant comfort, and helps deliver an airtight, watertight building envelope. Use the interactive checklist to capture calibrated measurements, photos with scales, videos of smoke tests, and digital sign-offs. Start interactive mode, tick items, add comments, and export PDF/Excel with a QR link for authenticated records.
- Confirm dimensional alignment and hardware position so operable vents close squarely, avoiding binding, hinge stress, and premature wear. Document level, plumb, and diagonal measurements with photos, scales visible, and clear pass/fail tolerances to accelerate punch-list resolution and reduce rework across elevations and unit types.
- Validate gasket continuity and compression at corners, heads, jambs, and sills. Use feeler gauges, marker transfer on strikes, and cycle the sash to observe uniform contact. Evidence-driven checks reduce drafts, noise, and moisture pathways while protecting finishes and preventing mold or corrosion behind the façade line.
- Interactive online checklist with tick, comment, and export features secured by QR code. Capture photos, measurements, and approvals on-site, then share verified records with stakeholders for rapid issue resolution, sign-off tracking, and closeout documentation across project teams. All data time-stamped.
- Use practical onsite tests—smoke pencil sweeps, light anemometer readings at suspected leaks, and paper pull confirmation—to assess sealing performance. Where specified, perform controlled spray checks. Record conditions (wind, temperature), test parameters, and outcomes to demonstrate compliance and inform targeted adjustments.
Pre-Inspection Setup
Frame and Hinge Alignment
Sash/Leaf Alignment
Sealing Components
Operational Sealing Performance
Documentation and Sign-Off
Practical alignment checks that prevent binding and leaks
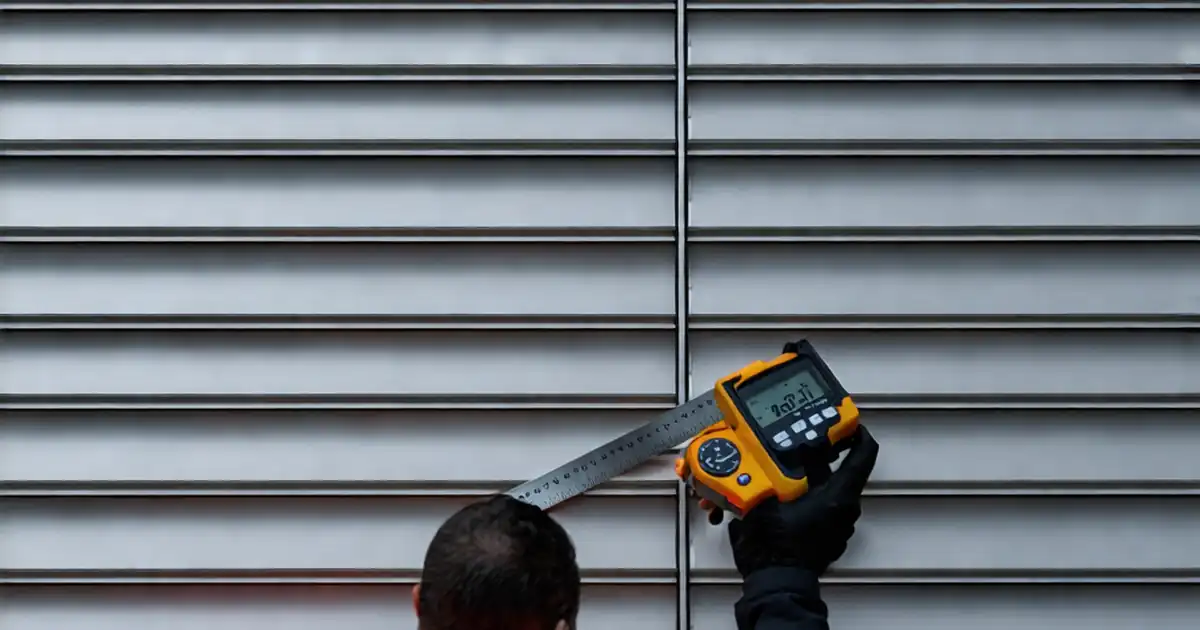
Alignment dictates whether an operable vent seals properly. Start by verifying frame level and plumb with a 600 mm spirit level; keep deviations within 2 mm per metre and no more than 3 mm overall. Measure diagonals to confirm squareness—differences should not exceed 3 mm. Small offsets drive latch misalignment and uneven gasket compression. Inspect hinge axes for straightness and correct set-out, and confirm fixings are tight to the torque specified by the hardware manufacturer per approved project specifications and authority requirements. Uniform reveal gaps (2–4 mm, variation ≤1 mm) around the leaf indicate consistent closing pressure. A common jobsite example: a 3 mm diagonal disparity created latch drag; adding a shim packer behind the top hinge bracket corrected squareness and restored smooth engagement. Always document measurements with photos, scales visible, and location references so trends can be spotted across elevations, enabling targeted adjustments before finishes conceal access points.
- Plumb/level within 2 mm per metre, 3 mm overall.
- Diagonal difference not greater than 3 mm.
- Reveal gaps 2–4 mm, variation ≤1 mm.
- Hinges straight, secure, and torqued to spec.
- Photo evidence with scales and locations.
Seal integrity: materials, compression, and quick performance cues
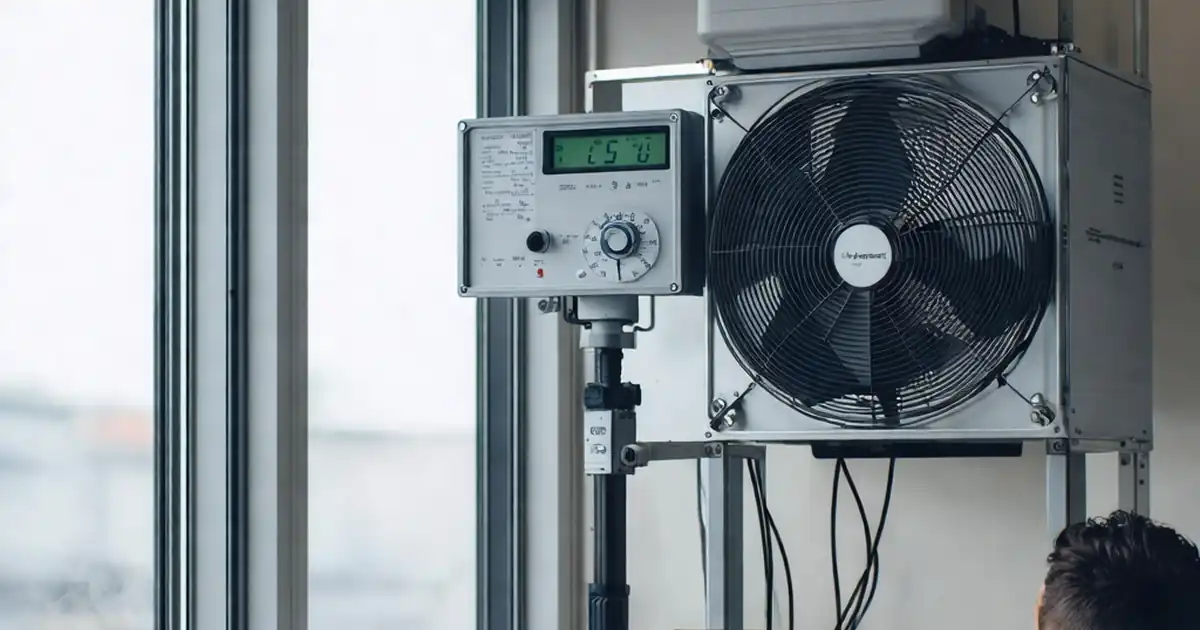
Airtightness depends on continuous, correctly compressed gaskets. Inspect EPDM/TPV profiles for tears, pulled joints, and twisted carriers, especially at corners. With the vent closed, attempt to insert a 0.10 mm feeler gauge at multiple points; it should not pass beyond the contact line. Confirm strike alignment using marker transfer for centered hardware engagement. For performance cues, sweep a smoke pencil along the internal perimeter; sustained inward deflection reveals leakage. Where available, use a sensitive anemometer to quantify suspected spots—≤0.10 m/s at 50 Pa is a practical target for site checks. Paper pull tests are quick proxies for uniform compression. If project documents authorize, conduct a controlled localized spray to observe water behavior without overloading seals. Record all test parameters—wind, temperature, duration—so results remain defensible and repeatable during commissioning, snagging, and warranty audits.
- Gaskets continuous, undamaged, corners intact.
- Feeler gauge 0.10 mm must not pass the seal.
- Centered latch contact verified by transfer.
- Smoke shows direction; sustained in-draft fails.
- Optional spray only if documents permit.
Evidence-led closeout and traceability
Reliable records transform inspections into actionable quality control. Use calibrated tools and photograph readings beside visible scales. Name files with unit ID, gridline, and elevation for traceability. Video smoke sweeps and operational cycles to capture behavior that photos can miss. Note corrective actions, responsible parties, and deadlines in the checklist; re-test and attach as-left evidence. Export signed reports (PDF/Excel) with embedded QR codes so anyone onsite can open the exact record from a mobile device. This reduces disputes and accelerates approvals. When conditions (e.g., high wind or rain) compromise testing, defer or simulate with a controlled fan, and log rationale. Where acceptance criteria are not explicitly stated, align outcomes per approved project specifications and authority requirements. Consistent documentation across identical units helps identify systemic installation issues early, allowing batch corrections before façade access becomes costly.
- Photos and videos with scales and timestamps.
- Link items to unit ID and elevation.
- Assign actions and retest before sign-off.
- Export with QR for quick onsite access.
- Log conditions influencing test validity.
How to Use This Operable Façade Vent Inspection Checklist
- Preparation: gather calibrated tools (spirit level, tape, caliper, feeler gauges, torque driver, smoke pencil, anemometer), PPE, drawing set, and access equipment. Confirm weather conditions suit functional and smoke tests.
- Open the checklist, select project, elevation, and unit ID. Review acceptance tolerances and required evidence types before starting the walk.
- Using the Interactive Checklist: switch to interactive mode, tick items as completed, attach photos/videos, and record measurements directly in the fields.
- Add comments for defects, propose corrective actions, and tag responsible parties with due dates. Link items to drawing references or detail numbers.
- After adjustments, retest only affected items and append as-left evidence. Mark each corrected item as closed with final readings.
- Export to PDF/Excel, including media links and a QR code for authentication and quick mobile access on site.
- Sign-Off: apply digital signatures from inspector and contractor, distribute to stakeholders, and archive the QR-authenticated report in the project folder.
Call to Action
- Start Checklist Tick off tasks, leave comments on items or the whole form, and export your completed report to PDF or Excel—with a built-in QR code for authenticity.
- Download Excel - Operable Façade Vent Inspection
- Download PDF - Operable Façade Vent Inspection
- View Image - Operable Façade Vent Inspection
Cite & Embed
“Operable Façade Vent Inspection by Quollnet”
with a link to
this source page.
FAQ
Question: What tolerances should I use for operable façade vent alignment?
Question: How can I assess sealing performance without specialized lab equipment?
Question: What should I do if weather conditions are unsuitable for testing?
Question: How do I document adjustments and prove issues are resolved?
Related Articles
Broader reading and guidance connected to this checklist topic.


Ncr Form Template (excel/pdf) – Non-conformance Report Format

Fidic Site Instruction Form – Free Download And Usage Tips
Related Checklists
Keep the workflow moving with nearby templates chosen from similar checklist content.