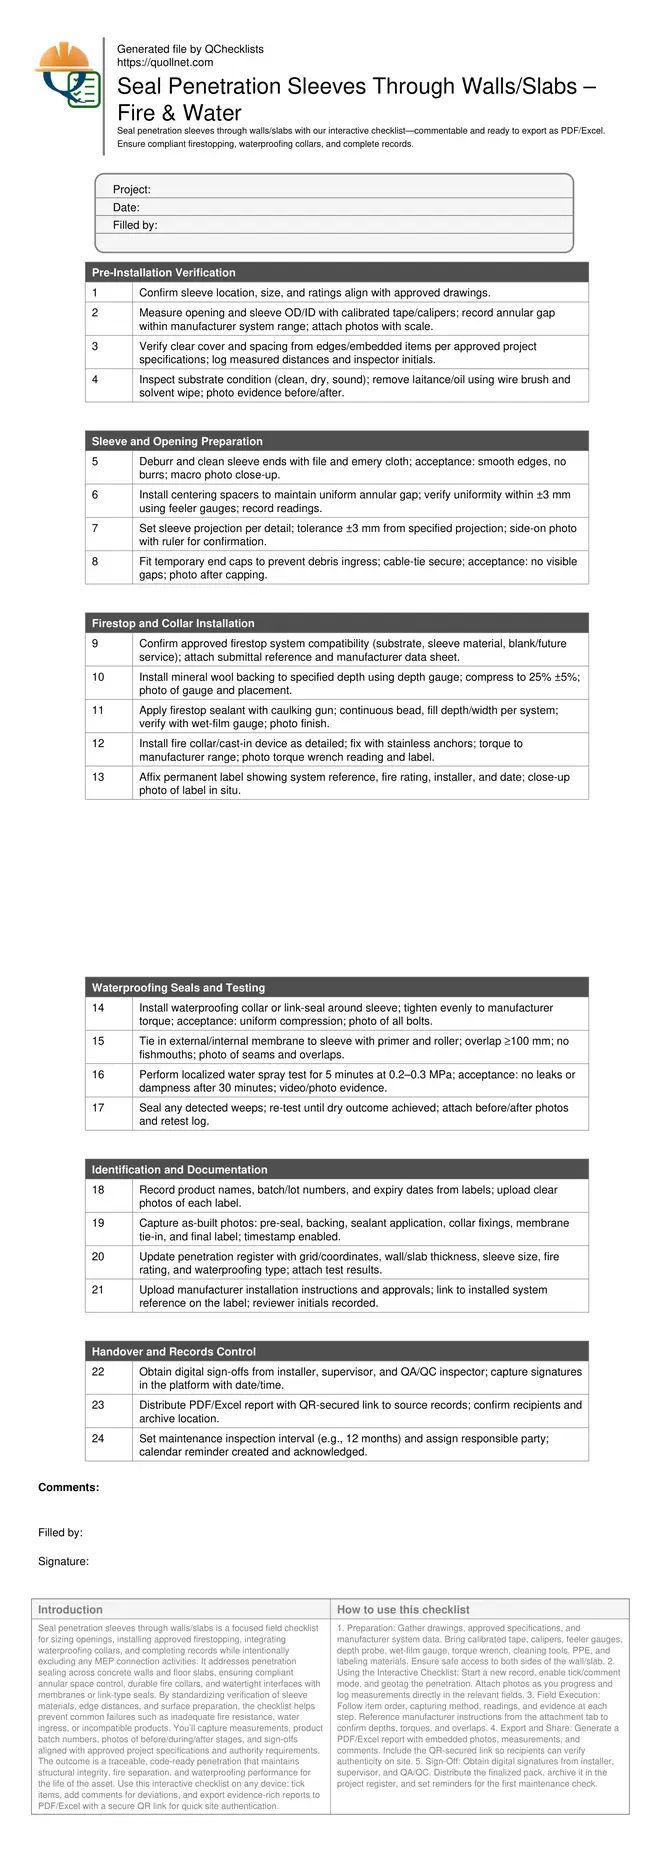
Seal Penetration Sleeves Through Walls/Slabs Checklist
Definition: Seal penetration sleeves through walls/slabs checklist guides contractors to size openings, install firestop and waterproofing collars, and maintain records, excluding MEP connections, to deliver compliant, durable, and leak-free penetrations.
- Verify sleeve size, annular gap, and substrate condition before sealing.
- Install compatible firestop systems and collars per approved specifications.
- Integrate waterproofing collars and membranes; test for leak-tightness.
- Interactive, commentable, export options with QR code for authentication.
Seal penetration sleeves through walls/slabs is a focused field checklist for sizing openings, installing approved firestopping, integrating waterproofing collars, and completing records while intentionally excluding any MEP connection activities. It addresses penetration sealing across concrete walls and floor slabs, ensuring compliant annular space control, durable fire collars, and watertight interfaces with membranes or link-type seals. By standardizing verification of sleeve materials, edge distances, and surface preparation, the checklist helps prevent common failures such as inadequate fire resistance, water ingress, or incompatible products. You’ll capture measurements, product batch numbers, photos of before/during/after stages, and sign-offs aligned with approved project specifications and authority requirements. The outcome is a traceable, code-ready penetration that maintains structural integrity, fire separation, and waterproofing performance for the life of the asset. Use this interactive checklist on any device: tick items, add comments for deviations, and export evidence-rich reports to PDF/Excel with a secure QR link for quick site authentication.
- This checklist streamlines sleeve sealing through walls and slabs by standardizing measurements, substrate preparation, and approved firestop systems. It prioritizes compatible collars, correct annular gaps, and reliable waterproofing tie-ins to prevent leaks and protect fire compartments.
- Each step specifies a method, tool, and acceptance criterion, enabling fast field decisions and objective sign-off. Teams capture labelled photos, torque and gauge readings, and batch numbers for a defensible audit trail across construction and commissioning phases.
- Waterproofing integrity is verified with methodical tie-ins and targeted water testing, reducing rework in basements and wet areas. Clear records integrate into the penetration register, improving traceability, warranty compliance, and maintenance planning after handover.
- Interactive online checklist with tick, comment, and export features secured by QR code. Field teams collaborate in real time, annotate deviations, and generate PDF/Excel packs that align with approved project specifications and authority requirements.
Pre-Installation Verification
Sleeve and Opening Preparation
Firestop and Collar Installation
Waterproofing Seals and Testing
Identification and Documentation
Handover and Records Control
Planning, Sizing, and Acceptance Cues
Successful sealing starts with accurate layout and sleeve control. Confirm sleeve size, wall or slab thickness, and fire/water requirements against approved drawings. Measure the annular gap with calibrated tools and keep it within the manufacturer’s qualified system range; uniformity matters as much as size. Substrates must be clean, dry, and sound—laitance, dust, or oil undermine adhesion and long-term performance. Maintain specified clear cover and edge distances to protect structural and durability requirements. Use centering spacers to keep the gap consistent around the sleeve and set the projection to match the detail. On dense reinforcement or retrofits, core-drilling may slightly ovalize openings; compensate with spacers and verify uniformity using feeler gauges at four quadrants. Thorough pre-checks save costly rework later and provide the baseline for auditable records and sign-off.
- Measure annular gap and uniformity with calibrated gauges.
- Verify clear cover and edge distances match drawings.
- Clean, dry, sound substrates ensure adhesion and longevity.
- Use spacers to control sleeve concentricity and projection.
Firestopping Systems and Collars That Fit
Choose a firestop system compatible with the substrate and sleeve materials. For blank or future-use sleeves, mineral wool backing plus sealant often delivers the rating, while some conditions require a tested fire collar or cast-in device. Follow the manufacturer’s depth, density, and bead size; verify with depth probes and wet-film gauges. Anchor collars with stainless hardware to the required torque, then label with the system reference and fire rating. Avoid overfilling sealant, which can slump, and underfilling, which reduces the rating. Where sleeves pass through both fire and wet zones, coordinate the sequence so the firestop remains continuous after any waterproofing works. Field photos at each stage and installer initials create a defensible record and help during third-party inspections.
- Match system to sleeve, substrate, and rating needs.
- Control backing density and sealant depth with gauges.
- Torque collar fixings to manufacturer’s specification.
- Apply durable labels showing system reference and rating.
Waterproofing Integration and Traceable Records
Waterproofing collars, link-seals, or puddle flanges must be compatible with surrounding membranes. Prime and roll overlaps to achieve a tight bond; avoid fishmouths and wrinkles. For critical areas, use localized spray testing to confirm seal integrity before finishes proceed. Address leaks immediately, then retest to closure. Comprehensive documentation is as important as installation: capture batch/lot numbers, expiry dates, and installation instructions; upload photos of each stage; and update the penetration register with coordinates, sizes, ratings, and test outcomes. Distribute QR-secured reports to stakeholders so anyone on site can validate the as-built with a scan. Clear records streamline approvals, warranties, and future maintenance when services are finally pulled through the sleeve.
- Tie membranes to sleeves with primed, well-rolled overlaps.
- Verify watertightness with targeted spray testing.
- Record batch numbers, labels, and staged photos.
- Publish QR-secured reports for easy site authentication.
How to Use This Interactive Sleeve Sealing Checklist
- Preparation: Gather drawings, approved specifications, and manufacturer system data. Bring calibrated tape, calipers, feeler gauges, depth probe, wet-film gauge, torque wrench, cleaning tools, PPE, and labeling materials. Ensure safe access to both sides of the wall/slab.
- Using the Interactive Checklist: Start a new record, enable tick/comment mode, and geotag the penetration. Attach photos as you progress and log measurements directly in the relevant fields.
- Field Execution: Follow item order, capturing method, readings, and evidence at each step. Reference manufacturer instructions from the attachment tab to confirm depths, torques, and overlaps.
- Export and Share: Generate a PDF/Excel report with embedded photos, measurements, and comments. Include the QR-secured link so recipients can verify authenticity on site.
- Sign-Off: Obtain digital signatures from installer, supervisor, and QA/QC. Distribute the finalized pack, archive it in the project register, and set reminders for the first maintenance check.
Call to Action
- Start Checklist Tick off tasks, leave comments on items or the whole form, and export your completed report to PDF or Excel—with a built-in QR code for authenticity.
- Download Excel - Seal Penetration Sleeves Through Walls/Slabs
- Download PDF - Seal Penetration Sleeves Through Walls/Slabs
- View Image - Seal Penetration Sleeves Through Walls/Slabs
Cite & Embed
“Seal Penetration Sleeves Through Walls/Slabs by Quollnet”
with a link to
this source page.

FAQ
Question: What annular gap should I maintain around the sleeve for sealing?
Question: When is a fire collar required instead of only sealant around the sleeve?
Question: How should I verify waterproofing performance after installing collars or link-seals?
Question: Why must I record batch and expiry details for firestop and sealing products?
Related Articles
Broader reading and guidance connected to this checklist topic.


Is It Important To Customize Your Qr Code And How To Do It?
Related Checklists
Keep the workflow moving with nearby templates chosen from similar checklist content.