Basement Wall Reinforcement and Embeds (Vertical) Inspection
Definition: Basement Wall Reinforcement and Embeds (Vertical) Inspection is a jobsite checklist for structural inspectors and site engineers focusing on vertical rebar, embeds, openings, and sleeves before concrete placement.
- Verify vertical rebar spacing and lap lengths meet approved drawings.
- Confirm concrete cover using gauges and approved spacers, before pour.
- Check openings, sleeves, and embeds alignment, edges, and clearances.
- Interactive, commentable checklist with export and QR code verification.
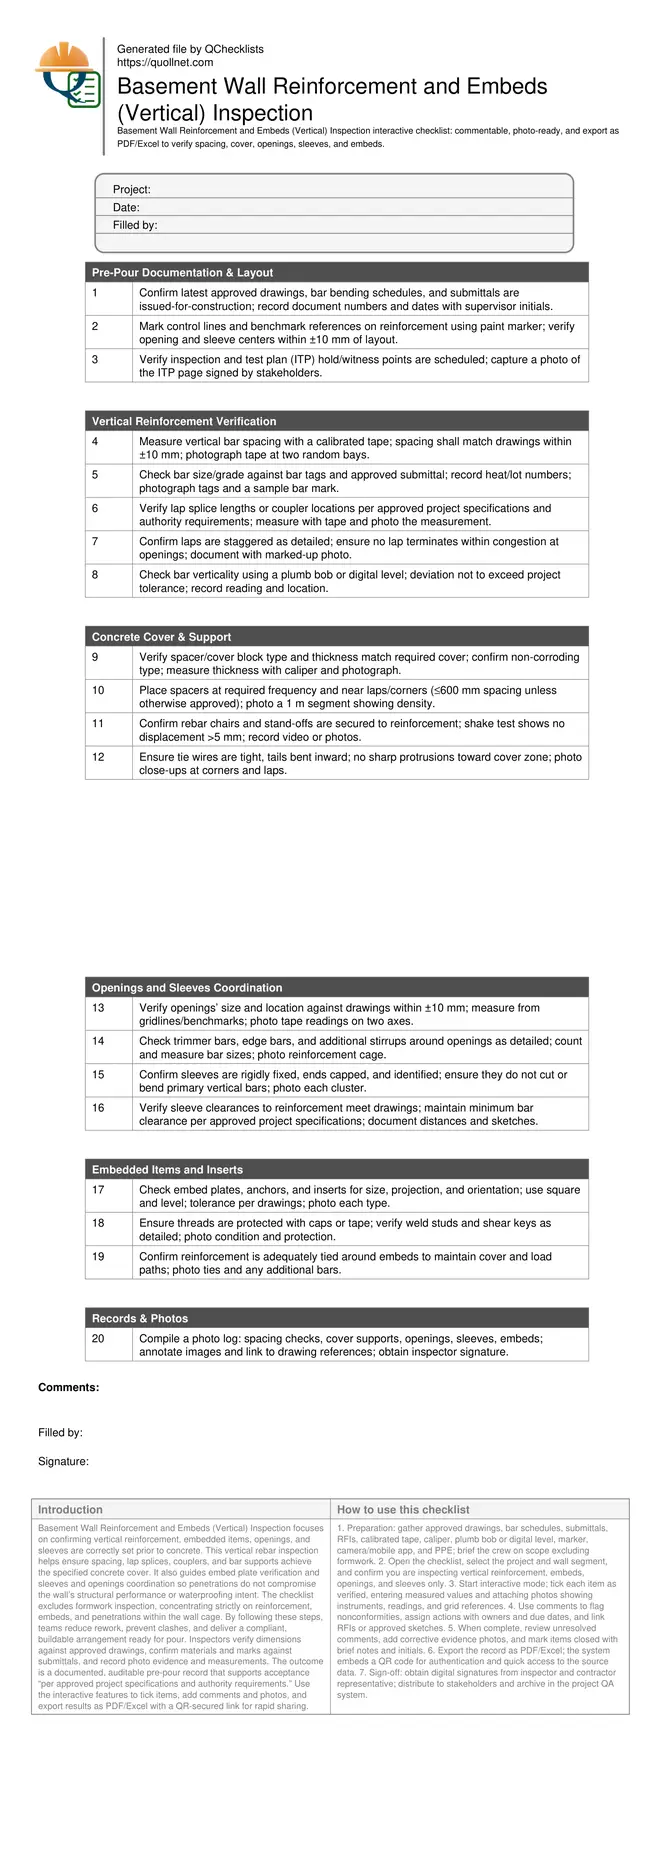
Basement Wall Reinforcement and Embeds (Vertical) Inspection focuses on confirming vertical reinforcement, embedded items, openings, and sleeves are correctly set prior to concrete. This vertical rebar inspection helps ensure spacing, lap splices, couplers, and bar supports achieve the specified concrete cover. It also guides embed plate verification and sleeves and openings coordination so penetrations do not compromise the wall’s structural performance or waterproofing intent. The checklist excludes formwork inspection, concentrating strictly on reinforcement, embeds, and penetrations within the wall cage. By following these steps, teams reduce rework, prevent clashes, and deliver a compliant, buildable arrangement ready for pour. Inspectors verify dimensions against approved drawings, confirm materials and marks against submittals, and record photo evidence and measurements. The outcome is a documented, auditable pre-pour record that supports acceptance “per approved project specifications and authority requirements.” Use the interactive features to tick items, add comments and photos, and export results as PDF/Excel with a QR-secured link for rapid sharing.
- This checklist targets vertical reinforcement, embeds, and penetrations in basement walls before concrete placement. It streamlines verification of spacing, laps or couplers, concrete cover, and the alignment of openings and sleeves, reducing clashes and stoppages while producing traceable evidence tied to drawings, submittals, and approvals.
- Interactive online checklist with tick, comment, and export features secured by QR code. Field teams capture photos, measurements, and signatures in real time, then generate verifiable records that supervisors, designers, and owners can review instantly without version conflicts or emailing outdated spreadsheets.
- Methodical prompts ensure vertical bars, ties, spacers, embeds, and sleeves match approved layouts and tolerances. The process highlights common nonconformities—insufficient cover, misaligned inserts, conflicted sleeves—and requires corrective actions, documented approvals, and photographic closeouts to prevent rework and protect durability and waterproofing outcomes.
Pre-Pour Documentation & Layout
Vertical Reinforcement Verification
Concrete Cover & Support
Openings and Sleeves Coordination
Embedded Items and Inserts
Records & Photos
Vertical Reinforcement: Spacing, Laps, and Alignment
Accurate vertical rebar placement prevents cracking, limits deflection, and maintains load paths in basement walls. Begin by confirming bar size and grade from tags and submittals, then verify spacing using a calibrated tape across multiple bays. Tolerances typically allow small placement variation, but rely on approved drawings and authority requirements for acceptance. Laps must meet the specified development length and be staggered away from openings and congestion. Where couplers replace laps, check coupler type, location, and manufacturer markings; note any torque mark or witness line if applicable. Assess verticality with a plumb bob or digital level to ensure bars remain within project tolerance, supporting proper cover and fit for embedded items. Record each measurement with clear photos that show the instrument, the reading, and a recognizable reference like a grid label or bench mark. This evidence speeds approvals, reduces rework, and safeguards structural performance.
- Measure spacing at several bays and heights.
- Photograph tape readings with grid references.
- Stagger laps away from openings and corners.
- Verify coupler markings and locations.
- Check verticality with level or plumb bob.
Concrete Cover and Bar Support Strategy
Concrete cover protects reinforcement against corrosion and ensures fire and durability performance. Confirm spacer types (plastic, concrete, or composite) match the specified cover and environmental exposure. Use a caliper to verify spacer thickness and document lot or approval references. Distribute spacers closely near laps, corners, and around embedded items so the cage resists movement during placing and vibration. Ensure stand-offs and chairs are tied to bars and cannot slide or rotate; unsecured supports commonly lead to reduced cover and repair work. Tie wire tails should face inward so they do not encroach on the cover zone. Avoid ad-hoc packing shims not listed in approvals. Where dense cages risk movement, add temporary ties and record the reinforcement holds. Acceptance remains strictly per approved project specifications and authority requirements, supported by measured spacer density and photographed evidence along representative lengths and at critical details.
- Verify spacer type and thickness with caliper.
- Increase spacer density near laps and corners.
- Secure chairs and stand-offs to reinforcement.
- Keep tie tails away from cover zones.
- Avoid unapproved shims or packing.
Openings, Sleeves, and Embedded Items Coordination
Penetrations and embeds must align with design while preserving reinforcement continuity. Locate opening edges and sleeve centers from gridlines and benchmarks, confirming both axes within the stated tolerance. Provide trimmer and edge bars exactly as detailed; never cut primary bars to suit sleeves without approved instructions. Fix sleeves rigidly, cap ends, and label services to prevent accidental grout ingress and future mix-ups. For embedded plates, anchors, and inserts, verify orientation, projection, and cleanliness; protect threads and confirm welding features. Reinforcement around embeds should be tied to maintain cover and avoid honeycombing. Document every check with photos that include a rule or tape and a visible reference mark. Before pour release, ensure all clashes are resolved with an approved sketch or RFI record and that acceptance remains per approved project specifications and authority requirements.
- Measure from grids for sleeve and opening locations.
- Provide detailed trimmer and edge bars.
- Protect and label sleeves; cap ends.
- Verify embed orientation and projection.
- Tie bars around embeds to maintain cover.
How to Use This Interactive Inspection Checklist
- Preparation: gather approved drawings, bar schedules, submittals, RFIs, calibrated tape, caliper, plumb bob or digital level, marker, camera/mobile app, and PPE; brief the crew on scope excluding formwork.
- Open the checklist, select the project and wall segment, and confirm you are inspecting vertical reinforcement, embeds, openings, and sleeves only.
- Start interactive mode; tick each item as verified, entering measured values and attaching photos showing instruments, readings, and grid references.
- Use comments to flag nonconformities, assign actions with owners and due dates, and link RFIs or approved sketches.
- When complete, review unresolved comments, add corrective evidence photos, and mark items closed with brief notes and initials.
- Export the record as PDF/Excel; the system embeds a QR code for authentication and quick access to the source data.
- Sign-off: obtain digital signatures from inspector and contractor representative; distribute to stakeholders and archive in the project QA system.
Call to Action
- Start Checklist Tick off tasks, leave comments on items or the whole form, and export your completed report to PDF or Excel—with a built-in QR code for authenticity.
- Download Excel - Basement Wall Reinforcement & Embeds (Vertical) Inspection
- Download PDF - Basement Wall Reinforcement & Embeds (Vertical) Inspection
- View Image - Basement Wall Reinforcement & Embeds (Vertical) Inspection
Cite & Embed
“Basement Wall Reinforcement & Embeds (Vertical) Inspection by Quollnet”
with a link to
this source page.

FAQ
Question: What spacing and tolerance should I apply for vertical bars in basement walls?
Question: How can I verify concrete cover without inspecting formwork directly?
Question: What should I do if a sleeve conflicts with a primary vertical bar?
Question: When are embedded plates and inserts considered ready for pour?
Related Articles
Broader reading and guidance connected to this checklist topic.


Is The Crack You See On Your Wall Serious Or Minor Cosmetic Issue?
Related Checklists
Keep the workflow moving with nearby templates chosen from similar checklist content.