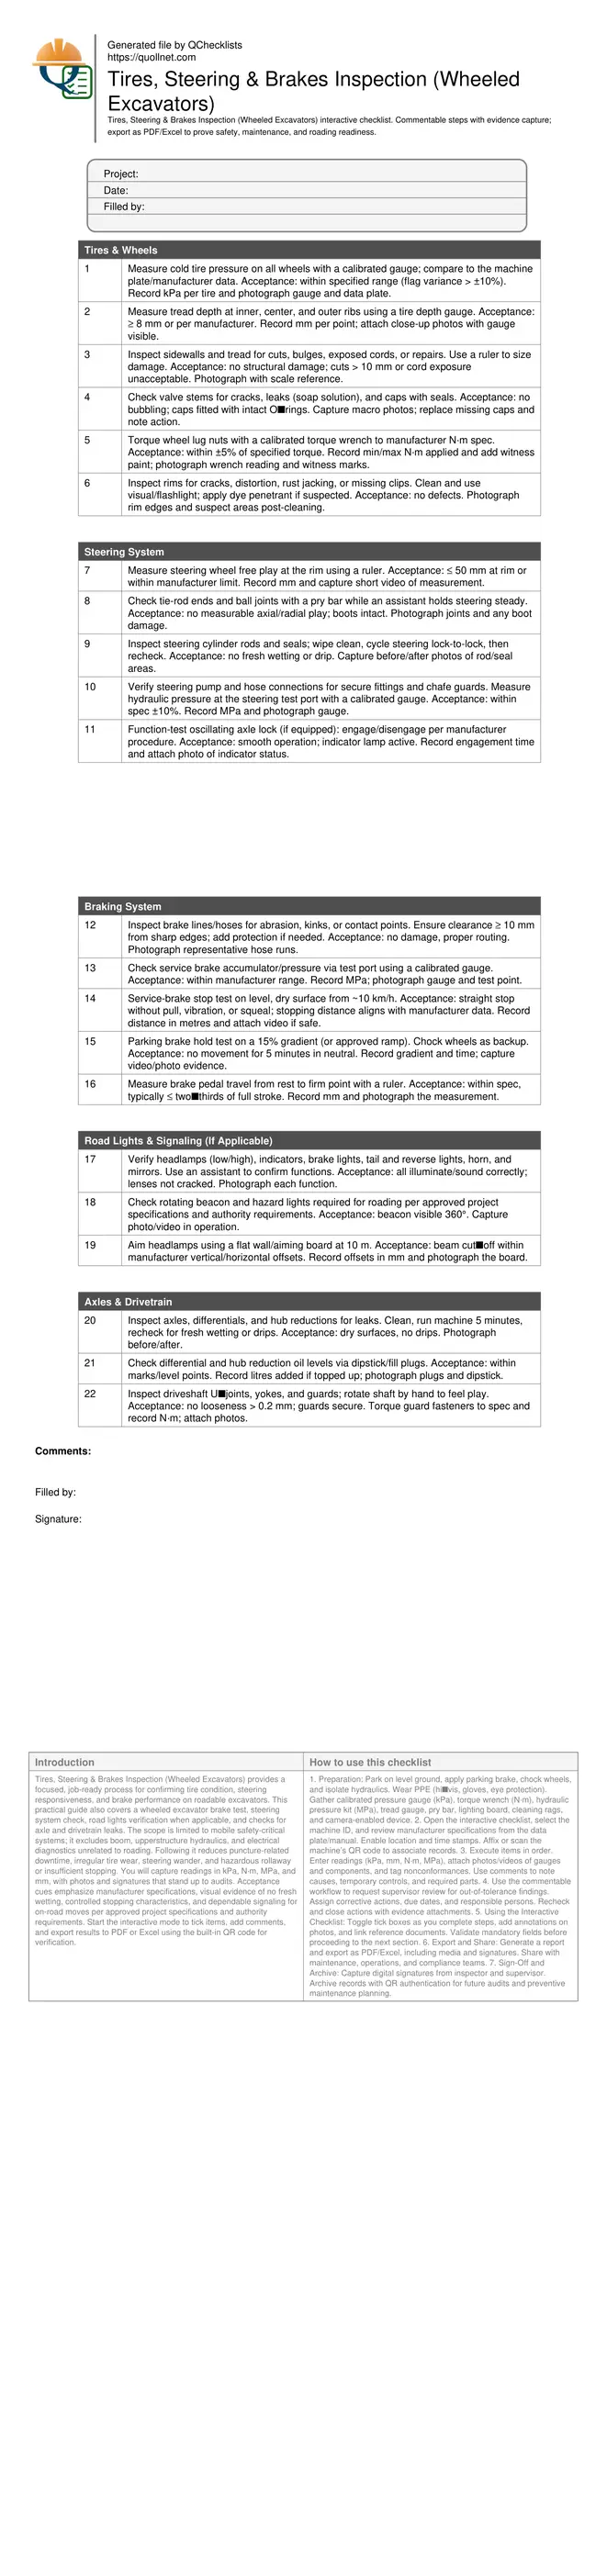
Tires, Steering & Brakes Inspection (Wheeled Excavators)
Definition: Tires, Steering & Brakes Inspection (Wheeled Excavators) directs field technicians to verify tire integrity, steering responsiveness, braking performance, road lighting, and axle/drivetrain leaks for safe, compliant roading and site movement.
- Verify tire pressure, tread, and lug torque to manufacturer specifications.
- Measure steering play and brake performance to prevent drift and rollaway.
- Document leaks at axles and drivetrain to avoid component failures.
- Interactive, commentable checklist with export and QR code authentication.
Tires, Steering & Brakes Inspection (Wheeled Excavators) provides a focused, job-ready process for confirming tire condition, steering responsiveness, and brake performance on roadable excavators. This practical guide also covers a wheeled excavator brake test, steering system check, road lights verification when applicable, and checks for axle and drivetrain leaks. The scope is limited to mobile safety-critical systems; it excludes boom, upperstructure hydraulics, and electrical diagnostics unrelated to roading. Following it reduces puncture-related downtime, irregular tire wear, steering wander, and hazardous rollaway or insufficient stopping. You will capture readings in kPa, N·m, MPa, and mm, with photos and signatures that stand up to audits. Acceptance cues emphasize manufacturer specifications, visual evidence of no fresh wetting, controlled stopping characteristics, and dependable signaling for on-road moves per approved project specifications and authority requirements. Start the interactive mode to tick items, add comments, and export results to PDF or Excel using the built-in QR code for verification.
- Focus on tire pressure, tread health, and wheel fastener torque using calibrated tools. Evidence includes kPa readings, depth in millimetres, N·m torque logs, and geo‑tagged photos of gauges and identification plates for clarity and traceability.
- Steering responsiveness is validated through measured free play at the wheel rim, linkage inspection, cylinder seal checks, and hydraulic pressure readings. Outcomes include straighter tracking, predictable response, and early detection of joint wear or hydraulic fatigue.
- Brake reliability is proven with accumulator/pressure checks, service-brake stops on level ground, and parking-brake hold on a 15% gradient. The process reduces pull, fade, and creep risks while delivering recorded distances, MPa values, and videos.
- Interactive online checklist with tick, comment, and export features secured by QR code. Teams create auditable records, share PDF/Excel reports, and assign corrective actions immediately, aligning with manufacturer specifications and project or authority requirements for roading.
Tires & Wheels
Steering System
Braking System
Road Lights & Signaling (If Applicable)
Axles & Drivetrain
Why Tire and Wheel Accuracy Dictates Mobile Safety
Tire health on wheeled excavators directly influences stability, braking, and steering performance. Cold pressure should be verified in kilopascals against the machine plate, allowing no more than a ±10% variance to prevent heat build-up or bead unseating. Recording tread depth at inner, center, and outer ribs exposes misalignment and underinflation wear patterns. Sidewall cuts, bulges, and any exposed cords are immediate red flags, as carcass failures often begin at minor-looking defects. Lug torque matters just as much: under‑torque permits fretting and stud fatigue; over‑torque risks stretching studs and distorted rims. Applying a calibrated torque wrench to the manufacturer’s N·m specification and marking witness paint ensures repeatable security. Documenting evidence—kPa readings, depth in millimetres, torque ranges, and photos of gauges and witness marks—creates an auditable trail and speeds corrective action approval. On real jobs, teams catch mismatched pressures after a tire swap and avoid roadside failures by re‑torquing wheels after initial settling.
- Capture cold pressure kPa and photo the data plate.
- Measure tread at three points across each tire.
- Witness-mark lug nuts after torque verification.
- Reject tires with bulges, deep cuts, or exposed cords.
- Record serials and corrective actions for traceability.
Steering and Brake Confidence Through Measured Tests
Small steering faults become big alignment issues at transport speed. Measure steering wheel free play at the rim and compare with manufacturer limits; excessive movement points to worn tie‑rod ends or joints. Inspect cylinder rods and seals for fresh wetting after cycling lock‑to‑lock to rule out leakage that degrades response. For brakes, combine a pressure/accumulator check (MPa) with functional tests. On a level, dry surface, complete a service‑brake stop around 10 km/h and confirm straight, predictable deceleration without pull or vibration. On a 15% gradient, the parking brake must hold for five minutes with transmission in neutral and wheels chocked as a safeguard. Pedal travel beyond two‑thirds stroke signals adjustment or component wear. Field teams often uncover chafed hoses and insufficient accumulator charge that would otherwise reduce stopping power under load.
- Record steering free play in millimetres at rim.
- Check ball joints for boot tears and looseness.
- Log brake pressure readings in MPa with photos.
- Prove straight, even stops without pull or noise.
- Verify parking brake hold on a 15% slope.
Leaks, Road Lights, and Readiness for Legal Roading
Axle, differential, and hub reduction leaks progress from dampness to drips, drawing in debris that accelerates wear. Clean suspected areas, run the machine briefly, and re‑inspect for fresh wetting to differentiate old residue from active leaks. Confirm differential and hub oil levels at dipsticks or level plugs, recording any litres added. Driveshaft U‑joints must rotate without perceptible play; guards must be present and tight. For roading, road lights and signaling become safety‑critical. Verify headlamps, indicators, brake and tail lamps, reverse alarm, beacon, and horn. Aim headlamps using an aiming board at 10 m to achieve the manufacturer’s pattern, capturing the offsets. Ensure beacon visibility 360° when required per approved project specifications and authority requirements. Photos and short clips create defensible evidence that the machine is road‑ready, preventing rejection at site gates or during spot checks.
- Differentiate active leaks with a clean–run–recheck method.
- Maintain oil level within dipstick marks or fill ports.
- Confirm beacon visibility and lamp function.
- Photograph lighting tests and aiming results.
- Tighten guards; document torque values.
How to Use This Interactive Tires, Steering & Brakes Checklist
- Preparation: Park on level ground, apply parking brake, chock wheels, and isolate hydraulics. Wear PPE (hi‑vis, gloves, eye protection). Gather calibrated pressure gauge (kPa), torque wrench (N·m), hydraulic pressure kit (MPa), tread gauge, pry bar, lighting board, cleaning rags, and camera-enabled device.
- Open the interactive checklist, select the machine ID, and review manufacturer specifications from the data plate/manual. Enable location and time stamps. Affix or scan the machine’s QR code to associate records.
- Execute items in order. Enter readings (kPa, mm, N·m, MPa), attach photos/videos of gauges and components, and tag nonconformances. Use comments to note causes, temporary controls, and required parts.
- Use the commentable workflow to request supervisor review for out-of-tolerance findings. Assign corrective actions, due dates, and responsible persons. Recheck and close actions with evidence attachments.
- Using the Interactive Checklist: Toggle tick boxes as you complete steps, add annotations on photos, and link reference documents. Validate mandatory fields before proceeding to the next section.
- Export and Share: Generate a report and export as PDF/Excel, including media and signatures. Share with maintenance, operations, and compliance teams.
- Sign-Off and Archive: Capture digital signatures from inspector and supervisor. Archive records with QR authentication for future audits and preventive maintenance planning.
Call to Action
- Start Checklist Tick off tasks, leave comments on items or the whole form, and export your completed report to PDF or Excel—with a built-in QR code for authenticity.
- Download Excel - Wheeled Excavator Tires, Steering & Brakes Inspection
- Download PDF - Wheeled Excavator Tires, Steering & Brakes Inspection
- View Image - Wheeled Excavator Tires, Steering & Brakes Inspection
Cite & Embed
“Wheeled Excavator Tires, Steering & Brakes Inspection by Quollnet”
with a link to
this source page.

FAQ
Question: How often should a Tires, Steering & Brakes inspection be performed on wheeled excavators?
Question: Should I adjust tire pressure when the tires are hot from operation?
Question: What if there is no safe area to perform the service-brake stop test?
Question: What torque tolerance should I use for wheel lug nuts?
Related Articles
Broader reading and guidance connected to this checklist topic.

Is It Important To Customize Your Qr Code And How To Do It?


Master Construction Project Cashflow With Cashflowpot

Related Checklists
Keep the workflow moving with nearby templates chosen from similar checklist content.