Excavator Daily Pre-Start Walkaround
Definition: Excavator Daily Pre-Start Walkaround is a standardized safety checklist for operators and supervisors to identify visible defects and verify controls before startup on crawler or wheeled excavators.
- Detect leaks, loose pins, worn teeth, and damaged guards early.
- Verify mirrors, cameras, lights, alarms, and extinguisher are operational.
- Record measurements, photos, and signatures for compliance and traceability.
- Interactive, commentable, export-ready checklist with secure QR code access.
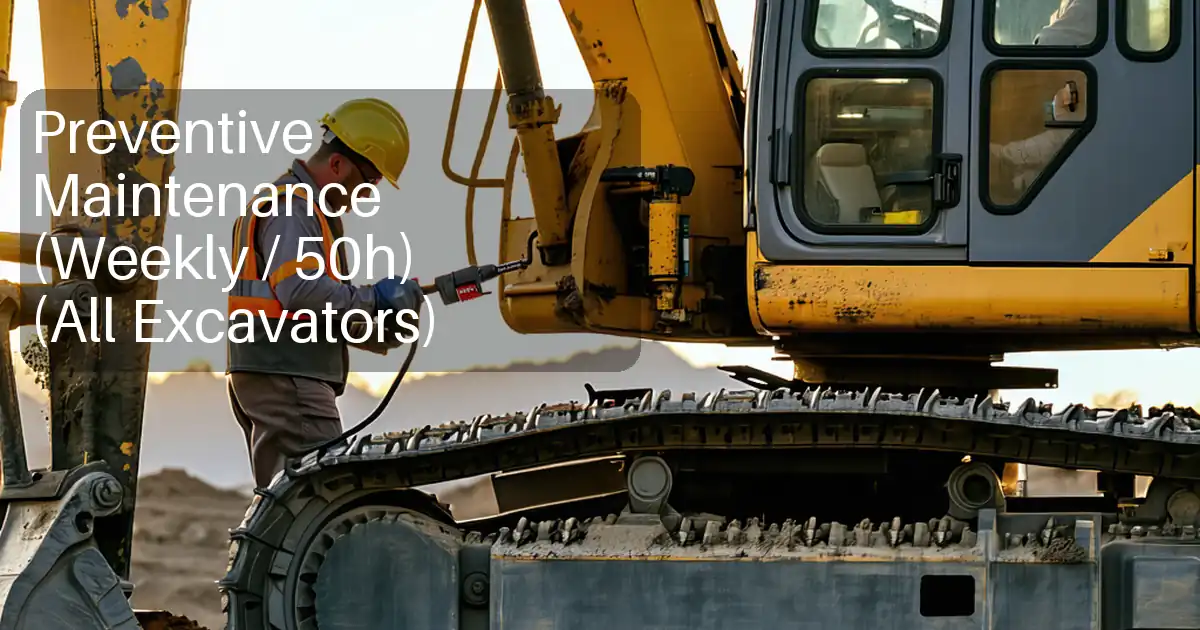
Excavator Daily Pre-Start Walkaround ensures every machine begins the shift safe, compliant, and fit for purpose. This daily pre-operation inspection, often called an excavator walk-around or prestart checklist, focuses on visible defects that cause downtime and incidents: hydraulic leaks, chafed hoses, worn pins, broken bucket teeth, missing guards, obscured mirrors or cameras, faulty alarms, out-of-date fire extinguishers, low fluids, and general damage. The scope covers all excavator types—crawler and wheeled—conducted on level ground with the engine off (unless function-testing). It excludes maintenance repairs and deep diagnostics, which must be escalated to qualified technicians per approved project specifications and authority requirements. By capturing measurements, photos, and comments, this checklist reduces unplanned stoppages, protects people and assets, and documents compliance. Begin outside-in, verify safety systems first, then undercarriage, structures, hydraulics, attachments, and fluids, finishing with a short start-up check. Use this interactive checklist to tick items, add comments, attach photos, and export PDF/Excel with a secure QR.
- A disciplined outside-in walkaround prevents incidents by catching issues before they escalate. Operators verify safety systems, structures, undercarriage, hydraulics, attachments, and fluid levels, documenting findings with photos, readings, and signatures for reliable traceability and faster maintenance response during the shift.
- Interactive online checklist with tick, comment, and export features secured by QR code. This enables instant sharing with supervisors, service teams, and clients, streamlines defect escalation, and creates a tamper-evident audit trail that supports daily compliance across multiple excavators and crews.
- Built for crawler and wheeled excavators, the checklist uses practical cues: wipe tests for leaks, feeler/pry checks for pin wear, sight gauges for fluids, and short functional tests for alarms and lights. Clear acceptance criteria help operators decide when to proceed or stop and isolate equipment.
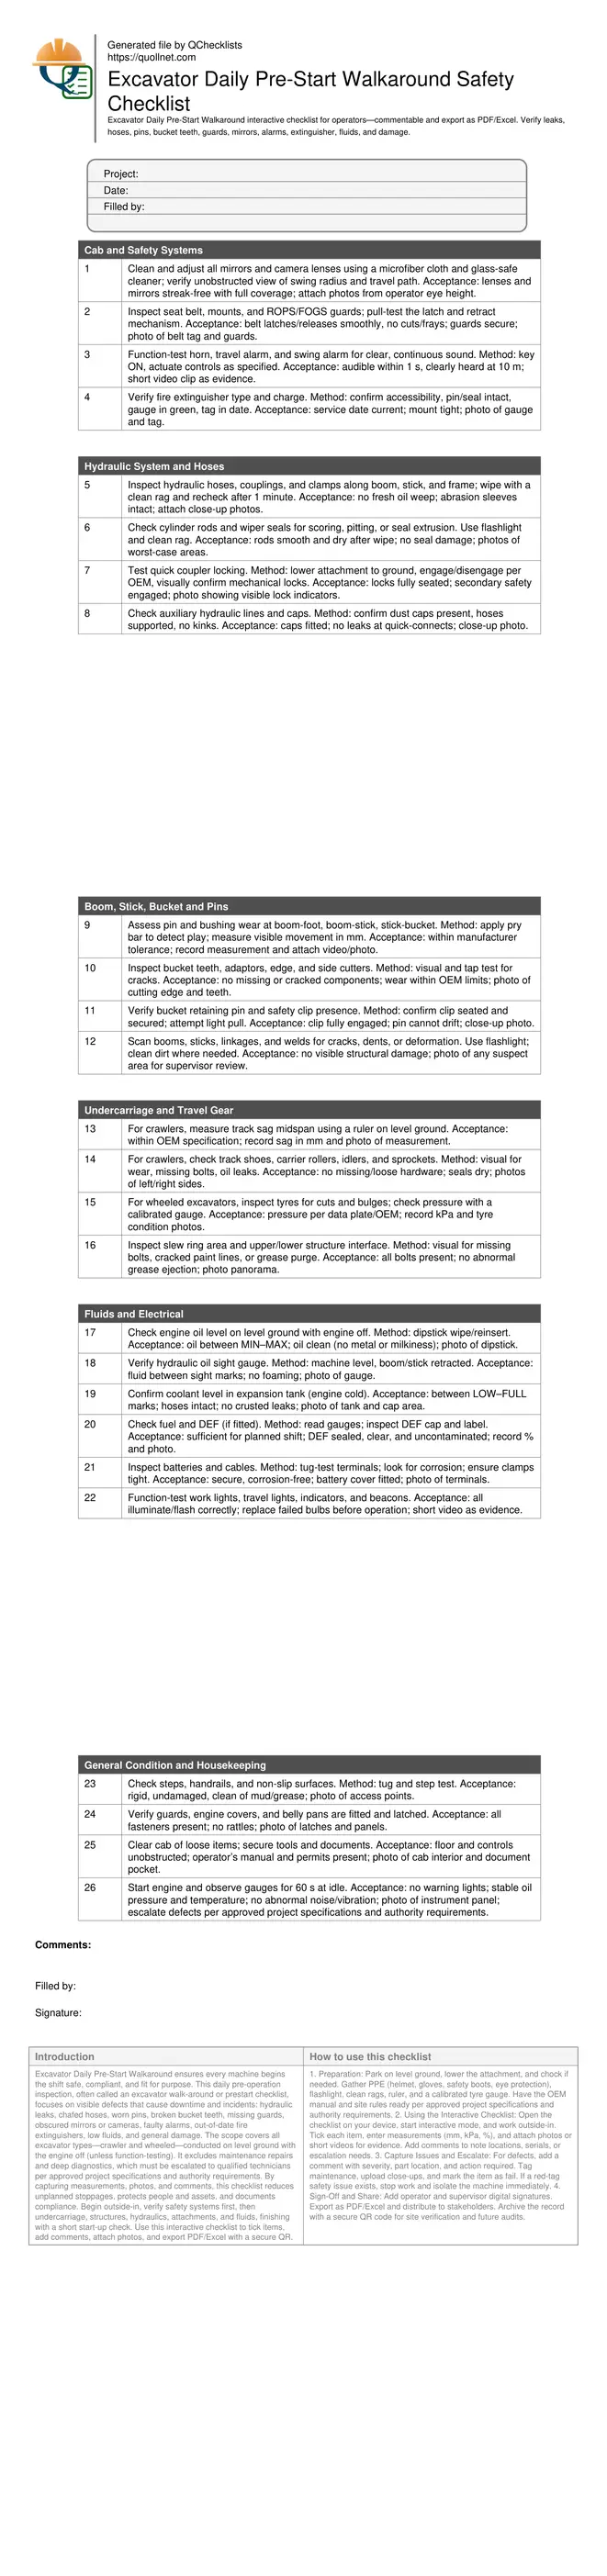
Cab and Safety Systems
Hydraulic System and Hoses
Boom, Stick, Bucket and Pins
Undercarriage and Travel Gear
Fluids and Electrical
General Condition and Housekeeping
A safe, repeatable outside-in sequence that catches critical defects
Begin the Excavator Daily Pre-Start Walkaround on stable, level ground with the engine off and the attachment grounded. Work outside-in, left-to-right, top-to-bottom for consistency. Prioritize safety systems first—mirrors, cameras, seat belt, alarms, and extinguisher—because these directly protect people in the swing and travel envelope. Move to structures and guards, confirming latches are closed and non-slip access points are solid. Continue to the undercarriage: for crawlers, measure track sag and look for missing bolts; for wheeled units, check tyres and pressures. Finish with fluids, electrics, and a brief start-up check to confirm gauges and lights stabilize. Use a flashlight and clean rag to reveal leaks and cracks hidden by dust. Capture clear photos and short videos, and record measurements to create reliable evidence. If any red-tag condition is found—such as non-functioning alarms, structural cracks, or active leaks—stop, isolate, and report before operating.
- Work outside-in for full machine coverage without missed areas.
- Verify safety systems first; they prevent immediate harm.
- Use light and wipe tests to expose subtle leaks or cracks.
- Record photos, videos, and measurements as objective evidence.
- Isolate and report red-tag conditions before operation.
Hydraulics, pins, and attachments: simple methods, clear acceptance cues
Hydraulic reliability starts with clean, intact hoses routed away from pinch points, secure clamps, and dry couplings. Wipe suspect areas, then recheck for fresh oil weep to confirm active leaks. Cylinder rods should be smooth and free of scoring; damaged wiper seals allow dirt ingress and fluid loss. For pin and bushing assessment, gently apply a pry bar to observe movement, then record the maximum play in millimetres. Acceptance is straightforward: readings within the manufacturer’s tolerance allow operation; over-limit play is escalated for service. Quick couplers must show positive lock indicators and an engaged secondary safety. Buckets should have all teeth/adaptors present, edges free of cracks, and wear within OEM guidance. Structural components—boom, stick, and linkages—must be free of visible cracks or deformation. Any suspect finding is documented with close-up photos and, where helpful, a short video for the supervisor or fitter.
- Wipe then recheck to confirm active hydraulic leaks.
- Measure pin play in mm; compare to OEM tolerance.
- Verify coupler primary lock and secondary safety.
- Confirm all teeth present; no cracked edges.
- Photograph defects and note precise locations.
Fluids, electrics, and final start-up: prevent downtime before it starts
Fluid checks are fast and decisive when performed on level ground. Engine oil by dipstick must sit between MIN–MAX with no milky contamination. Hydraulic oil should be visible between sight marks and free of foam. Coolant in the expansion tank must be within marks when cold, with no crusted residue near hose joints. Fuel and DEF levels should support the planned shift; keep DEF sealed and uncontaminated. Electrical reliability depends on clean, tight battery terminals and fully functional lights and beacons. For crawlers, verify track sag is within the data plate or OEM manual; for wheeled units, measure tyre pressures with a calibrated gauge and match the manufacturer’s kPa values. Conclude with a 60-second idle to confirm stable gauges and no warning lights. Log all readings and attach photos, then export the report for supervisors and maintenance.
- Check fluids on level ground for accurate readings.
- Record kPa, mm, and percentages; avoid guesswork.
- Keep DEF sealed to prevent contamination.
- Confirm no warning lights during 60 s idle.
- Export the report to inform maintenance planning.
How to Use the Interactive Pre-Start Checklist
- Preparation: Park on level ground, lower the attachment, and chock if needed. Gather PPE (helmet, gloves, safety boots, eye protection), flashlight, clean rags, ruler, and a calibrated tyre gauge. Have the OEM manual and site rules ready per approved project specifications and authority requirements.
- Using the Interactive Checklist: Open the checklist on your device, start interactive mode, and work outside-in. Tick each item, enter measurements (mm, kPa, %), and attach photos or short videos for evidence. Add comments to note locations, serials, or escalation needs.
- Capture Issues and Escalate: For defects, add a comment with severity, part location, and action required. Tag maintenance, upload close-ups, and mark the item as fail. If a red-tag safety issue exists, stop work and isolate the machine immediately.
- Sign-Off and Share: Add operator and supervisor digital signatures. Export as PDF/Excel and distribute to stakeholders. Archive the record with a secure QR code for site verification and future audits.
Call to Action
- Start Checklist Tick off tasks, leave comments on items or the whole form, and export your completed report to PDF or Excel—with a built-in QR code for authenticity.
- Download Excel - Excavator Daily Pre-Start Walkaround
- Download PDF - Excavator Daily Pre-Start Walkaround
- View Image - Excavator Daily Pre-Start Walkaround
Cite & Embed
“Excavator Daily Pre-Start Walkaround by Quollnet”
with a link to
this source page.

FAQ
Question: How long should an excavator daily pre-start walkaround take, and what if I’m rushed?
Question: What defects require immediate shutdown or isolation before operating the excavator?
Question: How should I measure track sag and tyre pressure accurately for records?
Question: What kind of evidence should I attach to support my checklist entries?
Related Articles
Broader reading and guidance connected to this checklist topic.


Related Checklists
Keep the workflow moving with nearby templates chosen from similar checklist content.