Test façade perimeter sealant adhesion before large-scale application
Definition: Test façade perimeter sealant adhesion before large-scale application guides façade QA teams to verify field adhesion at perimeter joints, confirm surface preparation, and document approvals before authorizing full-scale sealant works.
- Verify adhesion on representative perimeter joints before production work proceeds.
- Control variables: substrate prep, primer use, bead size, and cure time.
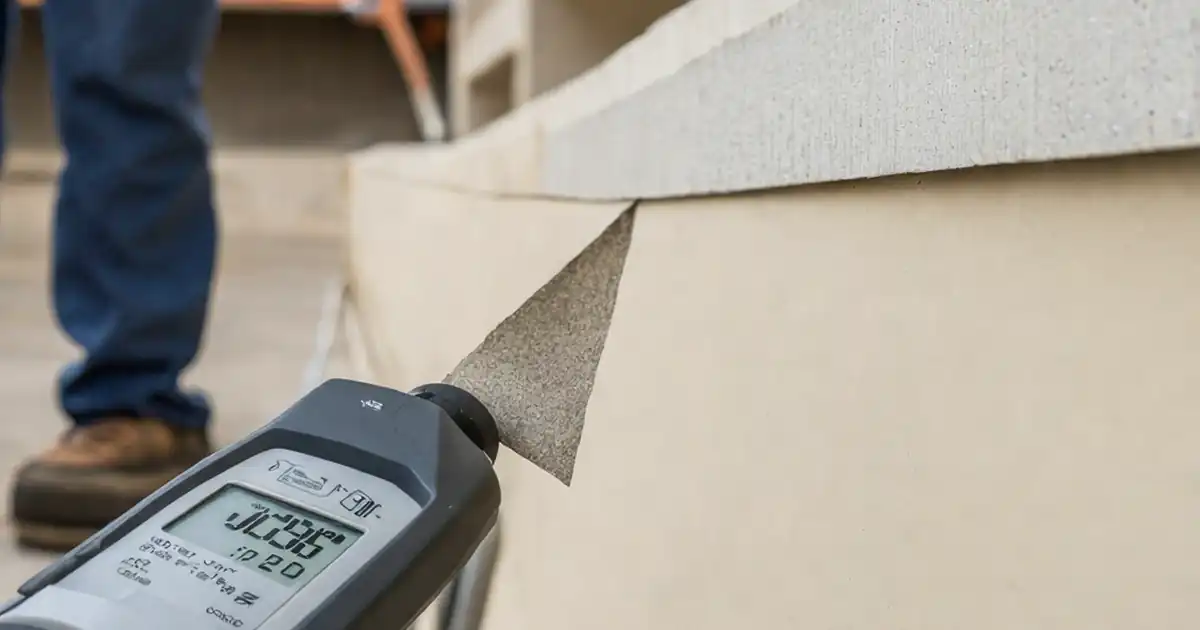
- Use field hand-pull testing with measurable force and failure mode evidence.
- Interactive, commentable checklist with export and QR code verification.
Test façade perimeter sealant adhesion before large-scale application ensures the sealant bonds reliably to perimeter joint substrates. This field adhesion test, often called a hand-pull test or mock-up verification, validates material compatibility, substrate preparation, and cure conditions before production. Focusing on vertical façade perimeters only, this checklist excludes movement cycling, water ingress testing, and non-perimeter glazing interfaces. By standardizing surface cleaning, primer application where specified, bead dimensions, and curing parameters, teams can identify adhesive versus cohesive failure and avoid costly rework, staining, or premature debonding. Documented measurements, photos, and sign-offs create a defensible quality record for approvals per approved project specifications and authority requirements. Use this interactive checklist on site: tick each step, add comments with photos, and export PDF/Excel reports secured by QR code for quick stakeholder review.
- Confirm sealant and primer selection, shelf life, and compatibility on representative perimeter joints. Standardize cleaning, masking, bead geometry, and cure times, then execute controlled hand-pull tests. Capture measurable force, failure mode, and environmental data to justify approvals and prevent scale-up errors and post-occupancy callbacks.
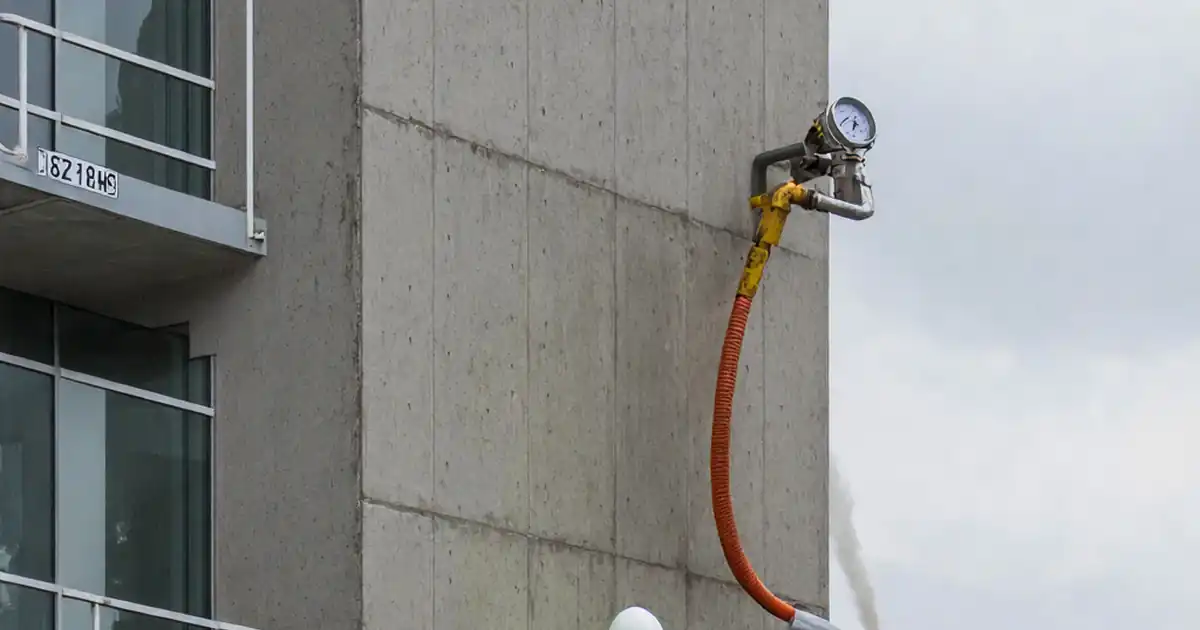
- Environmental control is decisive. Record substrate and ambient temperatures, relative humidity, wind speed, and rain exposure windows. Ensure substrates are dry and dust-free. Apply primer where specified and verify flash-off. Only proceed to test after the minimum cure period, preventing false negatives and protecting schedules and materials.
- Interactive online checklist with tick, comment, and export features secured by QR code.
- Accept or escalate based on evidence. Approve large-scale application when results meet project acceptance criteria and manufacturer guidance. If adhesive failure or inconsistent readings appear, pause works, correct root causes, retest, and document sign-offs. Archive exports with photos, readings, and batch data for full traceability.
Pre-Test Verification
Substrate & Weather Conditions
Surface Preparation
Sample Preparation
Field Adhesion Pull Test
Inspection & Documentation
Acceptance & Escalation
Why field adhesion testing prevents costly façade rework
A controlled field adhesion test at perimeter joints validates real-world performance before crews mobilize at scale. By selecting representative vertical locations across all substrate types, you expose variables such as surface contamination, primer necessity, bead geometry, and cure time. The hand-pull method reveals whether the sealant fails cohesively (within the material) or adhesively (at the interface). Cohesive failure typically indicates good bonding; adhesive failure signals preparation or compatibility issues. Quantifying force with a spring scale and logging ambient conditions tightens your decision-making. Documenting lot numbers and photos builds traceability and accelerates approvals per approved project specifications and authority requirements. A recent high-rise example showed marginal adhesion on anodized aluminium until light abrasion and primer were added, after which cohesive failure dominated across three locations, unlocking production with confidence.
- Select locations covering each substrate and exposure condition.
- Prefer cohesive over adhesive failure along the pull path.
- Record force (N), temperature, RH, and cure time.
- Log sealant and primer lots for traceability.
- Photograph failures with a scale for clarity.
Control environment and surface preparation for reliable results
Environmental conditions and surface prep drive adhesion outcomes. Record ambient and substrate temperatures, relative humidity, wind, and dry-weather windows. Substrates must be clean, dry, and dust-free. Where specified, use solvent cleaning followed by light abrasion on non-porous metals to promote wetting, then apply primer and allow proper flash-off. Standardize bead size with a calibrated nozzle and verify depth using a simple gauge to avoid thin sections. Respect the minimum cure period at the measured conditions; testing too early often misrepresents bond strength. Keep masking neat to produce repeatable 25 mm strips for evaluation. Capturing all parameters transforms a subjective tug into a reproducible test, reducing the risk of false approvals and later warranty claims.
- Use 70% isopropyl alcohol and lint-free cloths for cleaning.
- Abrade metals lightly; vacuum debris before priming.
- Verify primer flash-off time before gunning sealant.
- Standardize bead width 25 ± 2 mm and depth 8–12 mm.
- Do not test before minimum cure period.
Document, decide, and release production with confidence
Consistent documentation converts results into actionable approvals. Record readings, photos, force values, failure modes, and comments for each grid location. Ensure the checklist captures who performed each step, the time, and the materials used. Exporting to PDF/Excel consolidates evidence for quick consultant review. If any test shows adhesive failure or erratic force, stop and correct the root cause—typically cleaning, abrasion, primer, or cure time—then retest. Approve large-scale application only when the evidence aligns with project acceptance criteria and manufacturer guidance. Archive all exports, raw images, and logs in a central repository. Using QR-secured reports enables on-site spot checks during production, maintaining quality beyond the pilot tests.
- Capture readings, lots, times, and photos per location.
- Require signatures from applicator and QA before release.
- Pause and correct if adhesive failure is observed.
- Export PDF/Excel and store with project identifiers.
- Use QR for quick on-site verification.
How to use this interactive adhesion test checklist
- Preparation: Bring utility knives with new blades, masking tape, lint-free cloths, 70% IPA, primer (if specified), calibrated nozzle/depth spacer, thermometer-hygrometer, infrared thermometer, anemometer, spring scale, PPE (gloves, safety glasses), and access equipment. Verify materials, drawings, and test locations before starting.
- Using the Interactive Checklist: Start interactive mode on a mobile device, tick each step as completed, add time-stamped photos and comments, and log readings. When finished, export the record as PDF/Excel. Share the QR-secured link with reviewers for rapid approval.
- Sign-Off: Obtain digital signatures from the applicator, QA/QC, and the consultant/owner representative. Distribute the exported files to stakeholders and archive them in the project repository. Use the QR code to authenticate records during production audits.

Call to Action
- Start Checklist Tick off tasks, leave comments on items or the whole form, and export your completed report to PDF or Excel—with a built-in QR code for authenticity.
- Download Excel - Façade Perimeter Sealant Adhesion Test (Pre-Rollout)
- Download PDF - Façade Perimeter Sealant Adhesion Test (Pre-Rollout)
- View Image - Façade Perimeter Sealant Adhesion Test (Pre-Rollout)
Cite & Embed
“Façade Perimeter Sealant Adhesion Test (Pre-Rollout) by Quollnet”
with a link to
this source page.

FAQ
Question: How many field adhesion tests are required before full production?
Question: What indicates a passing adhesion result in the field hand-pull test?
Question: Why do I need to wait for a specific cure time before testing?
Question: What should I do if adhesive failure is observed?
Related Articles
Broader reading and guidance connected to this checklist topic.


Download Excel Format Snag List


Is It Important To Customize Your Qr Code And How To Do It?
Related Checklists
Keep the workflow moving with nearby templates chosen from similar checklist content.