Test Façade Airtightness at Slab-Edge and Perimeter Interfaces
Definition: Test façade airtightness at slab-edge and perimeter interfaces for site managers and commissioning agents, using calibrated fan pressurization, diagnostics, and documentation to control infiltration, moisture risks, and energy loss.
- What: floor-by-floor perimeter fan pressurization of slab-edge interfaces
- Why: limit drafts, condensation, noise transfer, and energy waste
- How: mask openings, stabilize 50 Pa, quantify L/s·m, verify repairs
- Interactive, commentable checklist with export and QR code verification
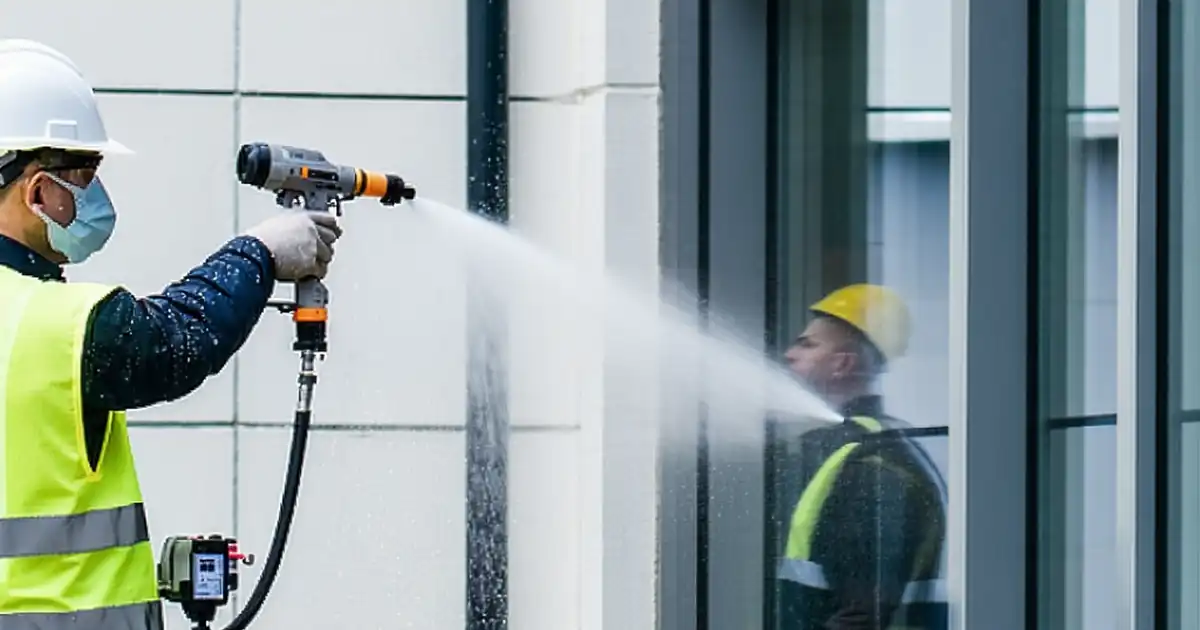
Test façade airtightness at slab-edge and perimeter interfaces is a focused procedure to quantify and locate air leakage where the building envelope meets the structure. This guide centers on air leakage testing using fan pressurization (blower door), building envelope pressurization strategies, and perimeter seal inspections without drifting into unrelated window or roof testing. You will prepare the zone, mask non-tested penetrations, establish baseline pressure, then pressurize to 50 Pa to measure airflow and convert results to a lineal leakage rate (L/s·m). Targeting the slab-edge and perimeter joint mitigates condensation, mold potential, uncomfortable drafts, noise transmission, and energy penalties caused by uncontrolled infiltration. The checklist emphasizes clear acceptance cues, practical diagnostics with smoke pencils and infrared thermography, and complete evidence capture—photos, readings, and signatures—so findings hold up during commissioning. Use this interactive checklist to tick items, add comments at exact locations, and export your documented results as PDF or Excel with an embedded QR for verification.
- Focuses the test boundary on slab-edge and perimeter interfaces only, using calibrated fan pressurization to 50 Pa. Quantifies leakage as L/s·m so teams can compare floors, prioritize repairs, and validate performance against project specifications and authority requirements with reproducible, data-backed steps.
- Delivers a reliable field workflow: define the zone, mask non-tested openings, verify instruments, stabilize pressures, measure airflow, convert to L/s·m, and document diagnostics with smoke and infrared. Minimizes disruption, supports safety and access planning, and speeds decision-making on corrective sealing.
- Interactive online checklist with tick, comment, and export features secured by QR code. Teams collaborate in real time, attach photos, instrument logs, and drawings, then generate authenticated PDF/Excel reports for stakeholders and archival compliance without duplicating effort or losing traceability.
- Reduces risk of condensation, mold growth, hot/cold spots, acoustic bridging, and occupant complaints by catching perimeter joint defects early. Structured evidence, acceptance cues, and sign-offs help close out punch items faster and avoid costly rework after finishes or occupancy.
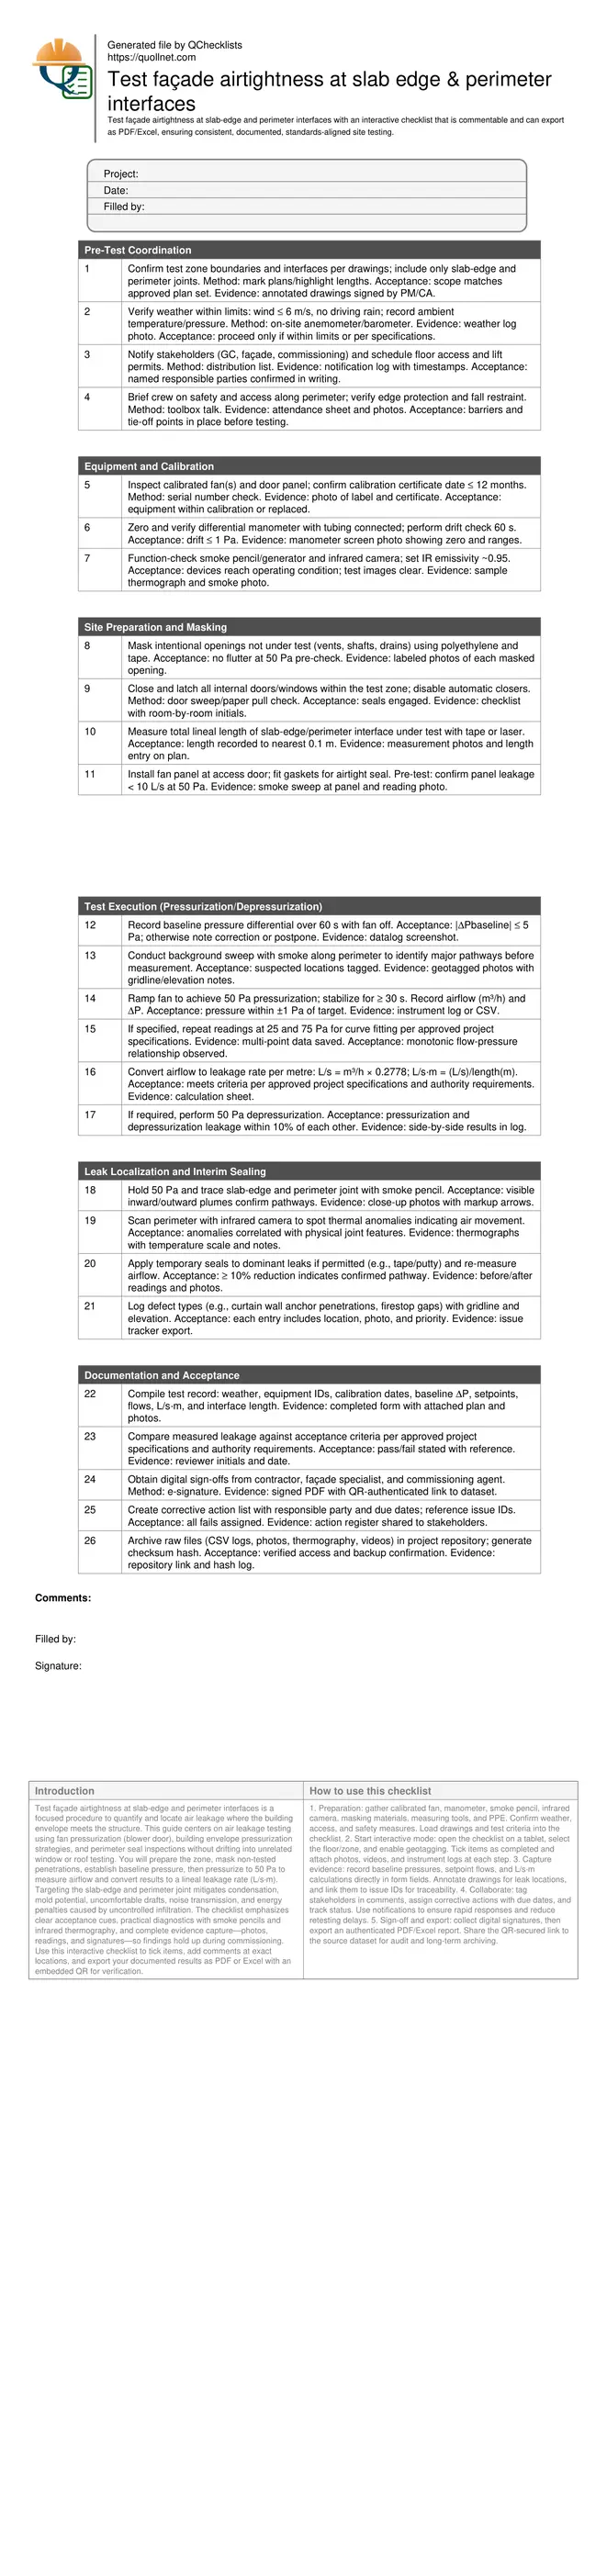
Pre-Test Coordination
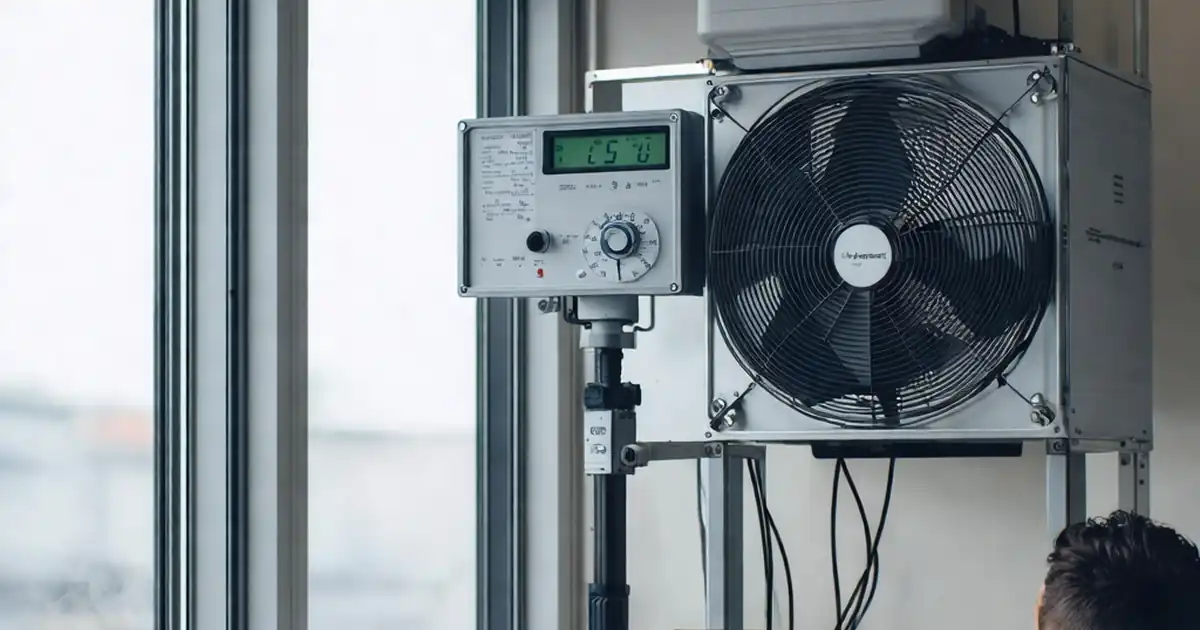
Equipment and Calibration
Site Preparation and Masking
Test Execution (Pressurization/Depressurization)
Leak Localization and Interim Sealing
Documentation and Acceptance
Methodology and metrics for slab-edge and perimeter interface testing
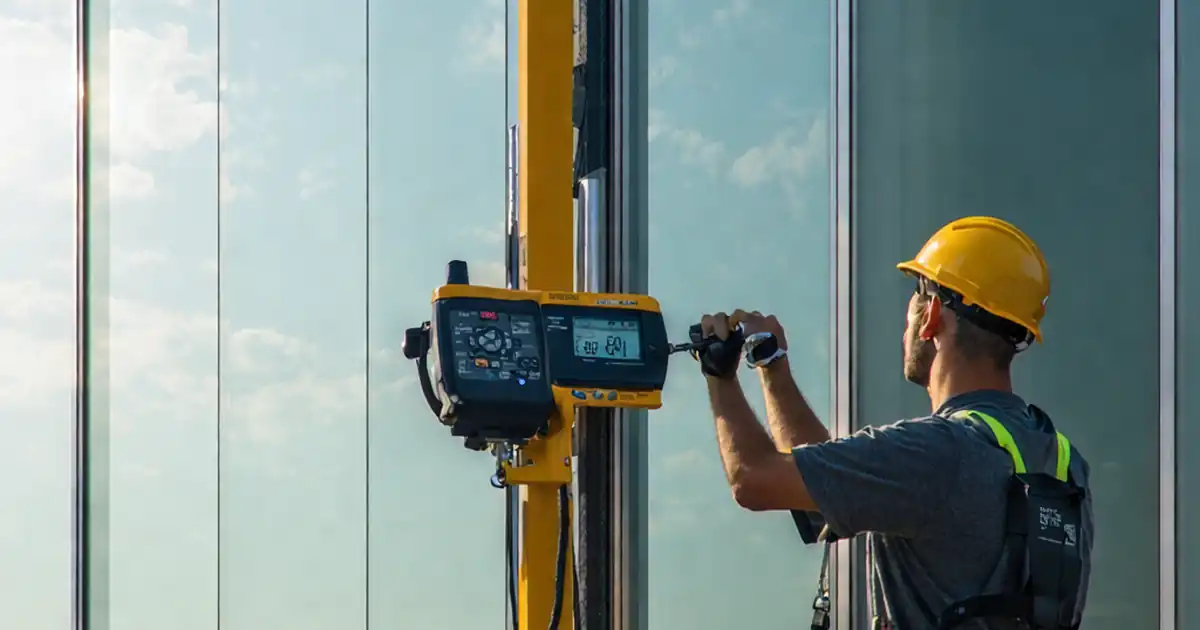
Fan pressurization isolates the test zone to quantify leakage at slab-edge and perimeter interfaces. After masking intentional openings, establish a stable baseline, then drive the zone to 50 Pa and log airflow. Converting m³/h to L/s and dividing by the total lineal length yields L/s·m, a normalized metric that compares floors and details fairly. Aim for steady pressure within ±1 Pa and repeatability within 5% on duplicate runs. On a recent tower floor, a 50 Pa test indicated 1,350 m³/h. With a 110 m perimeter, that converts to 1,350 × 0.2778 = 375 L/s, or 3.41 L/s·m. Smoke and infrared traced leakage to intermittent gaps behind spandrel anchors. Temporary taping dropped flow by 14%, confirming the pathway and guiding targeted remediation. Acceptance remains per approved project specifications and authority requirements; this process simply ensures the numbers are reliable and traceable.
- Stabilize pressure within ±1 Pa before logging flow
- Normalize leakage as L/s·m for fair comparisons
- Repeat runs; target ≤ 5% variation between tests
- Trace leaks with smoke and infrared for confirmation
- Acceptability per project specifications and authorities
Preparation, masking, and controlling unintended air paths
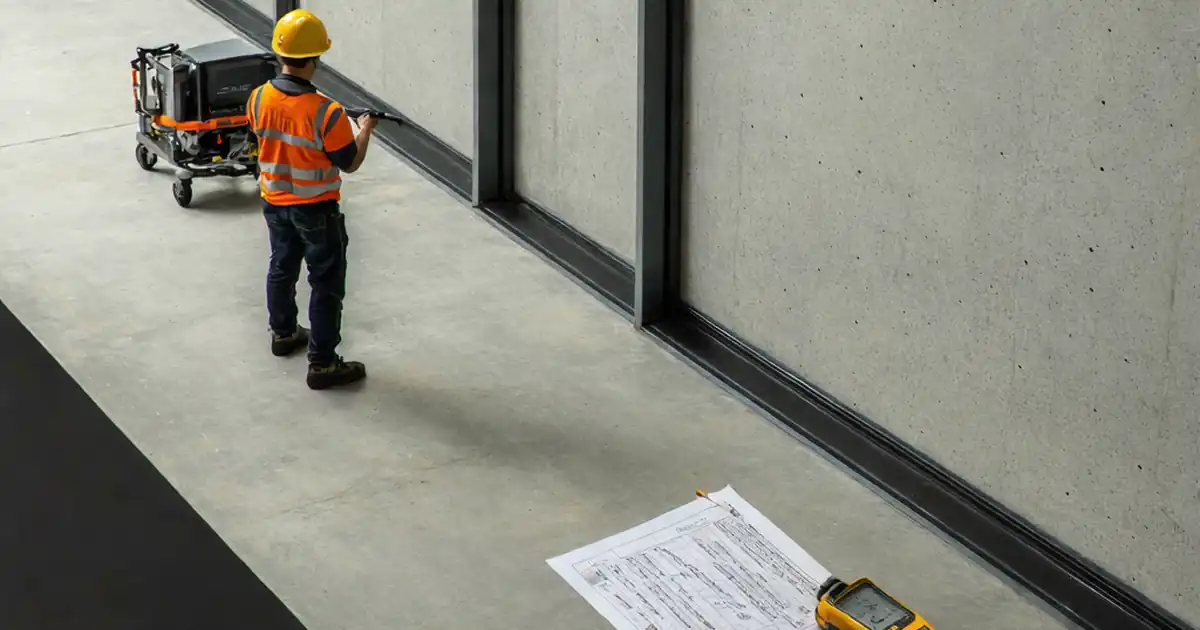
Test accuracy depends on clean boundaries. Close and latch doors in the zone, and mask vents, shafts, and penetrations that are not part of the slab-edge interface. Confirm panel seals so the fan system does not become the dominant leak. Wind and stack effect can bias results; check on-site wind ≤ 6 m/s and correct for baseline pressures if |ΔP| exceeds 5 Pa. Mark and record the total lineal length to the nearest 0.1 m so later calculations are defensible. Align with construction sequencing—inspect after initial sealant installation but before enclosure of finishes to allow rapid fixes. On busy sites, schedule lift access and perimeter protection early to avoid delays. Early coordination prevents chasing false positives through unsealed risers or open mechanical grilles that skew readings and undermine confidence in the data set.
- Mask non-tested openings thoroughly and label
- Measure and record interface length accurately
- Check wind and baseline before proceeding
- Ensure safe access and edge protection
- Time tests before finishes for quick fixes
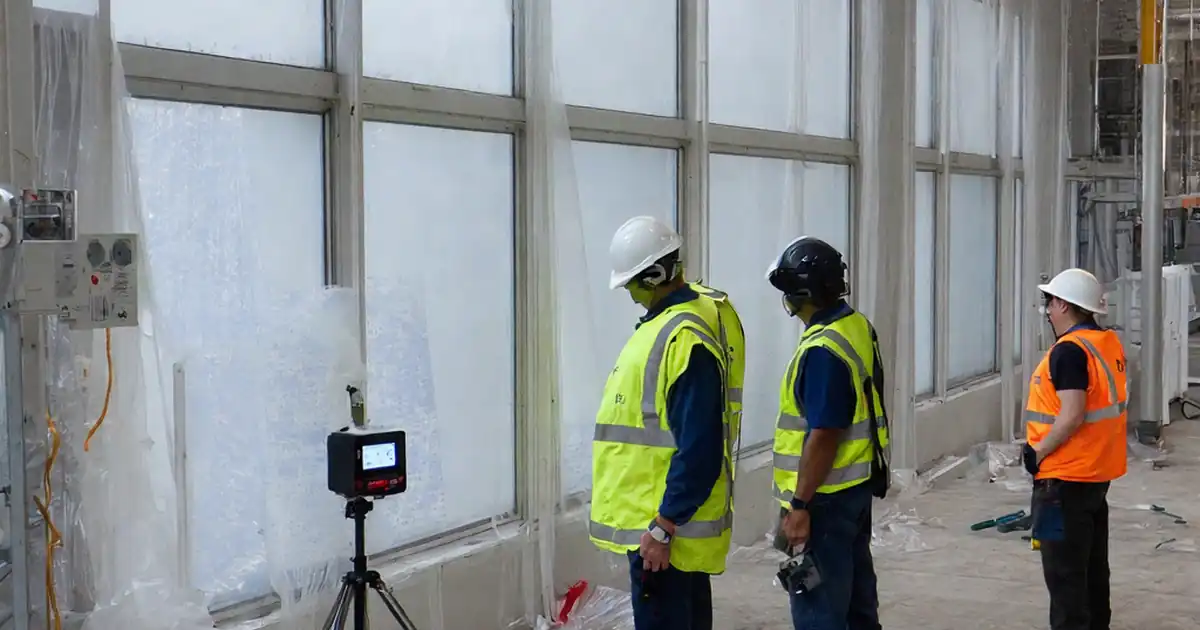
Diagnostics, acceptance cues, and reporting that drives action
Quantitative leakage alone does not fix defects. While holding 50 Pa, use a smoke pencil along the slab-edge to visualize pathways, then confirm with infrared—especially near discontinuous insulation or anchors. Document each finding with gridlines and elevations, and prioritize defects by estimated flow impact. If allowed, apply temporary sealing to validate suspected sources and estimate savings; a ≥10% flow reduction after taping supports the diagnosis. For acceptance, compare the L/s·m result to the project’s criteria per approved project specifications and authority requirements. Package the evidence: instrument IDs, calibration dates, raw CSV logs, annotated photos, and sign-offs. Export to PDF/Excel, and secure with a QR link to the underlying dataset so reviewers can authenticate results and trace decisions, accelerating closeout and minimizing disputes.
- Pair smoke and IR to confirm pathways
- Prioritize by impact on total leakage
- Temporary seals validate suspected sources
- Compare L/s·m to project acceptance
- Export reports with QR authentication
How to Use This Airtightness Testing Checklist
- Preparation: gather calibrated fan, manometer, smoke pencil, infrared camera, masking materials, measuring tools, and PPE. Confirm weather, access, and safety measures. Load drawings and test criteria into the checklist.
- Start interactive mode: open the checklist on a tablet, select the floor/zone, and enable geotagging. Tick items as completed and attach photos, videos, and instrument logs at each step.
- Capture evidence: record baseline pressures, setpoint flows, and L/s·m calculations directly in form fields. Annotate drawings for leak locations, and link them to issue IDs for traceability.
- Collaborate: tag stakeholders in comments, assign corrective actions with due dates, and track status. Use notifications to ensure rapid responses and reduce retesting delays.
- Sign-off and export: collect digital signatures, then export an authenticated PDF/Excel report. Share the QR-secured link to the source dataset for audit and long-term archiving.
Call to Action
- Start Checklist Tick off tasks, leave comments on items or the whole form, and export your completed report to PDF or Excel—with a built-in QR code for authenticity.
- Download Excel - Façade Airtightness Testing at Slab-Edge & Perimeter
- Download PDF - Façade Airtightness Testing at Slab-Edge & Perimeter
- View Image - Façade Airtightness Testing at Slab-Edge & Perimeter
Cite & Embed
“Façade Airtightness Testing at Slab-Edge & Perimeter by Quollnet”
with a link to
this source page.

FAQ
Question: Why is 50 Pa commonly used for façade airtightness testing at slab-edges?
Question: How do we isolate slab-edge and perimeter interface leakage from other openings?
Question: What should we do if wind or stack effect prevents stable pressure?
Question: How should results be reported and interpreted for acceptance?
Related Articles
Broader reading and guidance connected to this checklist topic.


Concrete Cube Test Register Excel Format – Pdf & Excel Sample

Is It Important To Customize Your Qr Code And How To Do It?

Related Checklists
Keep the workflow moving with nearby templates chosen from similar checklist content.