Inspect vertical fins and shading screens after installation
Definition: Inspect vertical fins and shading screens after installation provides site teams a structured, post-install QA/QC checklist to verify alignment, anchorage, finishes, seals, and safety before handover.
- Confirm plumb, spacing, and screen flatness within specified tolerances.
- Verify anchors, torque, and corrosion protection per approved specifications.
- Check joints, sealants, and interfaces for weather-tightness and firestopping.
- Interactive, commentable checklist with export and QR code traceability.
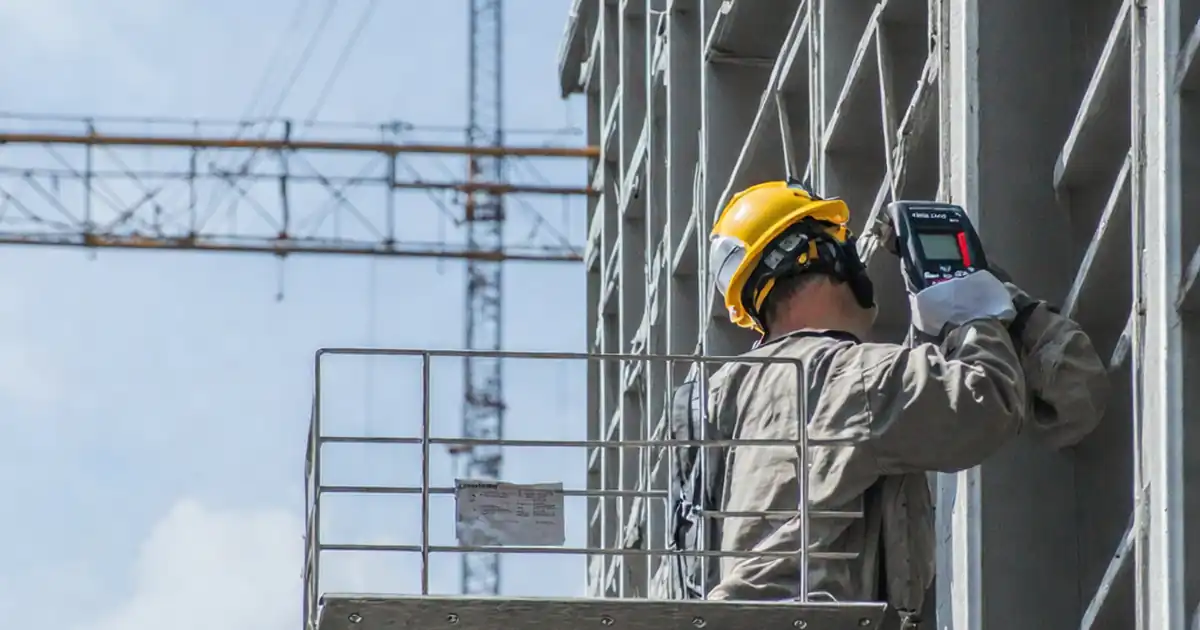
Inspect vertical fins and shading screens after installation is a targeted, post-install inspection for façade elements that manage solar control and architectural expression. This checklist focuses on vertical architectural fins, solar shading screens, and related brise-soleil assemblies adjacent to curtain wall or cladding. You will verify plumb, spacing, and flatness; confirm anchorage, torque, and isolation; check finishes and color; and assess seals, gaskets, and firestopping per approved project specifications and authority requirements. The scope excludes horizontal fins, glazing performance tests, and unrelated building services. By capturing on-site measurements, photos, and approvals, teams reduce rework, prevent water ingress and corrosion, and ensure safe clearances and reliable operation for any movable screens. Use this structured process to deliver consistent outcomes across elevations and trades, supporting quality assurance, commissioning, and handover. Start in interactive mode to tick items, add comments, attach evidence, and export PDF/Excel with a secure QR for audit.
- This checklist standardizes post-install verification of vertical fins and shading screens, helping teams confirm geometry, anchorage, finishes, and interfaces. It reduces punch-list churn by catching misalignment, loose fixings, and sealing gaps before handover.
- Field-ready acceptance cues, clear tools, and measurable tolerances minimize ambiguity. Crews can verify plumb within millimetres, confirm torque compliance, and validate color/finish against the approved mock-up, with repeatable sampling across elevations and bays.
- Interactive online checklist with tick, comment, and export features secured by QR code.
- Practical evidence capture—photos, readings, batch numbers, and signatures—builds a defensible as-built record. The process supports closeout, future maintenance planning, and warranty claims without revisiting inaccessible façade locations.
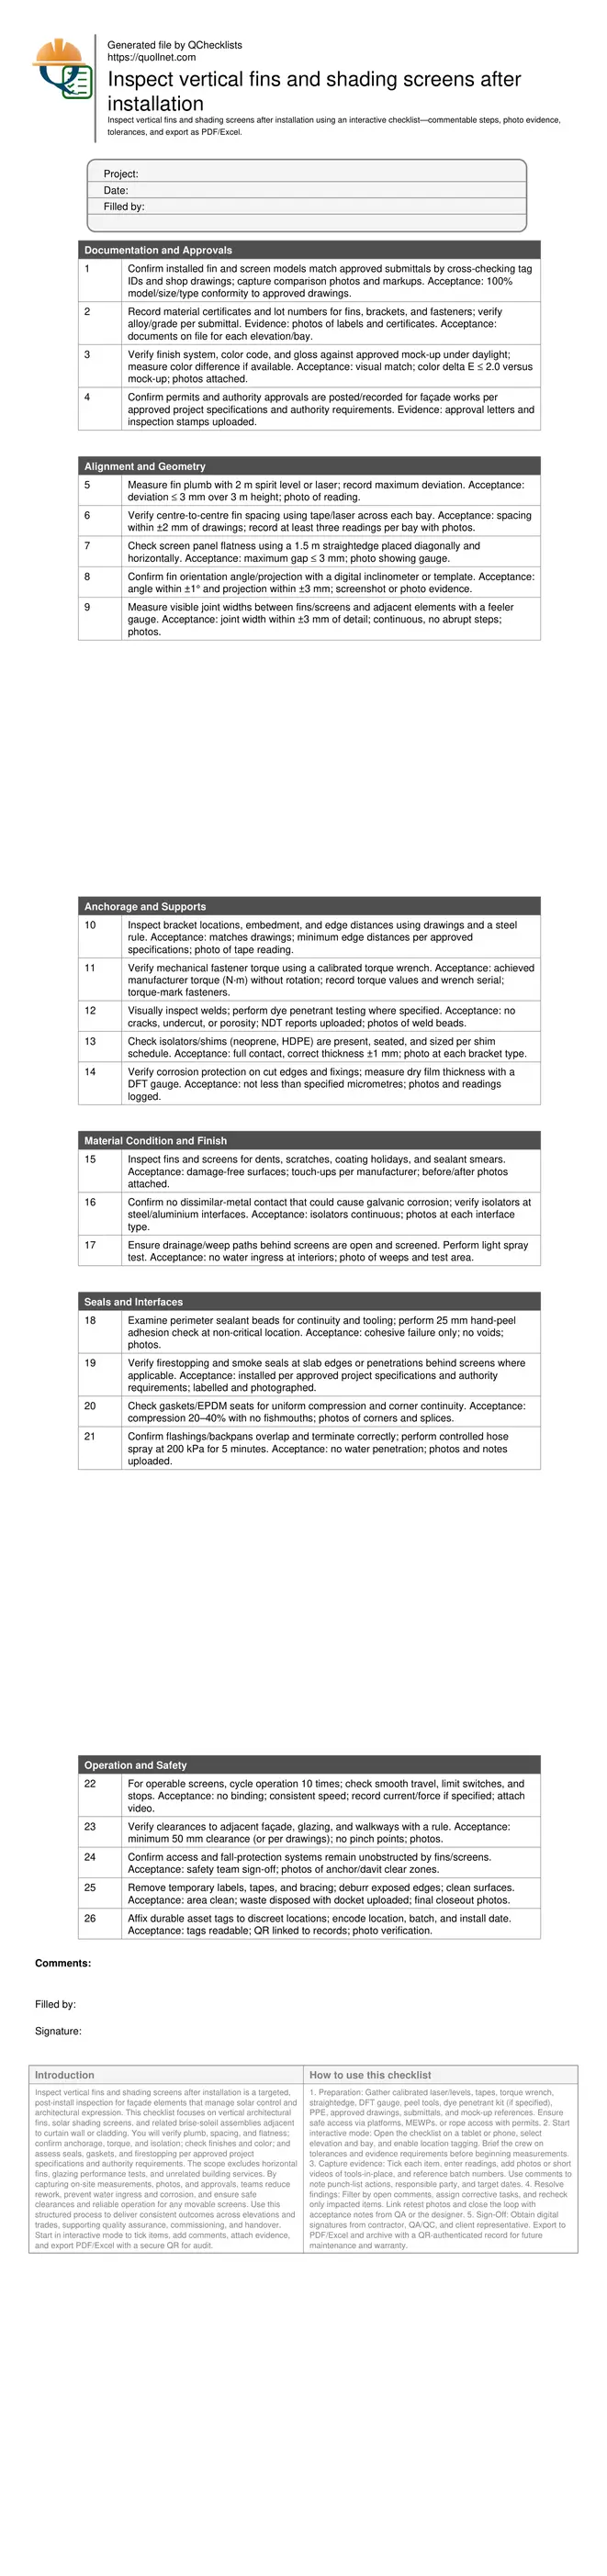
Documentation and Approvals
Alignment and Geometry
Anchorage and Supports
Material Condition and Finish
Seals and Interfaces
Operation and Safety
Geometry Verification: Plumb, Spacing, Flatness, and Joints
Post-install geometry drives both appearance and performance. Use a calibrated 2 m spirit level or a line laser to confirm fin plumb; target a maximum deviation of 3 mm over 3 m to keep visual lines true and minimize torsion loads on brackets. Measure fin centre-to-centre spacing with a laser distance meter or tape at three locations per bay; allow ±2 mm from drawings to preserve rhythm and avoid clashing with window-washing rigs. For shading screens, place a 1.5 m straightedge diagonally and horizontally; gaps should not exceed 3 mm to prevent flutter and light leaks. Confirm visible joint widths between components and adjacent facades; keep them within ±3 mm with no sudden steps, supporting sealant movement and uniform aesthetics. Capture photos of each reading and annotate any exceedances directly on images. On complex facades, record checks at gridlines and elevation breaks so deviations can be traced to a bracket set rather than the entire run, focusing remedial work where it matters.
- Use calibrated lasers, levels, and tapes only.
- Record readings at gridlines and mid-spans.
- Photograph measuring tools and displays.
- Flag deviations with temporary markings.
- Log corrective actions with dates.
Anchorage, Isolation, and Corrosion Protection
Anchors and brackets transfer wind and self-weight loads; their verification prevents rattling, cracking, and long-term failures. Check bracket positions and edge distances against drawings with a steel rule, and document each condition with photos. For mechanical fixings, confirm torque using a calibrated wrench; record N·m values and torque-mark heads to show final set. Where welds are present, perform visual inspection and dye penetrant tests as specified, uploading NDT reports. Isolation shims or pads (HDPE, neoprene) must be continuous and correctly sized to prevent bimetallic corrosion and stress points. For cut edges and touch-up paint, measure dry film thickness with a gauge and compare against the approved system; recoat if under thickness. These controls, coupled with traceable batch information, close common gaps that lead to premature corrosion. Always reference the approved project specifications and authority requirements when acceptance depends on proprietary systems or substrate conditions.
- Torque wrenches must have current calibration.
- Photo each bracket, shim, and fastener set.
- Upload NDT and DFT readings by location.
- Avoid dissimilar-metal contact without isolators.
Interfaces, Weather-Tightness, and Operable Elements
Seals and interfaces define how fins and screens meet the curtain wall, cladding, and structure. Inspect perimeter sealant beads for continuity, tooling, and adhesion; a small hand-peel at a non-critical area should indicate cohesive rather than adhesive failure. Confirm gaskets compress uniformly, especially at corners, avoiding fishmouths. Where screens conceal slab edges or penetrations, verify firestopping and smoke seals are installed, labelled, and photographed per approved project specifications and authority requirements. For weather performance, conduct a controlled hose spray at 200 kPa for five minutes on representative joints; interiors should remain dry. If any screens are operable, cycle them at least ten times to validate smooth travel, limit switches, and clearances to glass and adjacent fins. Finally, ensure maintenance access, anchors, or davits remain unobstructed, and that asset tags and QR labels are applied for future traceability. These steps prevent water ingress, binding, and safety conflicts during operations and maintenance.
- Perform a focused hose test on joints.
- Check gasket compression at corners.
- Label and photo all firestopping.
- Cycle operable screens repeatedly.
- Verify clearances and access paths.
How to Use This Interactive Post-Install Inspection Checklist
- Preparation: Gather calibrated laser/levels, tapes, torque wrench, straightedge, DFT gauge, peel tools, dye penetrant kit (if specified), PPE, approved drawings, submittals, and mock-up references. Ensure safe access via platforms, MEWPs, or rope access with permits.
- Start interactive mode: Open the checklist on a tablet or phone, select elevation and bay, and enable location tagging. Brief the crew on tolerances and evidence requirements before beginning measurements.
- Capture evidence: Tick each item, enter readings, add photos or short videos of tools-in-place, and reference batch numbers. Use comments to note punch-list actions, responsible party, and target dates.
- Resolve findings: Filter by open comments, assign corrective tasks, and recheck only impacted items. Link retest photos and close the loop with acceptance notes from QA or the designer.
- Sign-Off: Obtain digital signatures from contractor, QA/QC, and client representative. Export to PDF/Excel and archive with a QR-authenticated record for future maintenance and warranty.
Call to Action
- Start Checklist Tick off tasks, leave comments on items or the whole form, and export your completed report to PDF or Excel—with a built-in QR code for authenticity.
- Download Excel - Post-Install Inspection: Vertical Fins & Shading Screens
- Download PDF - Post-Install Inspection: Vertical Fins & Shading Screens
- View Image - Post-Install Inspection: Vertical Fins & Shading Screens
Cite & Embed
“Post-Install Inspection: Vertical Fins & Shading Screens by Quollnet”
with a link to
this source page.
FAQ
Question: What tolerances should I apply for plumb, spacing, flatness, and joints?
Question: How can I inspect fins and screens safely when access is limited?
Question: What evidence should I attach to close out each checklist item?
Question: How should operable shading screens be commissioned and documented?
Related Articles
Broader reading and guidance connected to this checklist topic.


Advanced High-rise Fire Safety: Drones & Modern Equipment
Related Checklists
Keep the workflow moving with nearby templates chosen from similar checklist content.