Inspect Dynamic Façade Movable Panels for Clearance & Interference
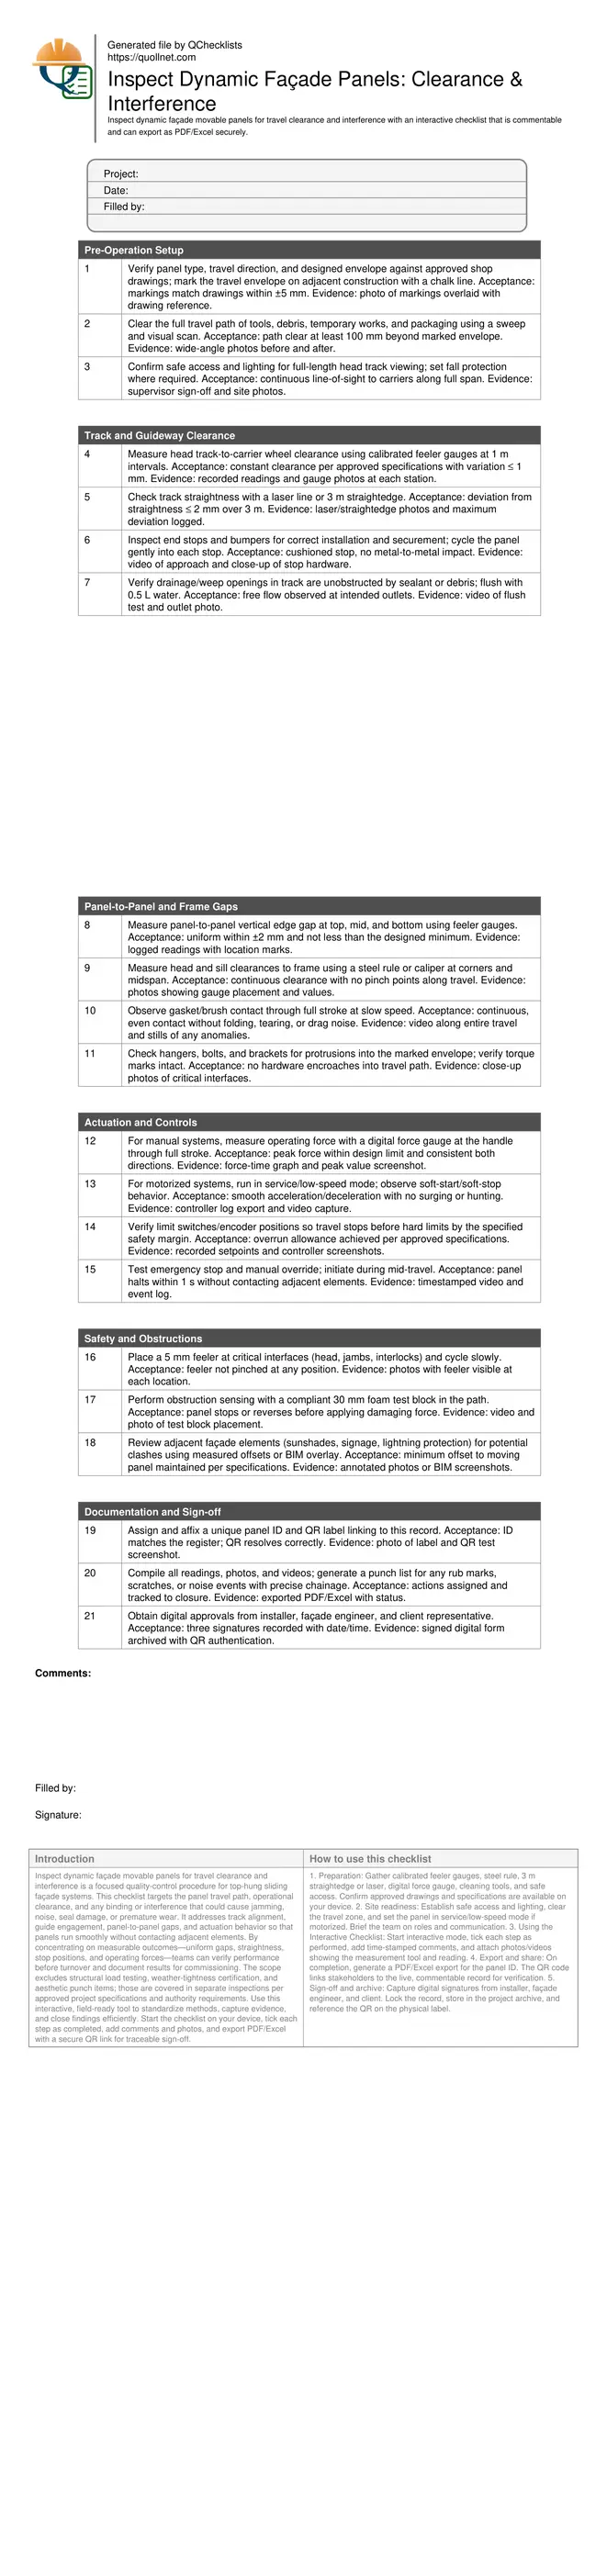
Definition: Inspect dynamic façade movable panels for travel clearance and interference helps site teams verify sliding panel travel paths, minimum clearances, and obstruction-free operation prior to commissioning.
- Confirms unobstructed travel path and uniform clearances along full stroke.
- Prevents rubbing, jamming, and weatherseal damage before handover.
- Uses gauges, lasers, and force meters for objective, repeatable results.
- Interactive, commentable, export, QR code features for field teams.
Inspect dynamic façade movable panels for travel clearance and interference is a focused quality-control procedure for top-hung sliding façade systems. This checklist targets the panel travel path, operational clearance, and any binding or interference that could cause jamming, noise, seal damage, or premature wear. It addresses track alignment, guide engagement, panel-to-panel gaps, and actuation behavior so that panels run smoothly without contacting adjacent elements. By concentrating on measurable outcomes—uniform gaps, straightness, stop positions, and operating forces—teams can verify performance before turnover and document results for commissioning. The scope excludes structural load testing, weather-tightness certification, and aesthetic punch items; those are covered in separate inspections per approved project specifications and authority requirements. Use this interactive, field-ready tool to standardize methods, capture evidence, and close findings efficiently. Start the checklist on your device, tick each step as completed, add comments and photos, and export PDF/Excel with a secure QR link for traceable sign-off.
- Ensure sliding façade panels achieve consistent, obstruction-free travel from end to end by verifying track alignment, stop settings, and panel-to-panel gaps. This avoids rubbing, noise, seal abrasion, jamming, and impact at limits while documenting repeatable, measurable evidence for commissioning and future maintenance.
- Interactive online checklist with tick, comment, and export features secured by QR code.
- Adopt objective tools—feeler gauges, laser alignment, digital force meters, and annotated photos or videos—to quantify clearance, straightness, and smoothness. Field teams can quickly compare readings to approved shop drawings, log deviations, assign actions, and close punch items before client demonstrations and handover.
Pre-Operation Setup
Track and Guideway Clearance
Panel-to-Panel and Frame Gaps
Actuation and Controls
Safety and Obstructions
Documentation and Sign-off
Why Travel Clearance and Interference Checks Matter
Dynamic top-hung sliding façade panels demand consistent clearances to avoid binding, noise, and seal damage. Small alignment errors, protruding fasteners, or debris in the head track can cause scuffing and jamming that escalate into motor overloads, broken carriers, or torn gaskets. By mapping the travel envelope, confirming straightness, and checking gaps at multiple points, teams ensure the panel glides freely without contacting adjacent frames or panels. Slow-speed cycling makes subtle rubs and harmonic noises easy to detect. End stops and limit settings protect against hard impacts that leave witness marks and loosen fixings. Force measurements help distinguish acceptable friction from emerging faults. The goal is to verify a free, repeatable stroke with uniform gaps and soft stops before client demonstrations. Evidence—photos, videos, and logged readings—proves conformance and speeds punch-list closure. When tolerances are validated against approved shop drawings, the risk of callbacks falls dramatically and long-term operability improves.
- Map and protect the full travel envelope.
- Measure gaps at multiple heights and positions.
- Cycle at slow speed to reveal subtle interference.
- Record objective readings with photos and video.
- Verify end stops cushion before hard limits.
Methods, Tools, and Practical Acceptance Cues
Use feeler gauges to verify minimum gaps and uniformity, a laser or long straightedge to check track straightness, and a digital force gauge to quantify operating loads. Expect minor variations, but investigate any sudden force spikes, rub marks, or metallic sounds. Continuous gasket or brush contact is desirable; folding, tearing, or squeal indicates misalignment. Limit switches must stop travel before hard limits with a documented safety margin. Obstruction tests using compliant media validate sensor function without damaging finishes. Where numeric tolerances are project-specific, compare readings to approved project specifications and authority requirements, and record exact positions of measurement. Adopt repeatable stations—every 1 m for clearances and at corners/midspan for gaps—so results trend across panels. Capture annotated photos showing tool position and value to eliminate ambiguity during review and sign-off.
- Standardize measurement stations along the span.
- Use calibrated gauges and document serial numbers.
- Investigate force spikes, squeal, or witness marks.
- Validate limit margins before full-speed runs.
Commissioning Evidence, Closeout, and Field Lessons
Strong commissioning records combine quantified readings, annotated images, and short videos covering full panel strokes. Link each record to a unique panel ID and QR label so teams can retrieve history instantly. Export controller logs for motorized systems to corroborate smooth starts, consistent speed, and stable currents. Punch items should include exact locations (chainage or grid), observed symptom, suspected cause, and a target closeout date. Many issues trace to minor debris in tracks, missing bumpers, or slightly shifted hangers—simple corrections if caught early. After adjustments, repeat the affected checks to confirm the fix and update the record. Standardizing this process across panels reduces variability and keeps turnover predictable.
- Tie evidence to a unique panel ID.
- Annotate photos with location and readings.
- Export logs to validate controller behavior.
- Retest after any adjustment or repair.
- Close actions before client demonstrations.
How to Use This Interactive Clearance & Interference Checklist
- Preparation: Gather calibrated feeler gauges, steel rule, 3 m straightedge or laser, digital force gauge, cleaning tools, and safe access. Confirm approved drawings and specifications are available on your device.
- Site readiness: Establish safe access and lighting, clear the travel zone, and set the panel in service/low-speed mode if motorized. Brief the team on roles and communication.
- Using the Interactive Checklist: Start interactive mode, tick each step as performed, add time-stamped comments, and attach photos/videos showing the measurement tool and reading.
- Export and share: On completion, generate a PDF/Excel export for the panel ID. The QR code links stakeholders to the live, commentable record for verification.
- Sign-off and archive: Capture digital signatures from installer, façade engineer, and client. Lock the record, store in the project archive, and reference the QR on the physical label.
Call to Action
- Start Checklist Tick off tasks, leave comments on items or the whole form, and export your completed report to PDF or Excel—with a built-in QR code for authenticity.
- Download Excel - Dynamic Façade Movable Panel Clearance Inspection
- Download PDF - Dynamic Façade Movable Panel Clearance Inspection
- View Image - Dynamic Façade Movable Panel Clearance Inspection
Cite & Embed
“Dynamic Façade Movable Panel Clearance Inspection by Quollnet”
with a link to
this source page.
FAQ
Question: What clearances should I expect between sliding façade panels and frames?
Question: How can I detect subtle interference that isn’t visible?
Question: Do I need special tools to verify travel clearance?
Question: When should obstruction testing be performed on motorized panels?
Related Articles
Broader reading and guidance connected to this checklist topic.


Download Excel Format Snag List

What Is a Snag List Or Punch List

Master Construction Project Cashflow With Cashflowpot
Related Checklists
Keep the workflow moving with nearby templates chosen from similar checklist content.