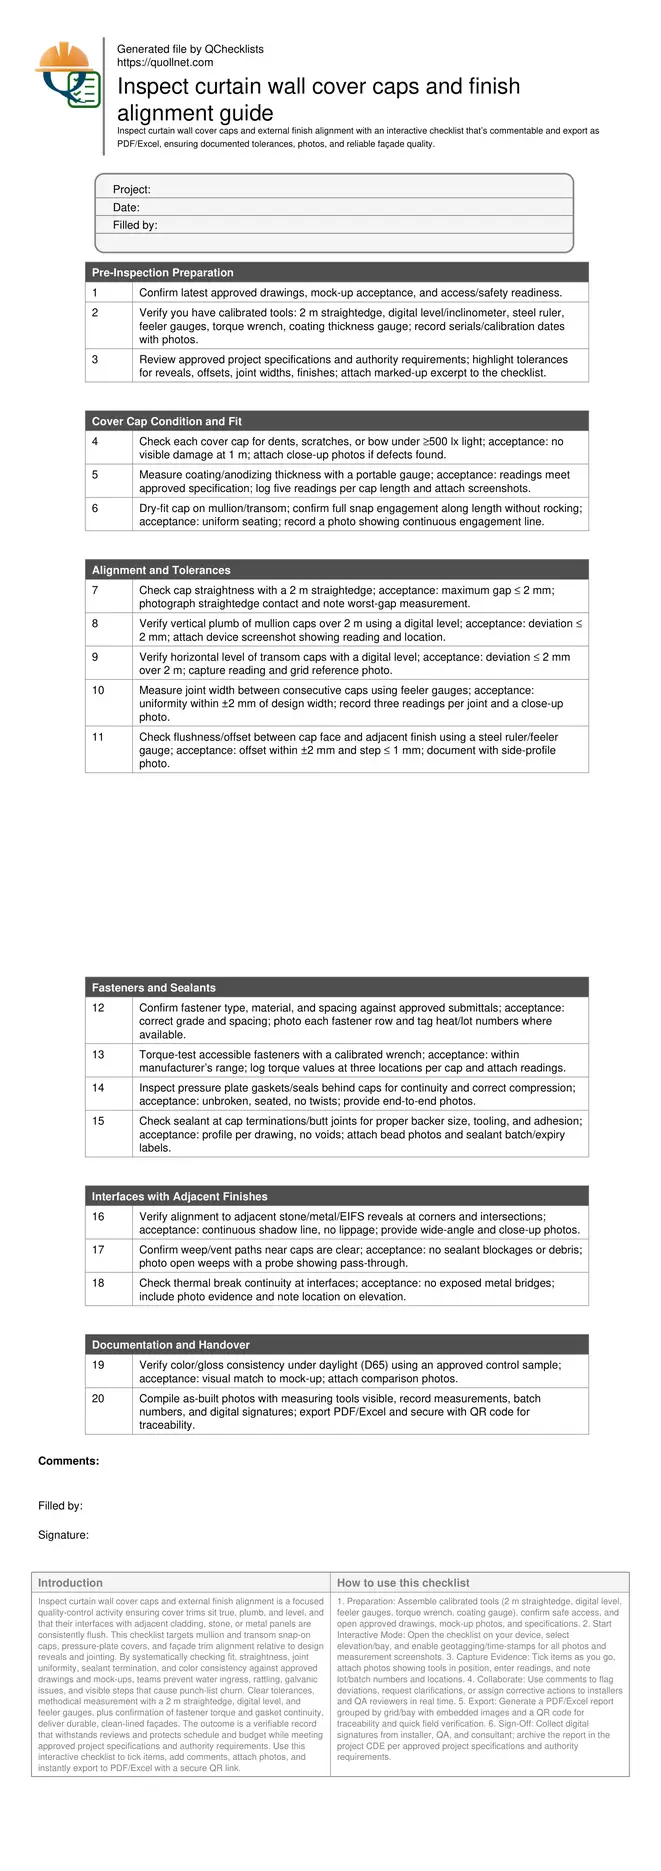
Inspect curtain wall cover caps and external finish alignment
Definition: Inspect curtain wall cover caps and external finish alignment for façade teams ensuring uniform reveals, plumb/level caps, seamless interfaces, and documented evidence against approved drawings and specifications.
- Confirm cap fit, straightness, and joint uniformity to drawings.
- Verify flushness with adjacent cladding and consistent shadow lines.
- Capture measurements, photos, and batch data for traceable records.
- Interactive, commentable checklist; export reports with QR code traceability.
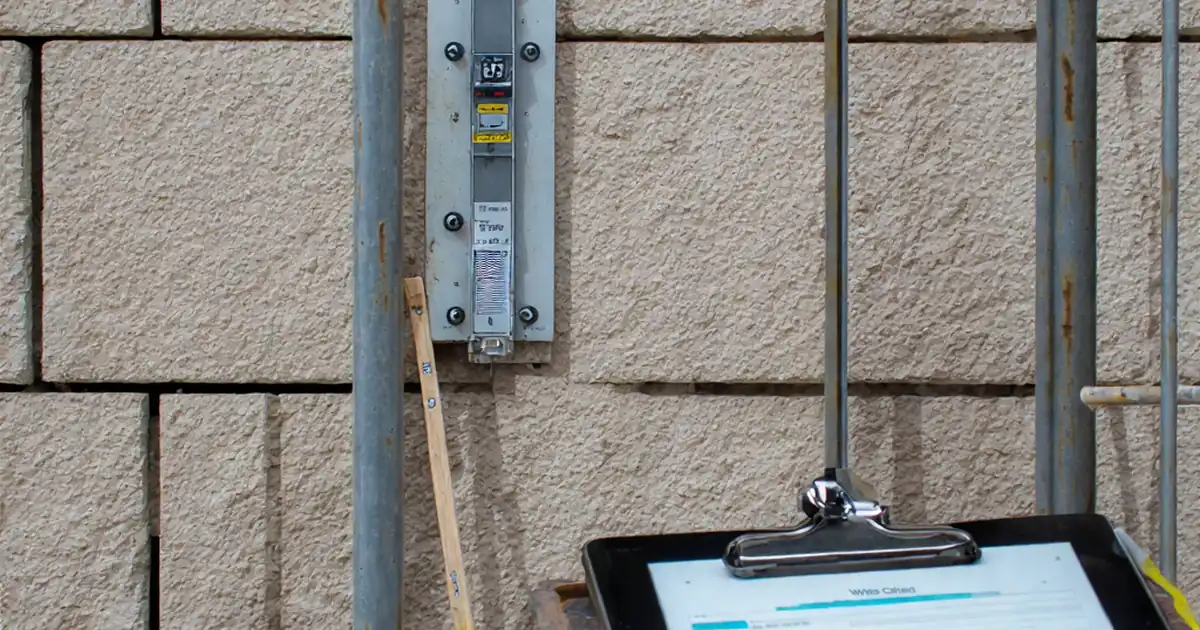
Inspect curtain wall cover caps and external finish alignment is a focused quality-control activity ensuring cover trims sit true, plumb, and level, and that their interfaces with adjacent cladding, stone, or metal panels are consistently flush. This checklist targets mullion and transom snap-on caps, pressure-plate covers, and façade trim alignment relative to design reveals and jointing. By systematically checking fit, straightness, joint uniformity, sealant termination, and color consistency against approved drawings and mock-ups, teams prevent water ingress, rattling, galvanic issues, and visible steps that cause punch-list churn. Clear tolerances, methodical measurement with a 2 m straightedge, digital level, and feeler gauges, plus confirmation of fastener torque and gasket continuity, deliver durable, clean-lined façades. The outcome is a verifiable record that withstands reviews and protects schedule and budget while meeting approved project specifications and authority requirements. Use this interactive checklist to tick items, add comments, attach photos, and instantly export to PDF/Excel with a secure QR link.
- Achieve consistent reveals, flush transitions, and straight sightlines between cover caps and adjacent finishes. This prevents water traps, panel chipping, and visual misalignments while reducing rework, field disputes, and client punch items through clear, documented acceptance criteria and measured evidence.
- Interactive online checklist with tick, comment, and export features secured by QR code. It guides sequencing, tools, and tolerances, links photos and readings to each item, and produces verifiable reports that align with approved drawings, project specifications, and stakeholder handover needs.
- Standardize inspection of cap fit, plumb/level, joint width, sealant terminations, and fastener torque. Evidence requirements—photos with scales, measurement screenshots, batch and lot numbers, and signatures—build traceability, support nonconformance management, and speed closeout while maintaining façade performance and appearance.
Pre-Inspection Preparation
Cover Cap Condition and Fit
Alignment and Tolerances
Fasteners and Sealants
Interfaces with Adjacent Finishes
Documentation and Handover
Why cover cap and external finish alignment matters
Cover caps frame the visual rhythm of a curtain wall. When caps are misaligned, stepped, or wavy against adjacent finishes, shadow lines break, joints read inconsistently, and water can track into unintended paths. This checklist focuses on uniform reveals, straightness, plumb/level control, joint widths, and smooth interfaces to stone, metal panels, or EIFS. By referencing approved drawings and the mock-up, you can quickly distinguish acceptable variance from defects. Field-proven methods—2 m straightedge checks, digital level readings, and feeler gauge offsets—offer repeatable results that installers and inspectors both trust. Records matter: photos with scales, measurement screenshots, and batch labels make findings defensible and speed up closeout. The acceptance cues provided here align with typical façade practice unless the project specification is stricter. Apply them consistently across bays to catch pattern errors early, before adjacent trades lock in misalignments that become expensive to correct.
- Use a 2 m straightedge to control local waviness.
- Measure offsets to adjacent finishes with feeler gauges.
- Reference the approved mock-up for visual acceptance.
- Capture readings and photos where tools touch the work.
Practical methods and tolerances you can defend
Measure vertical plumb and horizontal level over representative lengths to fairly reflect what the eye sees, then verify local joints where small gaps betray larger issues. For cap straightness, check at ends and mid-span; for reveals, confirm against the drawing and mock-up. Where sealant or gaskets terminate caps, ensure continuity so water management remains intact. If you find deviations, record magnitude, exact location (grid/bay), and a corrective action. Typical acceptance includes ≤ 2 mm deviation over 2 m for level/plumb and straightness, ±2 mm joint uniformity, and ≤ 1 mm visible step at interfaces, unless stricter in the approved specification. Always pair measurements with photos showing the tool in place. For fasteners, confirm the specified type and torque, as loose caps rattle and tight ones distort. Maintain a calm, consistent approach; systematic checks protect aesthetics and performance while keeping the punch list short.
- Record grid, elevation, and bay for every reading.
- Take wide and close-up photos of the same location.
- Note whether deviation trends up, down, or twists.
- Apply tighter limits if the project requires it.
Coordinating interfaces and sealing details
Great alignment depends on planning handoffs between glazing and adjacent cladding trades. Use this list before permanent sealant and after dry-fitting to catch steps and gapping. Confirm cap seating and pressure-plate gasket continuity first; then assess offsets to adjacent finishes with a steel ruler or feeler gauges. Inspect sealant termination at cap ends, ensuring correct backer size, adhesion, and tooling that sheds water. Keep weeps clear; small blobs of sealant or tape can block drainage. Document color and gloss against the approved control sample in daylight; lighting hides or exaggerates mismatch. When issues arise, agree a local datum line and shim or adjust under the cap rather than forcing caps into place with over-torque. Close out by exporting a report linking measurements, photos, and batch data, ready for sign-off per approved project specifications and authority requirements.
- Align to a shared datum before sealing.
- Verify gasket continuity prior to sealant.
- Keep weeps clear of debris and sealant.
- Compare color/gloss to the control sample.
How to use this interactive checklist
- Preparation: Assemble calibrated tools (2 m straightedge, digital level, feeler gauges, torque wrench, coating gauge), confirm safe access, and open approved drawings, mock-up photos, and specifications.
- Start Interactive Mode: Open the checklist on your device, select elevation/bay, and enable geotagging/time-stamps for all photos and measurement screenshots.
- Capture Evidence: Tick items as you go, attach photos showing tools in position, enter readings, and note lot/batch numbers and locations.
- Collaborate: Use comments to flag deviations, request clarifications, or assign corrective actions to installers and QA reviewers in real time.
- Export: Generate a PDF/Excel report grouped by grid/bay with embedded images and a QR code for traceability and quick field verification.
- Sign-Off: Collect digital signatures from installer, QA, and consultant; archive the report in the project CDE per approved project specifications and authority requirements.
Call to Action
- Start Checklist Tick off tasks, leave comments on items or the whole form, and export your completed report to PDF or Excel—with a built-in QR code for authenticity.
- Download Excel - Curtain Wall Cover Caps & Finish Alignment Inspection
- Download PDF - Curtain Wall Cover Caps & Finish Alignment Inspection
- View Image - Curtain Wall Cover Caps & Finish Alignment Inspection
Cite & Embed
“Curtain Wall Cover Caps & Finish Alignment Inspection by Quollnet”
with a link to
this source page.

FAQ
Question: What tolerances are acceptable for cover cap straightness and alignment?
Question: How do I verify flushness to adjacent finishes without damaging them?
Question: When should sealant checks occur relative to cover cap inspection?
Question: What evidence best supports closeout and future maintenance?
Related Articles
Broader reading and guidance connected to this checklist topic.


Related Checklists
Keep the workflow moving with nearby templates chosen from similar checklist content.