Test façade installed glazing for water-tightness after sealing completion
Definition: Test façade installed glazing for water-tightness after sealing completion for building envelope teams verifying post-sealant performance, preventing interior leaks under controlled spray applications per approved project specifications and authority requirements.
- Verify cured seals, approved method, and weather limits before water spray.
- Apply calibrated hose or spray rack; record angles, distance, and dwell time.
- Continuously observe interiors; log leaks, moisture readings, and photo evidence.
- Interactive, commentable checklist; export reports with QR code traceability.
Test façade installed glazing for water-tightness after sealing completion is a structured field procedure to confirm that perimeter seals, gaskets, and interface joints prevent interior water ingress. This checklist supports water penetration testing using a calibrated hose test or spray rack test on curtain wall or window wall glazing. It focuses strictly on post-sealant verification of installed façade glazing, not laboratory mock-ups or air infiltration testing. By validating sealant cure, equipment calibration, spray distance, angle, and dwell time, you reduce the risk of hidden moisture, warranty disputes, and downstream damage to finishes or insulation. Outcomes include documented compliance per approved project specifications and authority requirements, traceable measurements, and clear pass/fail evidence tied to locations. Use this interactive checklist to tick each step, add comments with photos, and export results to PDF/Excel with a secure QR link for project records.
- Confirm sealant cure, verify approved test method, and control ambient conditions to produce reliable, repeatable water exposure that reflects service conditions. Thorough preparation prevents false failures and supports immediate root-cause analysis when anomalies are observed during the spray sequence.
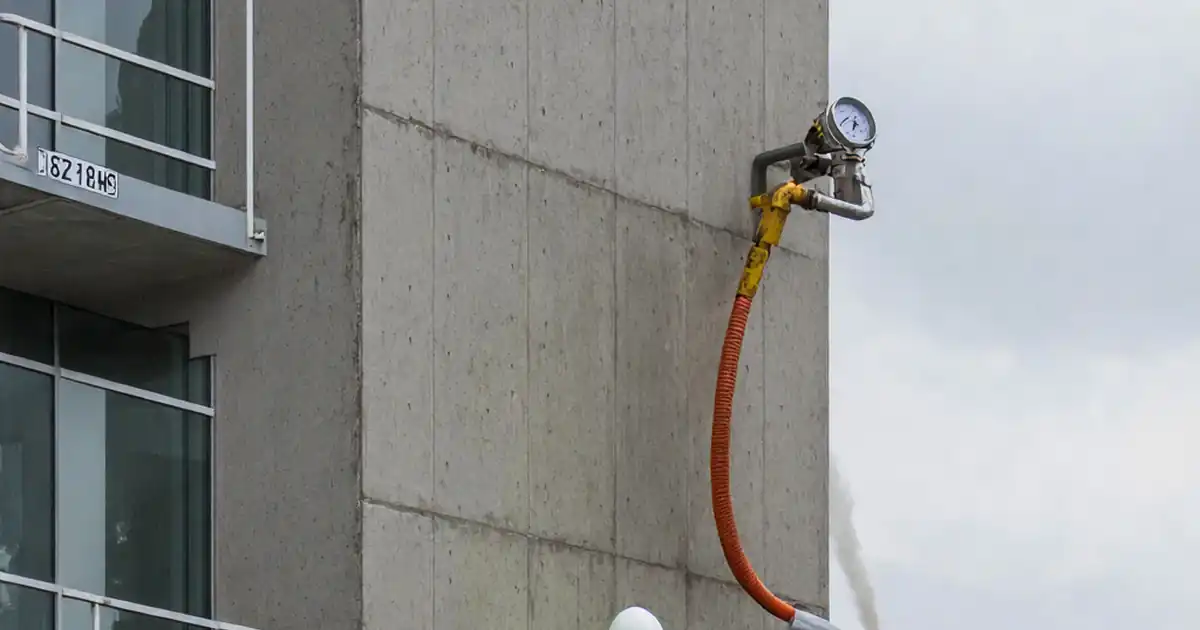
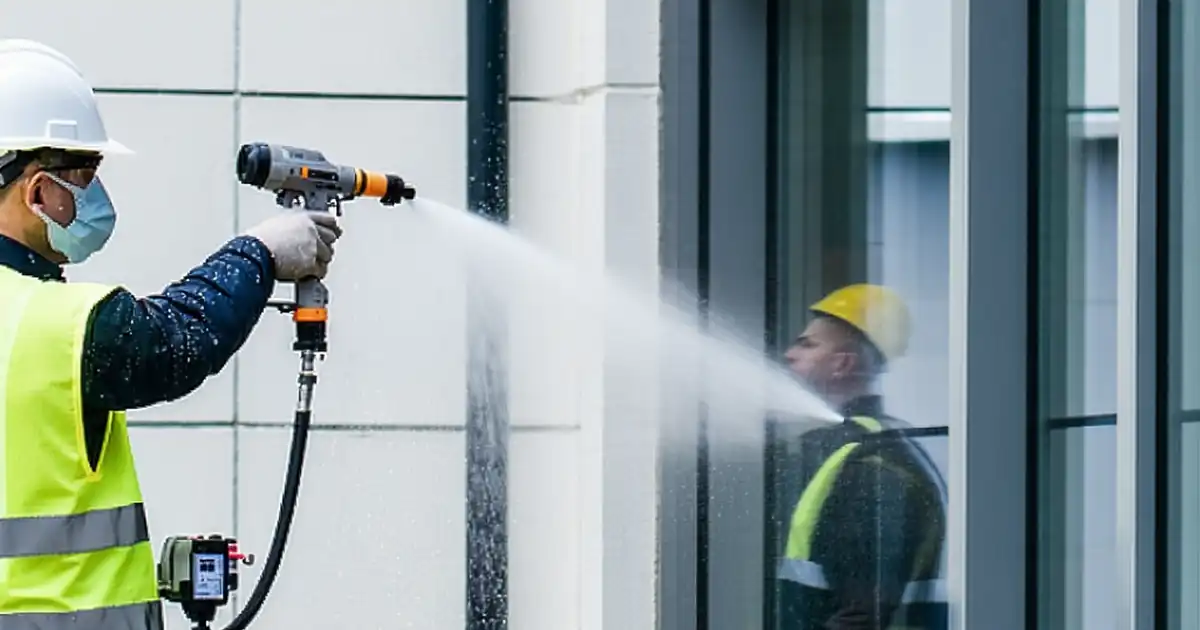
- Execute a calibrated hose or spray rack application with consistent pressure, flow, distance, angle, and dwell time. Methodical coverage of all glazing perimeters, corners, mullion intersections, and penetrations ensures 100% exposure and eliminates untested gaps that could mask real leaks.
- Interactive online checklist with tick, comment, and export features secured by QR code. This provides chain-of-custody for measurements, timestamps, equipment serials, and sign-offs, enabling transparent quality assurance and faster closeout across trades and stakeholders.
- Capture definitive evidence: interior observations, moisture readings, calibrated gauge photos, and marked elevations with coordinates. Clear acceptance criteria—no visible interior water and dry witness media—create unambiguous pass/fail outcomes and robust documentation for warranties and compliance submissions.
Pre-Test Verification
Test Setup and Calibration
Protection and Monitoring
Water-Spray Application
Observation and Evidence Capture
Post-Test Assessment and Rectification
Purpose, Timing, and Environmental Controls
Water-tightness testing of installed façade glazing immediately after sealing completion confirms that sealant joints, gaskets, and interfaces perform as designed under controlled water exposure. Schedule testing only after the sealant achieves manufacturer-stated cure, and verify batch numbers to link performance to materials used. Choose a calibrated hose or spray rack method per approved project specifications and authority requirements, and strictly control ambient conditions. Excessive wind can deflect spray and under-test joints, while low temperatures may affect sealant elasticity and misrepresent service behavior. Establish communication between exterior applicators and interior observers to capture real-time anomalies. Protection of interiors with absorbent pads and trays prevents incidental damage during investigations. Acceptance criteria are straightforward: no visible interior water, no wet witness media, and moisture meter readings at or below baseline +1%. When results are traceable to time, location, and equipment calibration, stakeholders gain confidence for handover and warranty issuance.
- Test only after documented sealant cure.
- Control wind, temperature, and humidity.
- Define method and acceptance before starting.
- Maintain constant observer communication.
- Link results to drawings and timestamps.
Executing a Repeatable, Calibrated Spray
Repeatability depends on consistent pressure, flow, distance, angle, and dwell. Calibrate gauges and flow meters, photograph settings, and record serial numbers. Keep the nozzle perpendicular to the façade, typically around 90°, at a consistent 350 mm ± 50 mm distance. Use a sweeping motion with 50% overlap to avoid missing edges and corners. Dwell on critical points—perimeters, mullion intersections, anchors, and penetrations—following the project’s dwell durations. Progress from low to high so runoff doesn’t mask new leaks. Inside, use witness paper and a moisture meter to validate that observations are not subjective. Mark each tested segment on the elevation with coordinates. Acceptance is pass/fail: any interior droplet, drip line, or wetted witness indicator constitutes a failure in that location and triggers investigation and corrective action before re-testing.
- Calibrate and photograph test equipment.
- Maintain perpendicular angle and set distance.
- Overlap passes to ensure full coverage.
- Record dwell times to the second.
- Treat any interior water as failure.
Troubleshooting Leaks and Documenting Closure
When leakage appears, stop the spray for that segment and localize the source. Common paths include discontinuous sealant tooling at corners, misaligned gaskets, blocked weeps, and gaps at anchors or brackets. Use a smoke pencil to reveal unintended air paths aiding water transport, and a borescope to inspect behind pressure plates without removing large sections. Install temporary protections to prevent damage to finishes, then repair per manufacturer guidance. Log materials, lot numbers, and cure times, and obtain supervisor approval before re-testing. Re-test only the affected zones under the same calibrated conditions to confirm closure. Comprehensive documentation—annotated elevations, photos, meter readings, and signatures—provides a defensible record for warranties and compliance submissions.
- Pause testing and localize the source.
- Check corners, weeps, and interfaces first.
- Use smoke and borescope for tracing.
- Record materials and cure times.
- Re-test under identical conditions.
How to Use This Interactive Water-Tightness Checklist
- Preparation: Assemble calibrated hose or spray rack, gauges, flow meter, thermometer, hygrometer, anemometer, radios, witness media, absorbent pads, and PPE. Confirm sealant cure and approved method per project specifications. Brief the team on roles, safety, and communication.
- Using the Interactive Checklist: Start interactive mode, tick tasks as completed, and add time-stamped comments with photos or videos at each location. Record measurements, equipment serials, and ambient conditions. Validate coverage by marking tested segments on the embedded elevation.
- Export and Share: After completion, generate a commentable report and export as PDF/Excel. The system appends a QR code for authentication. Share with the façade contractor, consultant, and client for coordinated review and action tracking.
- Sign-Off: Capture digital signatures from the tester, façade contractor, and owner’s representative. Archive calibration certificates, photos, and checklists under the test lot or elevation ID for traceable handover.

Call to Action
- Start Checklist Tick off tasks, leave comments on items or the whole form, and export your completed report to PDF or Excel—with a built-in QR code for authenticity.
- Download Excel - Façade Glazing Water-Tightness Test (Post-Sealant)
- Download PDF - Façade Glazing Water-Tightness Test (Post-Sealant)
- View Image - Façade Glazing Water-Tightness Test (Post-Sealant)
Cite & Embed
“Façade Glazing Water-Tightness Test (Post-Sealant) by Quollnet”
with a link to
this source page.

FAQ
Question: Which method should I use: hose or spray rack?
Question: What environmental limits apply during testing?
Question: How long should I apply water at each joint?
Question: What constitutes a failure during the water-tightness test?
Question: Can I test before the sealant is fully cured?
Related Articles
Broader reading and guidance connected to this checklist topic.


Concrete Cube Test Register Excel Format – Pdf & Excel Sample

Is The Crack You See On Your Wall Serious Or Minor Cosmetic Issue?
Related Checklists
Keep the workflow moving with nearby templates chosen from similar checklist content.