Excavator Periodic Service (250h/500h/1000h) Checklist
Definition: Periodic Service (250h/500h/1000h) (All Excavators) is a unified, field-ready checklist covering oils, filters, hydraulics, swing gearboxes, belts, and deep inspections to reduce downtime and protect components.
- Three clear intervals with tools, methods, and acceptance criteria.
- Minimize wear, contamination, leaks, overheating, and unplanned breakdowns.
- Evidence-first steps: readings, photos, lot numbers, signatures, timestamps.
- Interactive, commentable, export to PDF/Excel with QR code authentication.
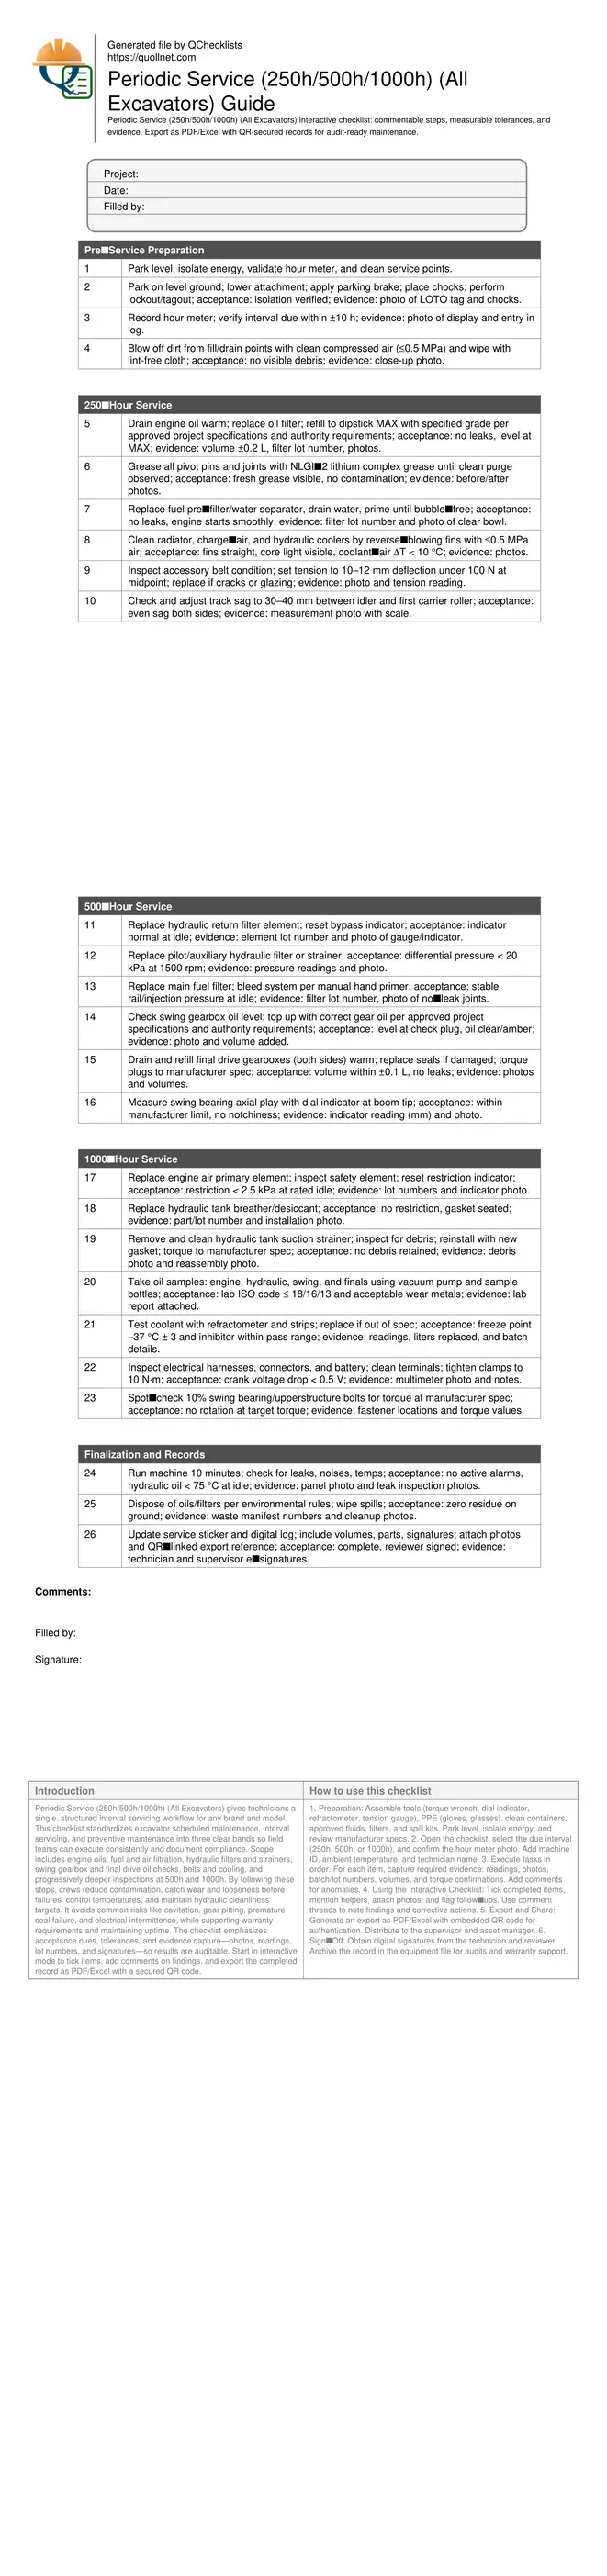
Periodic Service (250h/500h/1000h) (All Excavators) gives technicians a single, structured interval servicing workflow for any brand and model. This checklist standardizes excavator scheduled maintenance, interval servicing, and preventive maintenance into three clear bands so field teams can execute consistently and document compliance. Scope includes engine oils, fuel and air filtration, hydraulic filters and strainers, swing gearbox and final drive oil checks, belts and cooling, and progressively deeper inspections at 500h and 1000h. By following these steps, crews reduce contamination, catch wear and looseness before failures, control temperatures, and maintain hydraulic cleanliness targets. It avoids common risks like cavitation, gear pitting, premature seal failure, and electrical intermittence, while supporting warranty requirements and maintaining uptime. The checklist emphasizes acceptance cues, tolerances, and evidence capture—photos, readings, lot numbers, and signatures—so results are auditable. Start in interactive mode to tick items, add comments on findings, and export the completed record as PDF/Excel with a secured QR code.
- A single, brand-neutral servicing guide aligning 250h, 500h, and 1000h intervals. It details oils, filters, hydraulic return and pilot elements, swing and final drive gear oils, belts, and cooling best practices with measurable acceptance criteria and evidence.
- Focus on contamination control and component protection: purge grease until clean, verify oil levels and colors, measure pressures and belt deflection, and record torque checks. Capture lot numbers, volumes, temperatures, and photos to build a verifiable maintenance history.
- Interactive online checklist with tick, comment, and export features secured by QR code.
- Deeper 500h–1000h inspections add suction strainer cleaning, hydraulic oil sampling, breather replacement, swing bearing play checks, and coolant testing. This staged approach identifies early wear, extends component life, and minimizes unexpected downtime on mixed fleets.
Pre‑Service Preparation
250‑Hour Service
500‑Hour Service
1000‑Hour Service
Finalization and Records
Structuring 250h/500h/1000h intervals that technicians trust
A reliable interval plan staggers workload and evidence capture. The 250h band handles frequent contamination and heat risks—engine oil, fuel pre‑filters, belts, cooling, and grease. At 500h, the focus shifts deeper into hydraulics and drivetrain with return and pilot filters, final drive oils, and swing gearbox checks. By 1000h, you add condition‑based actions—suction strainer inspection, hydraulic sampling, breathers, and foundational structure checks. Use consistent acceptance cues: measured pressures and belt deflections, fluid levels at check plugs, indicator states, and documented volumes within narrow tolerances. Real jobsite examples show that simply reversing cooler airflow and purging joints until clean grease emerges can drop operating temperatures and stabilize cycle times across a mixed fleet. Always align lubricants and tightening torques with manufacturer specs and record lot numbers and torque confirmations to protect warranties and to make audits straightforward.
- Escalate depth by interval to balance effort and risk.
- Use measurable acceptance cues, not visual guesses.
- Capture lots, volumes, torques, and temperatures.
- Align fluids and torques with manufacturer specifications.
- Standardize photos for before/after evidence.
Contamination control and fluid integrity on excavators
Most failures trace back to dirt, water, or heat. Control these by cleaning service points before opening, using clean tools, and capping hoses immediately. Replace filters without pre‑filling on the dirty side; instead, prime through designed circuits to avoid unfiltered oil entry. When sampling, draw mid‑stream after warm‑up with a vacuum pump and clean bottles—never from drain pans. Check hydraulic cleanliness against ISO codes; if out of limits, escalate: change return and pilot filters, inspect suction strainers, and resample. Gear oils in final drives and swing boxes should appear clear to amber; milkiness indicates water. For cooling systems, rely on refractometers and inhibitor strips rather than guesswork. Record every reading, photo, and batch number so trends emerge and abnormal results trigger targeted actions rather than blanket part changes.
- Clean first, then open—prevent ingress.
- Prime through designed circuits; avoid unfiltered fills.
- Sample warm, mid‑stream, using clean bottles.
- Investigate milky or dark fluids immediately.
- Trend ISO codes and temperatures over time.
Mechanical inspections that prevent costly downtime
Beyond fluids, mechanical checks catch looseness and misalignment early. Verify belt deflection with a tension gauge and replace if cracked or glazed. Measure swing bearing axial play at the boom tip using a dial indicator and compare to limits; increased play and notchiness point to race or roller wear. Standardize track sag measurements and adjust to minimize idler and sprocket wear. For structural fasteners, spot‑check torque with a calibrated wrench and record location and values. Electrical reliability matters too—clean battery posts and confirm voltage drop during crank remains low. Finally, conduct a warm post‑service run to confirm stable temperatures and leak‑free joints before returning the excavator to production.
- Use gauges for belt deflection, not thumb tests.
- Dial‑indicator swing play reveals bearing health.
- Track sag settings reduce drivetrain wear.
- Spot‑check critical torques with calibration.
- Warm run confirms temperatures and leak status.
How to Use This Excavator Periodic Service Checklist
- Preparation: Assemble tools (torque wrench, dial indicator, refractometer, tension gauge), PPE (gloves, glasses), clean containers, approved fluids, filters, and spill kits. Park level, isolate energy, and review manufacturer specs.
- Open the checklist, select the due interval (250h, 500h, or 1000h), and confirm the hour meter photo. Add machine ID, ambient temperature, and technician name.
- Execute tasks in order. For each item, capture required evidence: readings, photos, batch/lot numbers, volumes, and torque confirmations. Add comments for anomalies.
- Using the Interactive Checklist: Tick completed items, mention helpers, attach photos, and flag follow‑ups. Use comment threads to note findings and corrective actions.
- Export and Share: Generate an export as PDF/Excel with embedded QR code for authentication. Distribute to the supervisor and asset manager.
- Sign‑Off: Obtain digital signatures from the technician and reviewer. Archive the record in the equipment file for audits and warranty support.
Call to Action
- Start Checklist Tick off tasks, leave comments on items or the whole form, and export your completed report to PDF or Excel—with a built-in QR code for authenticity.
- Download Excel - Excavator Periodic Service (250h/500h/1000h)
- Download PDF - Excavator Periodic Service (250h/500h/1000h)
- View Image - Excavator Periodic Service (250h/500h/1000h)
Cite & Embed
“Excavator Periodic Service (250h/500h/1000h) by Quollnet”
with a link to
this source page.

FAQ
Question: Do these intervals fit every excavator brand and model?
Question: What hydraulic cleanliness target should I use after service?
Question: How do I avoid introducing dirt when changing filters?
Question: What evidence is essential for audit and warranty protection?
Related Articles
Broader reading and guidance connected to this checklist topic.


Safety In Construction: The Role Of Periodic Safety Checklists


Related Checklists
Keep the workflow moving with nearby templates chosen from similar checklist content.