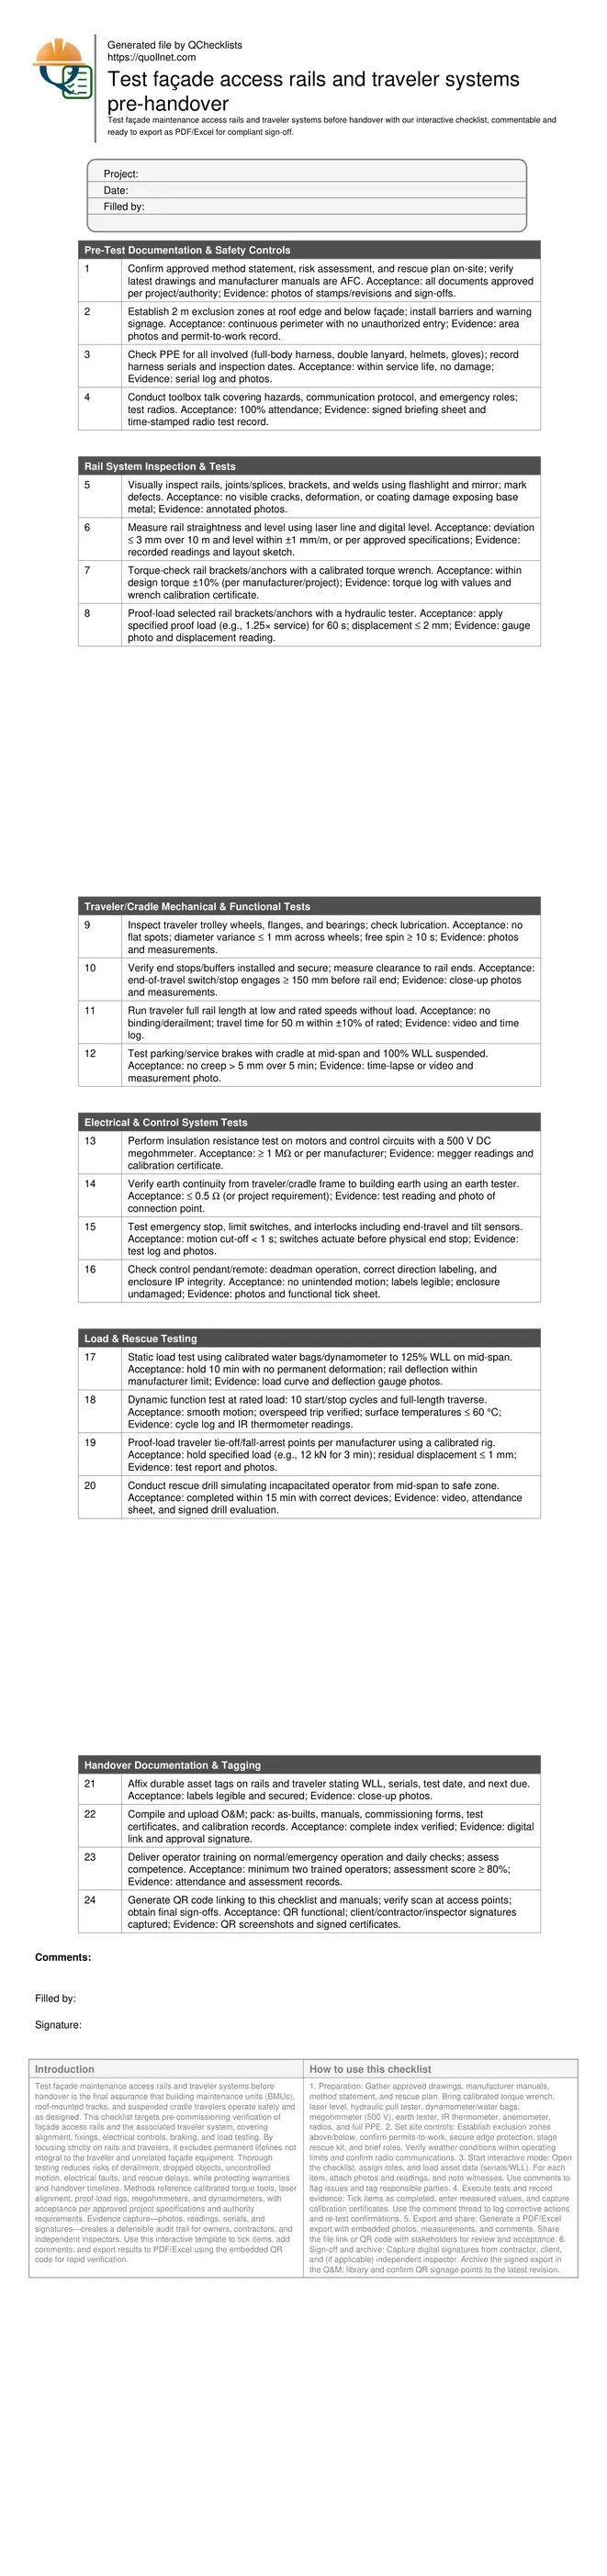
Test Façade Access Rails and Traveler Systems Pre-Handover
Definition: Test façade maintenance access rails and traveler systems before handover ensures safe, compliant operation of BMU rails and traveling cradles for facility owners and contractors.
- Pre-handover inspection, functional checks, proof loading, and documentation.
- Prevent derailment, falls, electrical faults, and warranty disputes.
- Calibrated tools, measurable tolerances, photo/video evidence, third-party witnessing.
- Interactive, commentable, export-ready checklist secured by QR code.
Test façade maintenance access rails and traveler systems before handover is the final assurance that building maintenance units (BMUs), roof-mounted tracks, and suspended cradle travelers operate safely and as designed. This checklist targets pre-commissioning verification of façade access rails and the associated traveler system, covering alignment, fixings, electrical controls, braking, and load testing. By focusing strictly on rails and travelers, it excludes permanent lifelines not integral to the traveler and unrelated façade equipment. Thorough testing reduces risks of derailment, dropped objects, uncontrolled motion, electrical faults, and rescue delays, while protecting warranties and handover timelines. Methods reference calibrated torque tools, laser alignment, proof-load rigs, megohmmeters, and dynamometers, with acceptance per approved project specifications and authority requirements. Evidence capture—photos, readings, serials, and signatures—creates a defensible audit trail for owners, contractors, and independent inspectors. Use this interactive template to tick items, add comments, and export results to PDF/Excel using the embedded QR code for rapid verification.
- Validate BMU rails and traveler systems with measurable criteria: alignment, torque, proof loads, insulation resistance, and brakes. Prevent post-handover defects by capturing photos, readings, serial numbers, and signatures, ensuring traceable compliance with approved specifications and authority requirements before operations begin.
- Reduce site risk through structured sequencing: documentation and exclusion zones first, then mechanical and electrical checks, followed by static/dynamic load tests and a timed rescue drill. Each step defines tools, tolerances, and acceptance cues to deliver safe, reliable façade access from day one.
- Streamline handover with complete O&M deliverables: approved drawings, commissioning forms, calibration certificates, training records, asset labels, and QR-linked manuals. Digital evidence accelerates stakeholder sign-off, minimizes punch list disputes, and supports future maintenance and statutory re-testing without repeating baseline investigations.
- Interactive online checklist with tick, comment, and export features secured by QR code.
Pre-Test Documentation & Safety Controls
Rail System Inspection & Tests
Traveler/Cradle Mechanical & Functional Tests
Electrical & Control System Tests
Load & Rescue Testing
Handover Documentation & Tagging
Why pre-handover testing of rails and travelers matters
Façade access rails and traveler systems demand rigorous pre-handover testing because they combine structural, mechanical, and electrical risks at height. This stage validates that rails are aligned, fixings torqued, and traveler motion and braking are reliable before routine maintenance begins. Without it, the likelihood of derailment, dropped loads, electrical faults, or failed rescues increases, exposing people and property to harm and delaying occupancy. Practical verification uses calibrated torque wrenches, laser levels, hydraulic proof-load equipment, and dynamometers, with acceptance aligned to manufacturer data and per approved project specifications and authority requirements. Evidence—photos, readings, and signatures—creates an auditable record that supports warranty claims and future re-certification. Typical jobsite sequencing starts with documentation and exclusion zones, proceeds to rail and trolley inspection, then executes electrical tests and load-based functional trials, finishing with training and sign-off.
- Sequence tests from paperwork to load to sign-off.
- Use only in-date, calibrated instruments and record certificates.
- Capture defects with annotated photos and exact locations.
- Apply acceptance per manufacturer and approved specifications.
Methods, tolerances, and acceptance cues in practice
On the roof, a laser line and digital level quickly confirm rail straightness and slope within agreed tolerances, while torque logs show anchors meet design values. Hydraulic testers proof-load select brackets with displacement monitoring to flag creep or movement. Traveler checks verify wheel condition, end stops, and brakes, then traverse tests confirm smooth, derailment-free motion. Electrically, megger readings must meet minimum insulation thresholds, and ground continuity must be low and stable. Static and dynamic load tests with water bags or calibrated weights validate structure and drive systems under real conditions. Finally, a timed rescue drill demonstrates workable emergency procedures. Throughout, acceptance values follow manufacturer data and the project’s approvals; where tolerances differ, the stricter requirement governs. Clear, dated evidence and witnesses help resolve disputes at handover.
- Record actual readings; avoid pass/fail without numbers.
- Hold proof loads long enough to detect creep or slip.
- Test end switches before contacting hard end stops.
- Time and video critical functional and rescue steps.
Documentation, traceability, and digital sign-off
Testing is only as strong as the traceability behind it. Maintain a complete O&M pack with approved drawings, commissioning forms, test certificates, and calibration records linked directly to each asset’s serial number. Use QR codes at access points to open the latest interactive checklist and manuals. During testing, attach photos, megger prints, torque logs, and dynamometer traces to the exact checklist item, tagging location and time. Close out comments with corrective actions and re-test evidence. Upon completion, export the results as PDF/Excel and secure final digital signatures from the contractor, client, and (where required) an independent inspector. This reduces punch list churn, compresses handover time, and establishes a reliable baseline for future periodic inspections and statutory re-certification.
- Link evidence to specific asset IDs and locations.
- Use QR codes to prevent outdated documents in the field.
- Export signed records to PDF/Excel for archiving.
- Retain calibration certificates with each instrument log.
How to Use This Pre-Handover Testing Checklist
- Preparation: Gather approved drawings, manufacturer manuals, method statement, and rescue plan. Bring calibrated torque wrench, laser level, hydraulic pull tester, dynamometer/water bags, megohmmeter (500 V), earth tester, IR thermometer, anemometer, radios, and full PPE.
- Set site controls: Establish exclusion zones above/below, confirm permits-to-work, secure edge protection, stage rescue kit, and brief roles. Verify weather conditions within operating limits and confirm radio communications.
- Start interactive mode: Open the checklist, assign roles, and load asset data (serials/WLL). For each item, attach photos and readings, and note witnesses. Use comments to flag issues and tag responsible parties.
- Execute tests and record evidence: Tick items as completed, enter measured values, and capture calibration certificates. Use the comment thread to log corrective actions and re-test confirmations.
- Export and share: Generate a PDF/Excel export with embedded photos, measurements, and comments. Share the file link or QR code with stakeholders for review and acceptance.
- Sign-off and archive: Capture digital signatures from contractor, client, and (if applicable) independent inspector. Archive the signed export in the O&M library and confirm QR signage points to the latest revision.
Call to Action
- Start Checklist Tick off tasks, leave comments on items or the whole form, and export your completed report to PDF or Excel—with a built-in QR code for authenticity.
- Download Excel - Façade Access Rails & Traveler Testing (Pre-Handover)
- Download PDF - Façade Access Rails & Traveler Testing (Pre-Handover)
- View Image - Façade Access Rails & Traveler Testing (Pre-Handover)
Cite & Embed
“Façade Access Rails & Traveler Testing (Pre-Handover) by Quollnet”
with a link to
this source page.
FAQ
Question: What proof load should be applied to rails and traveler components?
Question: Can testing proceed in windy or adverse weather conditions?
Question: Which documents are required for handover acceptance?
Question: How often should rails and traveler systems be re-tested after handover?
Question: Who must witness the tests before handover?
Related Articles
Broader reading and guidance connected to this checklist topic.


Is It Important To Customize Your Qr Code And How To Do It?


Related Checklists
Keep the workflow moving with nearby templates chosen from similar checklist content.