Excavator Daily Pre-Start Walkaround is a standardized safety checklist for operators and supervisors to identify visible defects and verify controls before startup on crawler or wheeled excavators.
- Detect leaks, loose pins, worn teeth, and damaged guards early.
- Verify mirrors, cameras, lights, alarms, and extinguisher are operational.
- Record measurements, photos, and signatures for compliance and traceability.
- Interactive, commentable, export-ready checklist with secure QR code access.
The checklist
Cab and Safety Systems
- Clean and adjust all mirrors and camera lenses using a microfiber cloth and glass-safe cleaner; verify unobstructed view of swing radius and travel path. Acceptance: lenses and mirrors streak-free with full coverage; attach photos from operator eye height.
- Inspect seat belt, mounts, and ROPS/FOGS guards; pull-test the latch and retract mechanism. Acceptance: belt latches/releases smoothly, no cuts/frays; guards secure; photo of belt tag and guards.
- Function-test horn, travel alarm, and swing alarm for clear, continuous sound. Method: key ON, actuate controls as specified. Acceptance: audible within 1 s, clearly heard at 10 m; short video clip as evidence.
- Verify fire extinguisher type and charge. Method: confirm accessibility, pin/seal intact, gauge in green, tag in date. Acceptance: service date current; mount tight; photo of gauge and tag.
Hydraulic System and Hoses
- Inspect hydraulic hoses, couplings, and clamps along boom, stick, and frame; wipe with a clean rag and recheck after 1 minute. Acceptance: no fresh oil weep; abrasion sleeves intact; attach close-up photos.
- Check cylinder rods and wiper seals for scoring, pitting, or seal extrusion. Use flashlight and clean rag. Acceptance: rods smooth and dry after wipe; no seal damage; photos of worst-case areas.
- Test quick coupler locking. Method: lower attachment to ground, engage/disengage per OEM, visually confirm mechanical locks. Acceptance: locks fully seated; secondary safety engaged; photo showing visible lock indicators.
- Check auxiliary hydraulic lines and caps. Method: confirm dust caps present, hoses supported, no kinks. Acceptance: caps fitted; no leaks at quick-connects; close-up photo.
Boom, Stick, Bucket and Pins
- Assess pin and bushing wear at boom-foot, boom-stick, stick-bucket. Method: apply pry bar to detect play; measure visible movement in mm. Acceptance: within manufacturer tolerance; record measurement and attach video/photo.
- Inspect bucket teeth, adaptors, edge, and side cutters. Method: visual and tap test for cracks. Acceptance: no missing or cracked components; wear within OEM limits; photo of cutting edge and teeth.
- Verify bucket retaining pin and safety clip presence. Method: confirm clip seated and secured; attempt light pull. Acceptance: clip fully engaged; pin cannot drift; close-up photo.
- Scan booms, sticks, linkages, and welds for cracks, dents, or deformation. Use flashlight; clean dirt where needed. Acceptance: no visible structural damage; photo of any suspect area for supervisor review.
Undercarriage and Travel Gear
- For crawlers, measure track sag midspan using a ruler on level ground. Acceptance: within OEM specification; record sag in mm and photo of measurement.
- For crawlers, check track shoes, carrier rollers, idlers, and sprockets. Method: visual for wear, missing bolts, oil leaks. Acceptance: no missing/loose hardware; seals dry; photos of left/right sides.
- For wheeled excavators, inspect tyres for cuts and bulges; check pressure with a calibrated gauge. Acceptance: pressure per data plate/OEM; record kPa and tyre condition photos.
- Inspect slew ring area and upper/lower structure interface. Method: visual for missing bolts, cracked paint lines, or grease purge. Acceptance: all bolts present; no abnormal grease ejection; photo panorama.
Fluids and Electrical
- Check engine oil level on level ground with engine off. Method: dipstick wipe/reinsert. Acceptance: oil between MIN–MAX; oil clean (no metal or milkiness); photo of dipstick.
- Verify hydraulic oil sight gauge. Method: machine level, boom/stick retracted. Acceptance: fluid between sight marks; no foaming; photo of gauge.
- Confirm coolant level in expansion tank (engine cold). Acceptance: between LOW–FULL marks; hoses intact; no crusted leaks; photo of tank and cap area.
- Check fuel and DEF (if fitted). Method: read gauges; inspect DEF cap and label. Acceptance: sufficient for planned shift; DEF sealed, clear, and uncontaminated; record % and photo.
- Inspect batteries and cables. Method: tug-test terminals; look for corrosion; ensure clamps tight. Acceptance: secure, corrosion-free; battery cover fitted; photo of terminals.
- Function-test work lights, travel lights, indicators, and beacons. Acceptance: all illuminate/flash correctly; replace failed bulbs before operation; short video as evidence.
General Condition and Housekeeping
- Check steps, handrails, and non-slip surfaces. Method: tug and step test. Acceptance: rigid, undamaged, clean of mud/grease; photo of access points.
- Verify guards, engine covers, and belly pans are fitted and latched. Acceptance: all fasteners present; no rattles; photo of latches and panels.
- Clear cab of loose items; secure tools and documents. Acceptance: floor and controls unobstructed; operator’s manual and permits present; photo of cab interior and document pocket.
- Start engine and observe gauges for 60 s at idle. Acceptance: no warning lights; stable oil pressure and temperature; no abnormal noise/vibration; photo of instrument panel; escalate defects per approved project specifications and authority requirements.
Preview the printable checklist
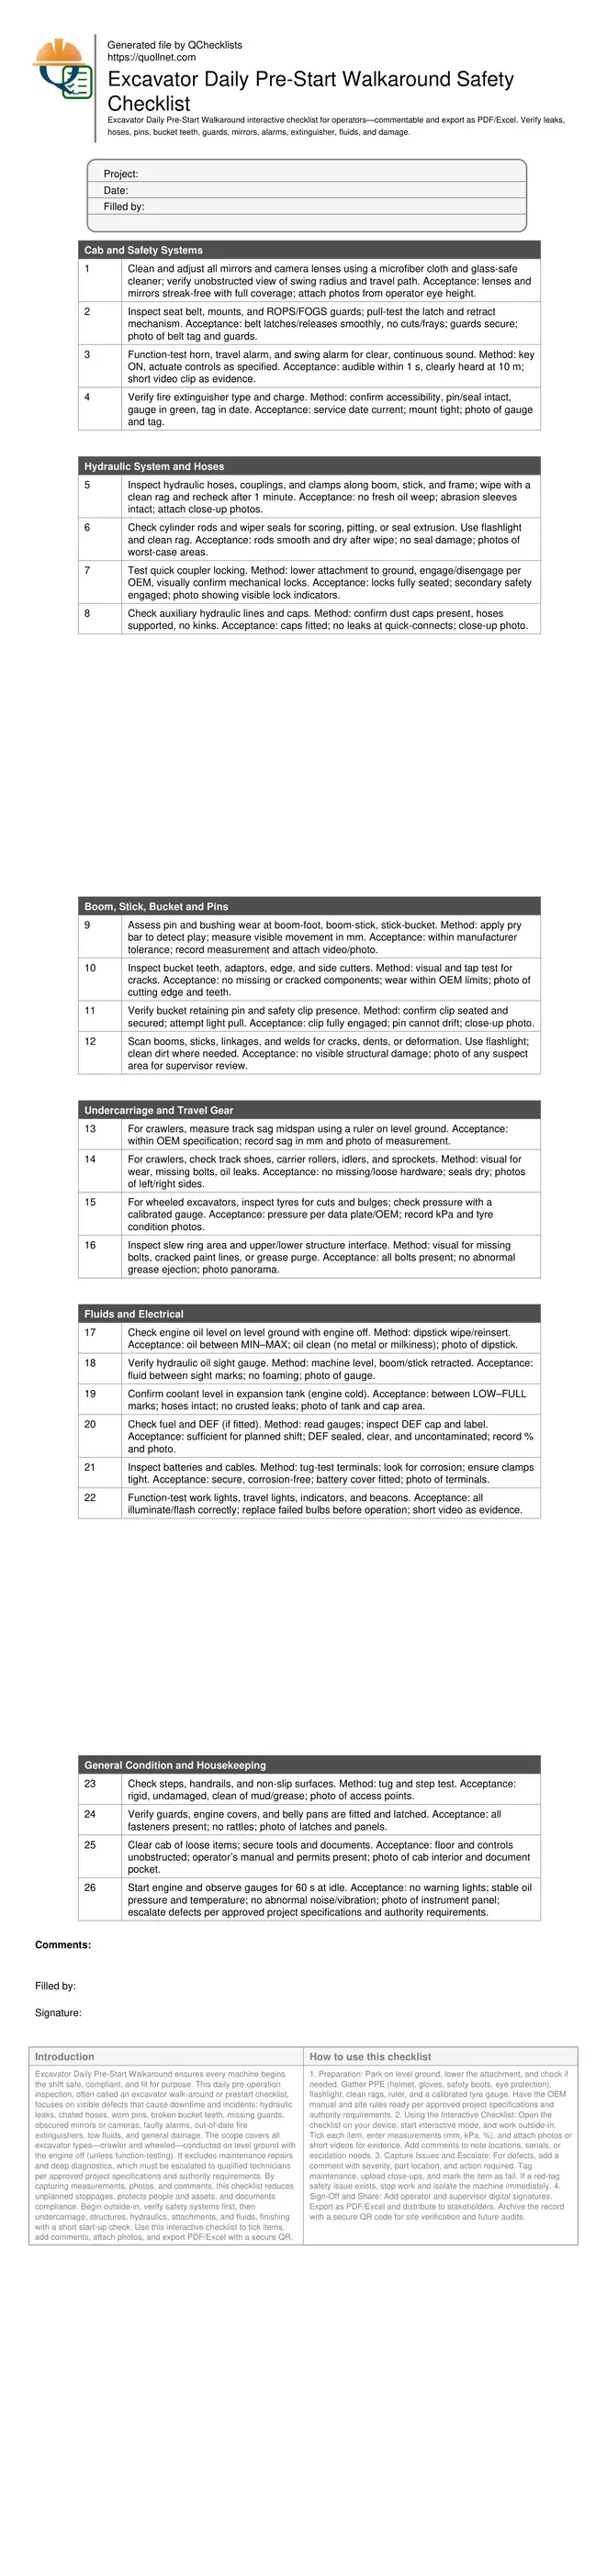
Preview page one below. Open the image or download the PDF for all pages.
At a glance
- A disciplined outside-in walkaround prevents incidents by catching issues before they escalate. Operators verify safety systems, structures, undercarriage, hydraulics, attachments, and fluid levels, documenting findings with photos, readings, and signatures for reliable traceability and faster maintenance response during the shift.
- Interactive online checklist with tick, comment, and export features secured by QR code. This enables instant sharing with supervisors, service teams, and clients, streamlines defect escalation, and creates a tamper-evident audit trail that supports daily compliance across multiple excavators and crews.
- Built for crawler and wheeled excavators, the checklist uses practical cues: wipe tests for leaks, feeler/pry checks for pin wear, sight gauges for fluids, and short functional tests for alarms and lights. Clear acceptance criteria help operators decide when to proceed or stop and isolate equipment.
How to Use the Interactive Pre-Start Checklist
- Preparation: Park on level ground, lower the attachment, and chock if needed. Gather PPE (helmet, gloves, safety boots, eye protection), flashlight, clean rags, ruler, and a calibrated tyre gauge. Have the OEM manual and site rules ready per approved project specifications and authority requirements.
- Using the Interactive Checklist: Open the checklist on your device, start interactive mode, and work outside-in. Tick each item, enter measurements (mm, kPa, %), and attach photos or short videos for evidence. Add comments to note locations, serials, or escalation needs.
- Capture Issues and Escalate: For defects, add a comment with severity, part location, and action required. Tag maintenance, upload close-ups, and mark the item as fail. If a red-tag safety issue exists, stop work and isolate the machine immediately.
- Sign-Off and Share: Add operator and supervisor digital signatures. Export as PDF/Excel and distribute to stakeholders. Archive the record with a secure QR code for site verification and future audits.
A safe, repeatable outside-in sequence that catches critical defects
Begin the Excavator Daily Pre-Start Walkaround on stable, level ground with the engine off and the attachment grounded. Work outside-in, left-to-right, top-to-bottom for consistency. Prioritize safety systems first—mirrors, cameras, seat belt, alarms, and extinguisher—because these directly protect people in the swing and travel envelope. Move to structures and guards, confirming latches are closed and non-slip access points are solid. Continue to the undercarriage: for crawlers, measure track sag and look for missing bolts; for wheeled units, check tyres and pressures. Finish with fluids, electrics, and a brief start-up check to confirm gauges and lights stabilize. Use a flashlight and clean rag to reveal leaks and cracks hidden by dust. Capture clear photos and short videos, and record measurements to create reliable evidence. If any red-tag condition is found—such as non-functioning alarms, structural cracks, or active leaks—stop, isolate, and report before operating.
- Work outside-in for full machine coverage without missed areas.
- Verify safety systems first; they prevent immediate harm.
- Use light and wipe tests to expose subtle leaks or cracks.
- Record photos, videos, and measurements as objective evidence.
- Isolate and report red-tag conditions before operation.
Hydraulics, pins, and attachments: simple methods, clear acceptance cues
Hydraulic reliability starts with clean, intact hoses routed away from pinch points, secure clamps, and dry couplings. Wipe suspect areas, then recheck for fresh oil weep to confirm active leaks. Cylinder rods should be smooth and free of scoring; damaged wiper seals allow dirt ingress and fluid loss. For pin and bushing assessment, gently apply a pry bar to observe movement, then record the maximum play in millimetres. Acceptance is straightforward: readings within the manufacturer’s tolerance allow operation; over-limit play is escalated for service. Quick couplers must show positive lock indicators and an engaged secondary safety. Buckets should have all teeth/adaptors present, edges free of cracks, and wear within OEM guidance. Structural components—boom, stick, and linkages—must be free of visible cracks or deformation. Any suspect finding is documented with close-up photos and, where helpful, a short video for the supervisor or fitter.
- Wipe then recheck to confirm active hydraulic leaks.
- Measure pin play in mm; compare to OEM tolerance.
- Verify coupler primary lock and secondary safety.
- Confirm all teeth present; no cracked edges.
- Photograph defects and note precise locations.
Fluids, electrics, and final start-up: prevent downtime before it starts
Fluid checks are fast and decisive when performed on level ground. Engine oil by dipstick must sit between MIN–MAX with no milky contamination. Hydraulic oil should be visible between sight marks and free of foam. Coolant in the expansion tank must be within marks when cold, with no crusted residue near hose joints. Fuel and DEF levels should support the planned shift; keep DEF sealed and uncontaminated. Electrical reliability depends on clean, tight battery terminals and fully functional lights and beacons. For crawlers, verify track sag is within the data plate or OEM manual; for wheeled units, measure tyre pressures with a calibrated gauge and match the manufacturer’s kPa values. Conclude with a 60-second idle to confirm stable gauges and no warning lights. Log all readings and attach photos, then export the report for supervisors and maintenance.
- Check fluids on level ground for accurate readings.
- Record kPa, mm, and percentages; avoid guesswork.
- Keep DEF sealed to prevent contamination.
- Confirm no warning lights during 60 s idle.
- Export the report to inform maintenance planning.