Apply Horizontal Spray-Applied Membranes: Coverage, Adhesion, Protection
Definition: Apply horizontal spray-applied membranes checklist for site supervisors and inspectors, defining coverage, rebound control, adhesion, curing, and protection on horizontal substrates; excludes liquid-applied systems.
- Confirm design thickness and uniform coverage across all horizontal areas.
- Control rebound and overspray to prevent defects and material waste.
- Verify adhesion and curing before protection or opening to traffic.
- Interactive, commentable, export options with QR code record security.
Apply horizontal spray-applied membranes is a focused field activity requiring disciplined verification of coverage, rebound control, adhesion, and protection on horizontal substrates. This checklist supports spray-applied waterproofing and horizontal membrane application workflows—excluding liquid-applied roll-on or brush coatings—to deliver a uniform, durable barrier. It guides users through pre-application controls, equipment setup, application sequencing, overspray and rebound capture, adhesion pull-off testing, curing verification, and final protection. By emphasizing substrate readiness, dew point and temperature windows, controlled spray passes, and pinhole detection, it helps avoid premature failures, delamination, punctures, and costly rework. The result is a membrane applied to the specified thickness with consistent bond, free of unbonded rebound and surface defects, and appropriately protected before construction traffic or backfilling. Use this interactive checklist to tick tasks, leave clarifying comments, upload photo evidence, and export as PDF/Excel with an embedded QR for secure traceability.
- Ensure specified thickness and coverage using grid-based measurements and calibrated gauges, then verify adhesion with representative pull-off tests. The process reduces variability, catches early defects such as pinholes and weak bond, and documents evidence for client acceptance per approved project specifications and authority requirements.
- Manage rebound and overspray using screens, collection trays, and real-time housekeeping. Capturing waste, stopping work under excessive wind, and prohibiting re-use of rebound prevent embedded debris, ridges, and thin spots. Logging waste and environmental readings creates transparent, auditable quality records across each pour or daywork section.
- Protect the membrane promptly with geotextile or protection boards and enforce exclusion zones to prevent point loading, UV exposure, and premature wetting. Curing and protection milestones—time, temperature, and coverage—are timestamped with photos, batch IDs, and signatures, ensuring the assembly’s long-term waterproofing performance and warranty integrity.
- Interactive online checklist with tick, comment, and export features secured by QR code.
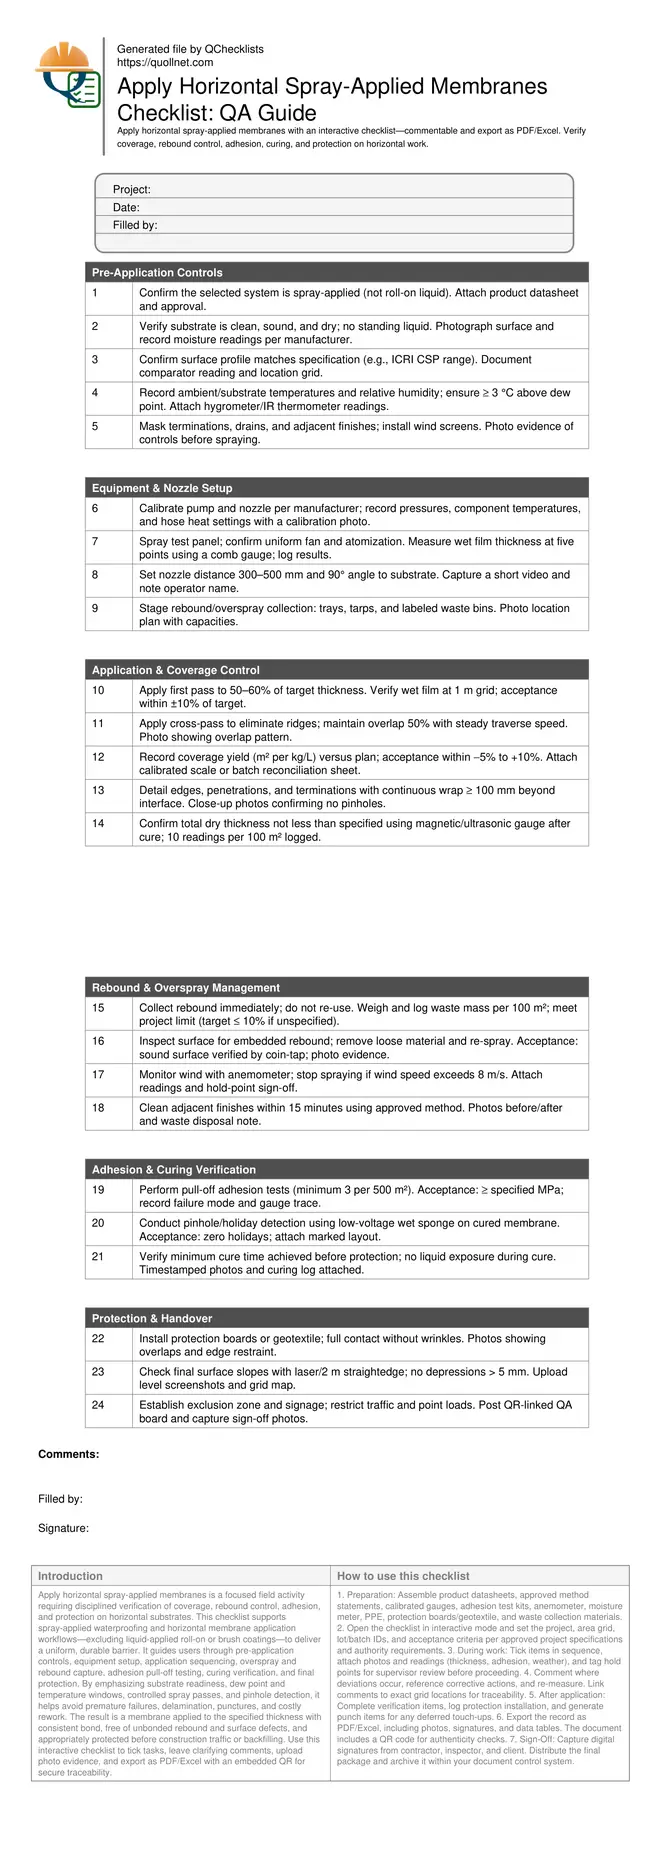
Pre-Application Controls
Equipment & Nozzle Setup
Application & Coverage Control
Rebound & Overspray Management
Adhesion & Curing Verification
Protection & Handover
Coverage and Thickness: Getting Uniform Results
Uniform coverage on horizontal substrates starts with environmental control and a disciplined pass strategy. Grid the area at 1 m intervals and measure wet film thickness immediately after each pass using a calibrated comb gauge. Use cross-direction passes at 50% overlap to eliminate ridges and shadows behind penetrations. Record actual yield against planned consumption to catch thin spots early. After curing per manufacturer guidance, verify dry film thickness with a magnetic or ultrasonic gauge at a statistically representative frequency (e.g., 10 readings per 100 m²), marking outliers for targeted repair. Acceptance cues include continuous film at edges and terminations, no visible pinholes, and thickness at or above the specified minimum. Document everything—photos with a steel ruler, gauge screenshots, and batch IDs—so your quality evidence is unambiguous and repeatable across pours or daywork sections.
- Grid at 1 m for repeatable measurements.
- Use cross-passes to remove ridges.
- Record yield and reconcile consumption.
- Verify dry thickness after full cure.
- Photograph edges and terminations closely.
Adhesion, Curing, and Defect Detection
Adhesion is the decisive performance metric. Conduct pull-off tests at representative locations, avoiding known weak zones and recording failure modes to demonstrate substrate or cohesive membrane failure rather than adhesive failure. Maintain ambient and substrate temperatures within the product window, with a ≥ 3 °C dew point margin. Do not expose the uncured membrane to liquids or traffic. After curing, perform a low-voltage wet-sponge holiday test to locate pinholes, mark them visibly, and repair per the manufacturer’s method. Curing records—time, temperature, humidity—support both performance and warranty discussions. Before protection boards or geotextile go down, confirm adhesion meets the specification and the membrane is defect-free across penetrations and terminations. These controls deliver a bonded, continuous barrier ready for protection without risking delamination or moisture entrapment.
- Pull-off tests with logged failure modes.
- Respect dew point and cure windows.
- No liquid exposure before full cure.
- Holiday test and mark repairs.
- Verify before installing protection.
Rebound, Overspray, and Protection Measures
Rebound and overspray are predictable by-products of spraying; plan to capture them and prevent re-incorporation. Install wind screens, trays, and tarpaulins, and track waste mass by area. Stop spraying when wind exceeds safe limits to avoid drift and thin zones. Inspect for embedded rebound using a coin-tap or scrape test; remove loose material and re-spray locally to the specified thickness. Clean adjacent finishes promptly to avoid staining. After quality checks and cure, install protection boards or geotextile to prevent point loading and UV/weather exposure, and establish exclusion zones until the assembly is covered or backfilled. Maintain as-built documentation—photos, readings, waste logs, and signatures—so any future investigation has a complete and trusted record per approved project specifications and authority requirements.
- Capture and log rebound waste by area.
- Suspend work during high winds.
- Remove embedded rebound before touch-up.
- Protect membrane before traffic.
- Keep full, signed QA records.
How to Use This Interactive Checklist
- Preparation: Assemble product datasheets, approved method statements, calibrated gauges, adhesion test kits, anemometer, moisture meter, PPE, protection boards/geotextile, and waste collection materials.
- Open the checklist in interactive mode and set the project, area grid, lot/batch IDs, and acceptance criteria per approved project specifications and authority requirements.
- During work: Tick items in sequence, attach photos and readings (thickness, adhesion, weather), and tag hold points for supervisor review before proceeding.
- Comment where deviations occur, reference corrective actions, and re-measure. Link comments to exact grid locations for traceability.
- After application: Complete verification items, log protection installation, and generate punch items for any deferred touch-ups.
- Export the record as PDF/Excel, including photos, signatures, and data tables. The document includes a QR code for authenticity checks.
- Sign-Off: Capture digital signatures from contractor, inspector, and client. Distribute the final package and archive it within your document control system.
Call to Action
- Start Checklist Tick off tasks, leave comments on items or the whole form, and export your completed report to PDF or Excel—with a built-in QR code for authenticity.
- Download Excel - Horizontal Spray-Applied Membranes (Application QA)
- Download PDF - Horizontal Spray-Applied Membranes (Application QA)
- View Image - Horizontal Spray-Applied Membranes (Application QA)
Cite & Embed
“Horizontal Spray-Applied Membranes (Application QA) by Quollnet”
with a link to
this source page.
FAQ
Question: What counts as acceptable coverage and thickness for spray-applied membranes on horizontal surfaces?
Question: How do I control and document rebound during spray application?
Question: When and how should adhesion be verified?
Question: What does “exclude liquids” mean in this checklist?
Question: What environmental limits should I observe during spraying?
Related Articles
Broader reading and guidance connected to this checklist topic.


Is It Important To Customize Your Qr Code And How To Do It?

Improve Your Project Handover Process With Snag List Tracking App


Related Checklists
Keep the workflow moving with nearby templates chosen from similar checklist content.