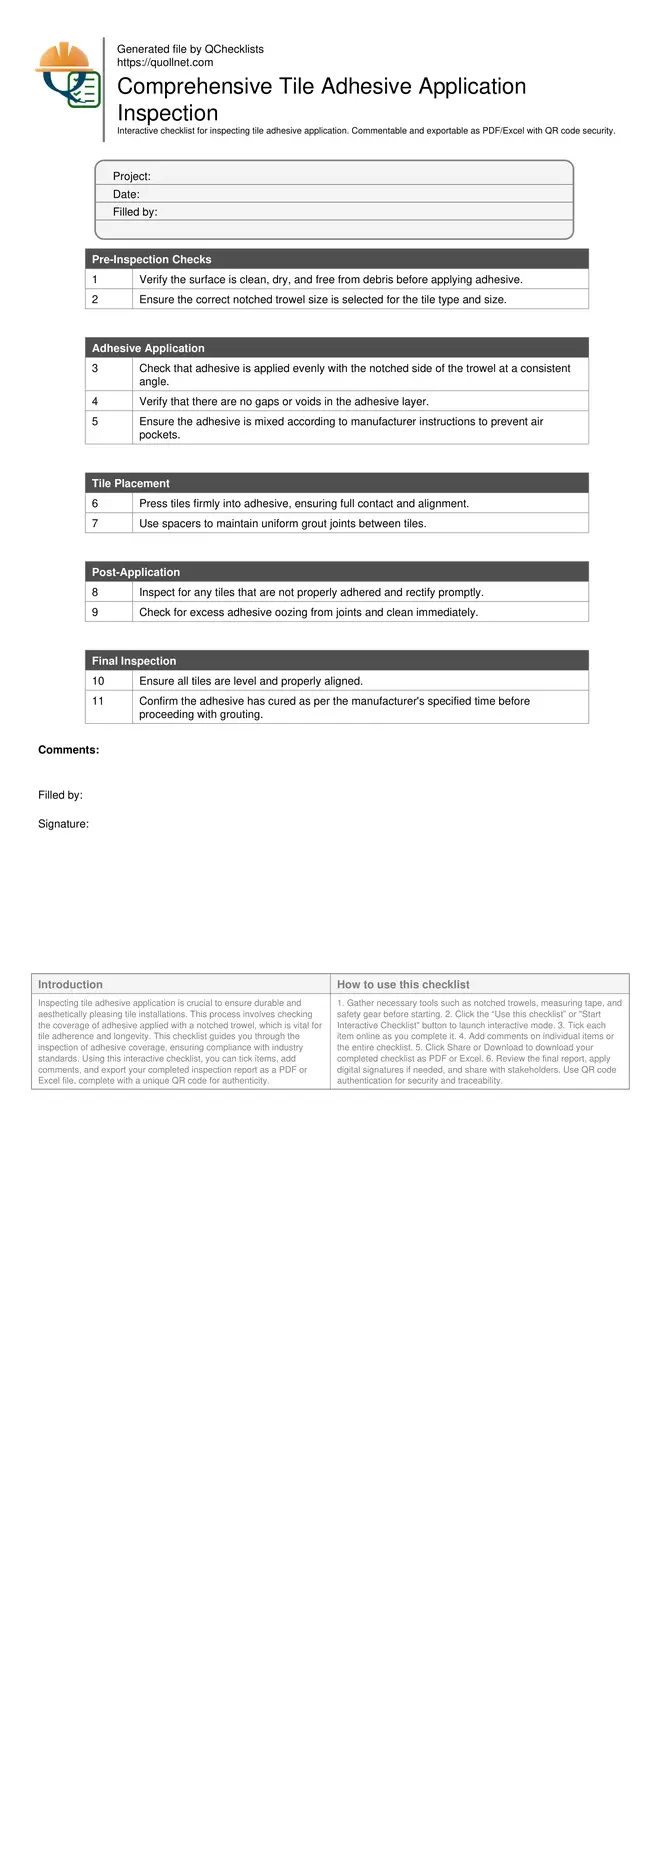
Tile Adhesive Application Inspection Checklist
Inspecting tile adhesive application is crucial to ensure durable and aesthetically pleasing tile installations. This process involves checking the coverage of adhesive applied with a notched trowel, which is vital for tile adherence and longevity. This checklist guides you through the inspection of adhesive coverage, ensuring compliance with industry standards. Using this interactive checklist, you can tick items, add comments, and export your completed inspection report as a PDF or Excel file, complete with a unique QR code for authenticity.
- Ensure complete and even tile adhesive coverage for long-lasting installations.
- Identify and rectify common adhesive application errors during inspections.
- Maintain quality by verifying compliance with industry standards.
- Interactive online checklist with tick, comment, and export features secured by QR code.
Pre-Inspection Checks
Adhesive Application
Tile Placement
Post-Application
Final Inspection
Importance of Adequate Adhesive Coverage
Proper adhesive coverage is key to the structural integrity of tile installations. Inadequate coverage can lead to loose tiles, water infiltration, and costly repairs. This inspection ensures that the adhesive is applied correctly, using the right notch size on the trowel for optimal coverage.
- Check for 100% adhesive coverage on the back of the tiles.
- Ensure the correct trowel size is used for the tile type and size.
- Identify areas with insufficient adhesive that could cause tile failure.
Common Mistakes in Adhesive Application
While applying tile adhesive, common mistakes can jeopardize the installation. This includes using the wrong trowel, applying uneven pressure, or inadequate adhesive mixing. This checklist helps identify and correct these errors during the inspection.
- Ensure consistent trowel angle to maintain even adhesive lines.
- Verify proper adhesive mixing to avoid air pockets.
- Avoid back-buttering tiles improperly as it affects adhesion.
How to Use This Interactive Checklist
- Gather necessary tools such as notched trowels, measuring tape, and safety gear before starting.
- Click the “Use this checklist” or "Start Interactive Checklist" button to launch interactive mode.
- Tick each item online as you complete it.
- Add comments on individual items or the entire checklist.
- Click Share or Download to download your completed checklist as PDF or Excel.
- Review the final report, apply digital signatures if needed, and share with stakeholders. Use QR code authentication for security and traceability.
Call to Action
- Start Checklist Tick off tasks, leave comments on items or the whole form, and export your completed report to PDF or Excel—with a built-in QR code for authenticity.
- Download Excel - Tile Adhesive Application Inspection
- Download PDF - Tile Adhesive Application Inspection
- View Image - Tile Adhesive Application Inspection
Cite & Embed
“Tile Adhesive Application Inspection by Quollnet”
with a link to
this source page.

FAQ
Question: How do I ensure proper adhesive coverage?
Question: What trowel size should I use for large format tiles?
Question: Why is it important to avoid air pockets in adhesive?
Related Articles
Broader reading and guidance connected to this checklist topic.


Is It Important To Customize Your Qr Code And How To Do It?
Download Excel Format Snag List


Related Checklists
Keep the workflow moving with nearby templates chosen from similar checklist content.