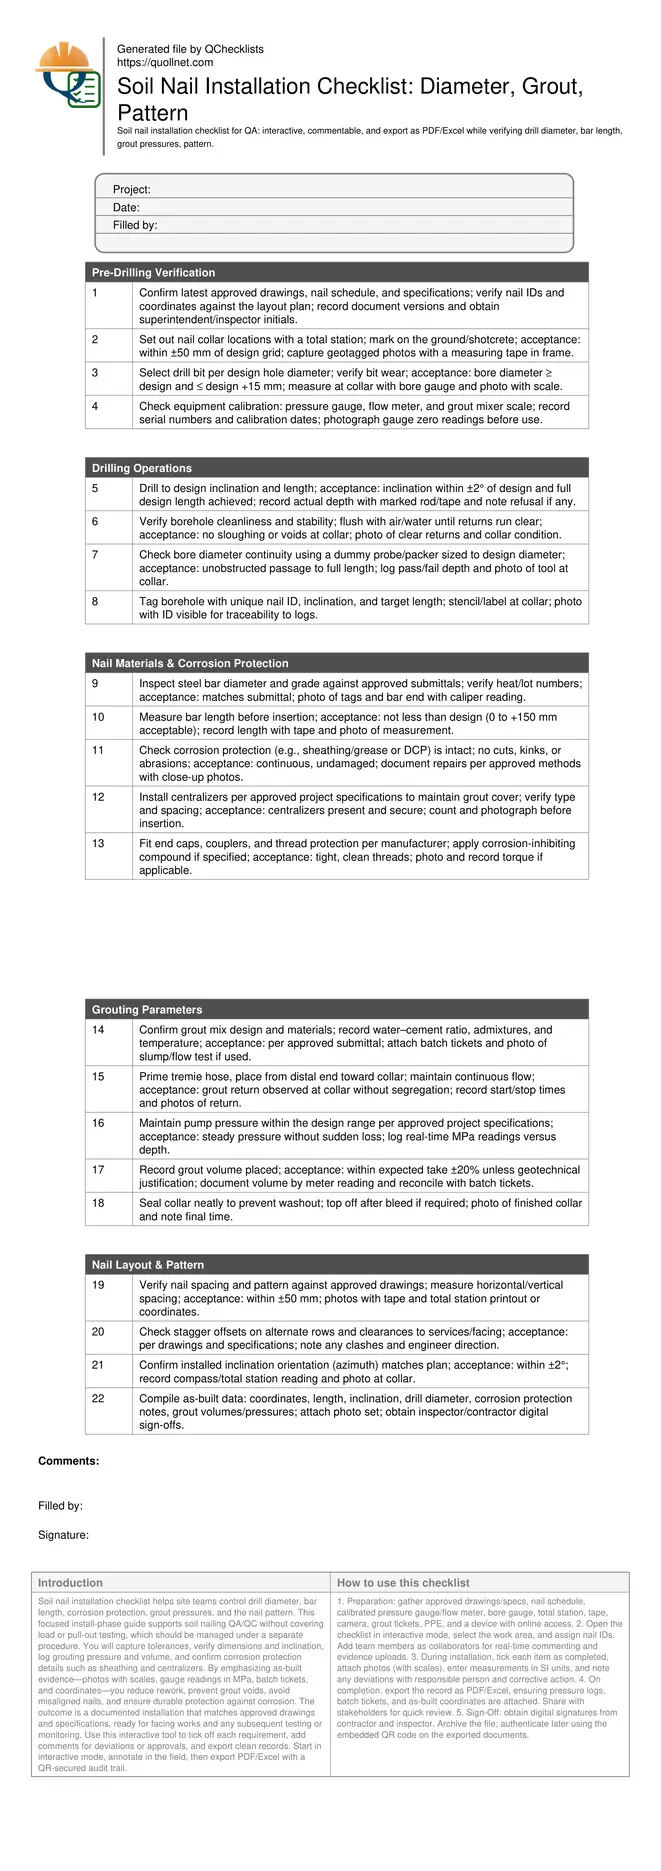
Soil Nail Installation Checklist: Diameter, Grout, Pattern
Definition: Soil nail installation checklist for field inspectors verifies drill diameter, bar length, corrosion protection, grout pressures, and pattern compliance during construction, excluding pull-out tests and focusing on install-time QA evidence.
- Verify drill diameter and bar length meet design tolerances.
- Confirm corrosion protection and grout pressures recorded during installation.
- Validate nail pattern and spacing align with approved drawings.
- Interactive, commentable checklist; export PDF/Excel with secure QR code.
Soil nail installation checklist helps site teams control drill diameter, bar length, corrosion protection, grout pressures, and the nail pattern. This focused install-phase guide supports soil nailing QA/QC without covering load or pull-out testing, which should be managed under a separate procedure. You will capture tolerances, verify dimensions and inclination, log grouting pressure and volume, and confirm corrosion protection details such as sheathing and centralizers. By emphasizing as-built evidence—photos with scales, gauge readings in MPa, batch tickets, and coordinates—you reduce rework, prevent grout voids, avoid misaligned nails, and ensure durable protection against corrosion. The outcome is a documented installation that matches approved drawings and specifications, ready for facing works and any subsequent testing or monitoring. Use this interactive tool to tick off each requirement, add comments for deviations or approvals, and export clean records. Start in interactive mode, annotate in the field, then export PDF/Excel with a QR-secured audit trail.
- Ensure every soil nail meets critical install criteria: minimum drill diameter, correct bar length, intact corrosion protection, controlled grouting pressures and volumes, and accurate pattern spacing. Capture photo evidence and instrument readings to create reliable as-built records for project turnover.
- Reduce rework and schedule risk by catching mismatches early—wrong drill bit sizes, inadequate centralizers, damaged sheathing, or out-of-tolerance inclination and spacing. Structured evidence (MPa logs, batch tickets, calibrated gauges) supports timely approvals and clear communication between crews and inspectors.
- Interactive online checklist with tick, comment, and export features secured by QR code. Field teams capture photos, pressures, and dimensions, then share sign-offs instantly to streamline closeout and facilitate oversight by engineers and quality managers.
- Align installation with approved project specifications and authority requirements while keeping scope tight: on-site verification of geometry, materials, corrosion protection, and grouting operations. Pull-out tests are intentionally excluded and should be executed under a dedicated testing plan.
Pre-Drilling Verification
Drilling Operations
Nail Materials & Corrosion Protection
Grouting Parameters
Nail Layout & Pattern
Control Critical Dimensions: Diameter, Length, and Inclination
Dimensional control underpins successful soil nailing. Start by confirming the drill bit size and actual bore diameter meet or slightly exceed design without excessive oversize. Maintain full design length, recording actual depth with marked rods or tapes, and do not accept shorter nails without engineer approval. Inclination and azimuth must track the modelled geometry to ensure the designed nail pattern develops the intended stabilizing forces. Use a total station to position collars within ±50 mm and verify inclination within ±2°. Clean, stable boreholes reduce the risk of voids and grout loss. Practical cues include clear flushing returns, dummy probe passage to full length, and photo evidence at the collar with a visible scale. When obstructions limit advance, capture refusal depth, identify the cause, and escalate promptly for direction. These acceptance checks turn potential tolerances into controlled outcomes and keep the grid aligned for subsequent rows and facing works.
- Bore diameter: ≥ design and ≤ design +15 mm.
- Inclination within ±2°; collar position within ±50 mm.
- Confirm full design length; no negative tolerance.
- Document clear flush returns and dummy probe pass.
Protect the Steel: Materials and Corrosion Measures
Verifying bar properties and corrosion protection preserves long-term performance. Match bar diameter and grade to approved submittals, and record heat/lot numbers. Measure bar length, accepting 0 to +150 mm above design, never shorter. Inspect sheathing, grease layers, couplers, end caps, and thread protection for damage; any cuts or kinks must be repaired per approved methods before insertion. Centralizers keep the bar centered and maintain grout cover; confirm the specified type and spacing are installed and secured. Photograph components before installation, showing labels, caliper readings, and the condition of sheathing. This documentation assures that the corrosion system is continuous and intact along the full nail length, minimizing corrosion initiation sites. Solid material control reduces future maintenance and ensures the as-built product aligns with the durability assumptions in the design.
- Match bar grade/diameter to submittals and record lot numbers.
- Length: not less than design; 0 to +150 mm acceptable.
- Sheathing intact; repair per approved methods before use.
- Centralizers installed per specification and photographed.
Grouting and Pattern Compliance for Reliable Capacity
Grouting quality and pattern accuracy drive performance. Calibrate gauges and flow meters, then mix grout per approved submittal. Place via tremie from the distal end to avoid segregation and air entrapment, maintaining continuous flow until clean returns appear at the collar. Monitor pump pressure continuously and keep it within the specified range; log MPa readings by depth and time. Reconcile placed volumes with expected take, investigating significant deviations that may indicate voids or loss to the ground. After grouting, finish and seal the collar to prevent washout. Finally, confirm the nail pattern—spacing and stagger—matches the drawing, using total station checks and tape measures. As-built records must include coordinates, inclination, volumes, pressures, and photographs to close the loop. This combination of controlled placement and verified geometry ensures the installed nails match the design intent and deliver reliable capacity.
- Calibrate gauges; log MPa vs depth and time.
- Tremie from tip to collar with continuous flow.
- Grout take within expected ±20%; reconcile tickets.
- Verify spacing and stagger against approved drawings.
How to Use This Interactive Checklist
- Preparation: gather approved drawings/specs, nail schedule, calibrated pressure gauge/flow meter, bore gauge, total station, tape, camera, grout tickets, PPE, and a device with online access.
- Open the checklist in interactive mode, select the work area, and assign nail IDs. Add team members as collaborators for real-time commenting and evidence uploads.
- During installation, tick each item as completed, attach photos (with scales), enter measurements in SI units, and note any deviations with responsible person and corrective action.
- On completion, export the record as PDF/Excel, ensuring pressure logs, batch tickets, and as-built coordinates are attached. Share with stakeholders for quick review.
- Sign-Off: obtain digital signatures from contractor and inspector. Archive the file; authenticate later using the embedded QR code on the exported documents.
Call to Action
- Start Checklist Tick off tasks, leave comments on items or the whole form, and export your completed report to PDF or Excel—with a built-in QR code for authenticity.
- Download Excel - Soil Nail Installation Checklist
- Download PDF - Soil Nail Installation Checklist
- View Image - Soil Nail Installation Checklist
Cite & Embed
“Soil Nail Installation Checklist by Quollnet”
with a link to
this source page.
FAQ
Question: What tolerance is acceptable for drill diameter when installing soil nails?
Question: How should grout pressure be recorded and evaluated on site?
Question: How do I verify bar length if obstructions prevent full drilling?
Question: What constitutes acceptable corrosion protection for soil nails on site?
Related Articles
Broader reading and guidance connected to this checklist topic.


Related Checklists
Keep the workflow moving with nearby templates chosen from similar checklist content.