Remediate Pile Defects: Pressure Grouting or Core Repair
Definition: Remediate pile defects using a structured, field-ready checklist for contractors and inspectors, covering pressure grouting or core repair, verification, and NCR closure per approved project specifications and authority requirements.
- Choose pressure grouting or core repair based on investigation findings.
- Control pressures, volumes, and workmanship; avoid introducing new tests.
- Document evidence for verification and NCR closure with traceable records.
- Interactive, commentable, export to PDF/Excel, with secure QR code.
Remediate pile defects with a disciplined, field-proven process focused on pressure grouting or core repair, verification, and closing nonconformance reports. This checklist guides supervisors, QC engineers, and contractors through practical pile repair steps without adding new tests, relying on the approved investigation and method statement. It helps decide between pressure grouting for internal voids or core repair for localized damage, manages materials and equipment, and controls grouting pressures, volumes, and curing. You will capture photo evidence, pressure/volume logs, batch certificates, and as-built sketches to demonstrate that defective piles are restored to intent per approved project specifications and authority requirements. The scope excludes new integrity or load testing; verification depends on process records, dimensional checks, and joint inspections. Outcomes include safe, durable repairs, traceable documentation, and timely NCR closure. Use this interactive checklist to tick off actions, add field comments, and export a QR-secured PDF/Excel package for review and archiving.
- Apply a clear decision path: use pressure grouting for internal voids and microcracking; use core repair for localized spalls or honeycombing. Follow the approved investigation and method statement to avoid unnecessary scope expansion or delays.
- Maintain process control during repair: record grouting pressure and volume per port, monitor for uplift, and verify substrate preparation and curing. Evidence-based verification replaces new testing while preserving safety and quality outcomes.
- Package proof for NCR closure: assemble marked photos, logs, batch certificates, and signed inspections into an as-built dossier. Secure approvals per approved project specifications and authority requirements before releasing the workfront.
- Interactive online checklist with tick, comment, and export features secured by QR code. Field teams standardize actions, supervisors review evidence in real time, and stakeholders receive traceable PDF/Excel outputs for rapid acceptance.
Pre-Remediation Controls
Pressure Grouting Execution
Core Repair Execution
Verification & Documentation
NCR Closure & Handover
Choosing Pressure Grouting or Core Repair
Selecting the right remedy follows the approved investigation: pressure grouting suits internal voids, microcracks, and honeycombing behind the cover; core repair addresses localized spalls, broken cover, or limited delamination. This checklist deliberately excludes new tests; it relies on the signed investigation, the method statement, and evidence gathered while performing the work. Use grouting where continuity and densification are needed without enlarging the defect; use core repair to remove and replace unsound material. For either path, control materials, equipment, and workmanship, and capture proof: marked photos with scales, pressure/volume logs for each port, and as-built sketches with measured dimensions. Acceptance hinges on matching the approved plan, staying within pressure limits, achieving refusal or target volume, restoring sound substrate, and curing per specification. Joint inspections finalize the scope and feed NCR closure. This practical split keeps scope tight, budgets intact, and documentation traceable for authorities and the engineer of record.
- Use grouting for internal voids and microcracks.
- Use core repair for localized spalls or delamination.
- Rely on investigation; add no new tests.
- Capture photos, logs, and as-built sketches.
Controlling the Grout Process Without Over-Testing
Effective pressure grouting depends on controlled mixing, staged injection, and real-time monitoring, not on additional testing. Mix with a high-shear mixer to the approved water–cement ratio and observe consistent workability. Inject from the lowest port upward, logging pressure and volume per port in MPa and litres. Watch for uplift using a laser and tell-tales; pause and seal leaks immediately. Acceptance is achieved when refusal or target volumes occur within method-statement pressure limits and no uplift exceeds the allowable movement. Post-injection, seal ports with non-shrink material and document the clean, leak-free finish. Compile pressure–time and volume–time charts to demonstrate effective grout take patterns. These process records, combined with photos and signed inspections, provide sufficient verification to proceed without new integrity or load tests, supporting timely NCR disposition and closure.
- Record pressure (MPa) and volume (L) per port.
- Monitor uplift with a laser; seal leaks.
- Achieve refusal within permitted pressures.
- Seal ports and document clean finish.
Executing Durable Core Repairs and Closing NCRs
For core repairs, remove only unsound material and maintain squared edges to a sound substrate. Prepare the surface with oil-free air and achieve saturated surface dry condition to ensure bond. Install dowels if specified, recording hole depth and adhesive batch details. Place approved repair mortar or micro-concrete to restore geometry, then cure per specification to prevent shrinkage cracking. Verification relies on visible quality, measured dimensions, curing logs, and signed inspections—not on new testing. For NCR closure, assemble a concise dossier: marked photos, as-built sketches, material certificates, batch tickets, and inspection records. Obtain approvals per approved project specifications and authority requirements, then export a QR-secured PDF/Excel package for archive. Clear evidence shortens review cycles, protects schedule, and ensures traceability for future audits.
- Remove only unsound material; keep neat edges.
- Prepare SSD substrate and clean thoroughly.
- Record dowel embedment and adhesive batches.
- Cure per specification; log times.
- Assemble evidence for NCR closure.
How to Use This Interactive Remediate Pile Defects Checklist
- Preparation: Gather the approved investigation, method statement, and permits; have grout pump, packers, core drill, mixers, PPE, laser level, and forms ready.
- Open the checklist on your device, select the project and pile IDs, and assign responsible persons for grouting or core repair.
- Start interactive mode, tick each step as completed, and attach photos, sketches, and logs directly to the corresponding item.
- Use comments to capture field changes, engineer instructions, and acceptance notes; mention dates, times, and measured values in SI units.
- When verification is complete, generate the as-built dossier and link it to the NCR record; ensure all approvals are recorded.
- Export to PDF/Excel with an embedded QR code for traceability; verify the QR resolves to your evidence folder.
- Capture digital signatures for sign-off, distribute to stakeholders, and archive the final package in the project document control system.

Call to Action
- Start Checklist Tick off tasks, leave comments on items or the whole form, and export your completed report to PDF or Excel—with a built-in QR code for authenticity.
- Download Excel - Pile Defect Remediation Checklist
- Download PDF - Pile Defect Remediation Checklist
- View Image - Pile Defect Remediation Checklist
Cite & Embed
“Pile Defect Remediation Checklist by Quollnet”
with a link to
this source page.

FAQ
Question: How do I decide between pressure grouting and core repair?
Question: What verification is acceptable if new tests are excluded?
Question: What pressure limits should I use during grouting?
Question: What documents are required to close an NCR after pile repair?
Related Articles
Broader reading and guidance connected to this checklist topic.


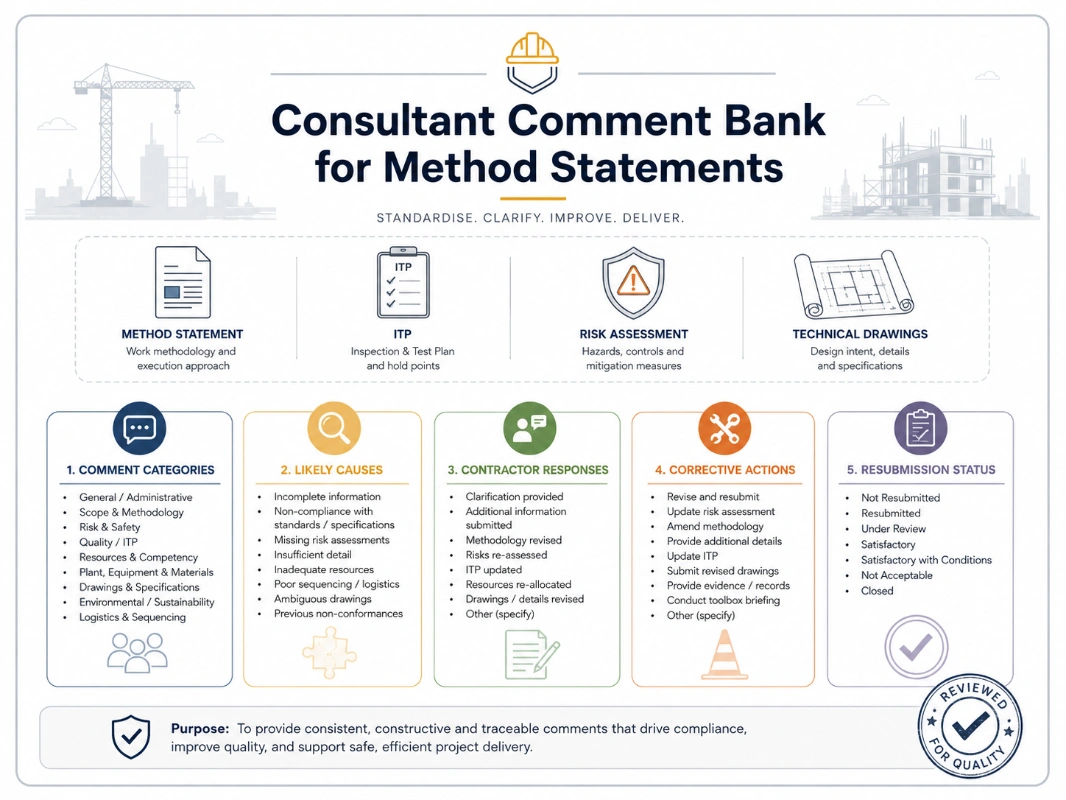
Consultant Comment Bank For Method Statements

Master Construction Project Cashflow With Cashflowpot

Related Checklists
Keep the workflow moving with nearby templates chosen from similar checklist content.