Ground Improvement Verification Checklist: CPT, SPT, Plate Load
Definition: Ground improvement verification checklist guides contractors and QA teams to verify post-treatment performance using CPT, SPT, and plate load tests, compare outcomes to targets, and accept lots or trigger remediation.
- Plan CPT, SPT, and plate load tests against approved targets.
- Capture calibrated data with locations, depths, and time-stamped evidence.
- Compare results to acceptance thresholds; decide accept, hold, or remediate.
- Interactive, commentable, export, QR code for authenticated sign-off.
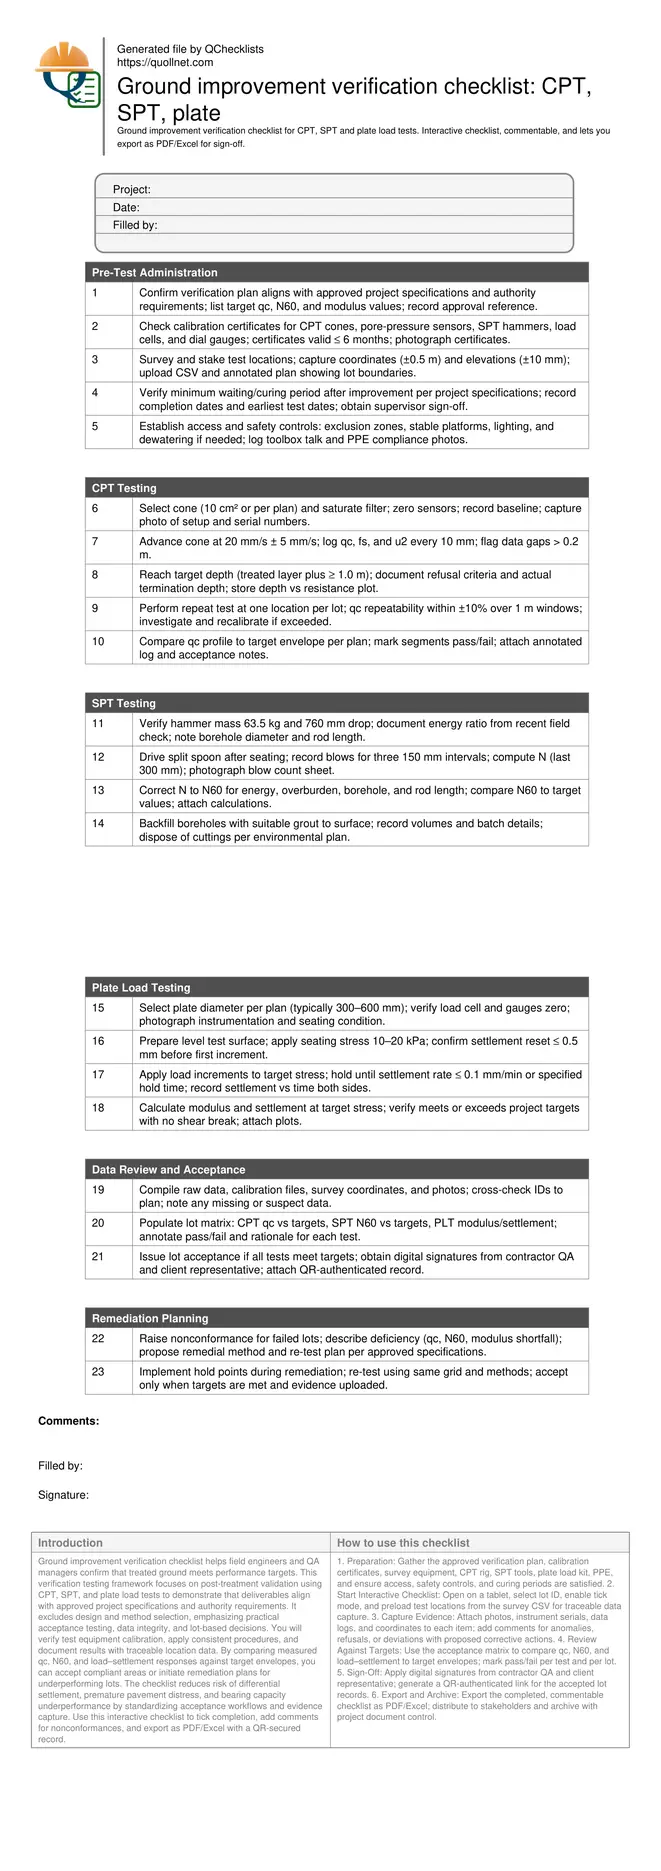
Ground improvement verification checklist helps field engineers and QA managers confirm that treated ground meets performance targets. This verification testing framework focuses on post-treatment validation using CPT, SPT, and plate load tests to demonstrate that deliverables align with approved project specifications and authority requirements. It excludes design and method selection, emphasizing practical acceptance testing, data integrity, and lot-based decisions. You will verify test equipment calibration, apply consistent procedures, and document results with traceable location data. By comparing measured qc, N60, and load–settlement responses against target envelopes, you can accept compliant areas or initiate remediation plans for underperforming lots. The checklist reduces risk of differential settlement, premature pavement distress, and bearing capacity underperformance by standardizing acceptance workflows and evidence capture. Use this interactive checklist to tick completion, add comments for nonconformances, and export as PDF/Excel with a QR-secured record.
- Standardizes post-treatment verification using CPT, SPT, and plate load tests. Ensures calibrated instruments, consistent procedures, and traceable locations so acceptance decisions reflect true ground performance rather than sampling bias or operator variability.
- Improves data quality and defensibility: records qc profiles, N60 corrections, and load–settlement curves with photos, calibration certificates, and survey files. Creates a transparent lot-by-lot acceptance matrix with clear pass/fail annotations and rationale.
- Reduces risk of serviceability failures by detecting insufficient densification or stiffness early. Triggers targeted remediation steps and re-testing, preventing schedule surprises and costly rework during overlying pavement or foundation construction.
- Interactive online checklist with tick, comment, and export features secured by QR code. Streamlines team reviews, digital signatures, and archiving, enabling rapid distribution to stakeholders and auditors without duplicating paperwork.
Pre-Test Administration
CPT Testing
SPT Testing
Plate Load Testing
Data Review and Acceptance
Remediation Planning
Scope, Sampling, and Lot-Based Strategy
This checklist covers verification only—confirming ground improvement outcomes using CPT, SPT, and plate load tests. It excludes design and treatment selection. Define lots by area or production sequence so acceptance reflects uniform treatment. Establish representative test spacing and depths that cover the treated layer and extend at least 1.0 m into underlying soils for control. Maintain consistent equipment, push/drive rates, and measurement intervals to limit variability. Record exact coordinates and elevations to tie results to the improvement layout. Evidence includes calibration certificates, photos, time-stamped logs, and survey files. The goal is to compare measured qc, N60, and load–settlement responses against target envelopes in the approved verification plan, then decide accept, hold, or remediate for each lot. This approach prevents isolated passes from masking weak zones and supports traceable, defensible sign-off decisions.
- Define lots and representative test spacing before mobilization.
- Test beyond treated depth by at least 1.0 m.
- Standardize equipment settings and recording intervals.
- Tie every result to surveyed coordinates and elevations.
- Use targets from approved verification plan only.
Field Execution: Reliable CPT, SPT, and Plate Load Tests
Reliability depends on calibration, procedure control, and documentation. For CPT, maintain a steady 20 mm/s push rate and continuous logging at 10 mm intervals; verify repeatability within ±10% qc in at least one location per lot. For SPT, control hammer energy, record blows correctly, and compute N60 with corrections for energy, overburden, borehole, and rod length. For plate load tests, prepare a level surface, use appropriate plate diameter, and hold each increment until creep rates stabilize; plot load–settlement curves. Always photograph setups, gauges, and readouts, and record weather and groundwater conditions. If refusal or anomalies occur, document causes and adjust procedures (e.g., relocate slightly, pre-drill crusts) while staying within the approved plan.
- Keep CPT push rate within 20 mm/s ± 5 mm/s.
- Log CPT at 10 mm increments; avoid gaps > 0.2 m.
- Compute SPT N60 with required corrections.
- Stabilize plate load increments before readings.
- Photograph setups, gauges, and results.
Acceptance Decisions, Records, and Remediation Triggers
After testing, compile data by lot and compare to target envelopes: qc profiles for CPT, corrected N60 for SPT, and modulus or settlement criteria for plate load tests. Annotate each test as pass or fail with clear reasoning. Accept lots only if all verification tests meet targets; otherwise, raise a nonconformance, outline deficiencies, and propose remediation actions per approved project specifications and authority requirements. Common remedial options include additional compaction passes, targeted grouting, or repeat vibro-treatment. Establish hold points and re-testing frequency to confirm improvement. Produce a concise report with plots, tabulated results, signatures, and a QR-secured export to support audits and archiving.
- Use lot-based acceptance with clear pass/fail notes.
- Escalate nonconformances immediately when targets are missed.
- Define remediation scope and re-test plan.
- Obtain digital signatures for acceptance.
- Archive with QR-authenticated exports.
How to Use This Interactive Verification Checklist
- Preparation: Gather the approved verification plan, calibration certificates, survey equipment, CPT rig, SPT tools, plate load kit, PPE, and ensure access, safety controls, and curing periods are satisfied.
- Start Interactive Checklist: Open on a tablet, select lot ID, enable tick mode, and preload test locations from the survey CSV for traceable data capture.
- Capture Evidence: Attach photos, instrument serials, data logs, and coordinates to each item; add comments for anomalies, refusals, or deviations with proposed corrective actions.
- Review Against Targets: Use the acceptance matrix to compare qc, N60, and load–settlement to target envelopes; mark pass/fail per test and per lot.
- Sign-Off: Apply digital signatures from contractor QA and client representative; generate a QR-authenticated link for the accepted lot records.
- Export and Archive: Export the completed, commentable checklist as PDF/Excel; distribute to stakeholders and archive with project document control.
Call to Action
- Start Checklist Tick off tasks, leave comments on items or the whole form, and export your completed report to PDF or Excel—with a built-in QR code for authenticity.
- Download Excel - Ground Improvement Verification Checklist
- Download PDF - Ground Improvement Verification Checklist
- View Image - Ground Improvement Verification Checklist
Cite & Embed
“Ground Improvement Verification Checklist by Quollnet”
with a link to
this source page.
FAQ
Question: How many CPT, SPT, and plate load tests should I perform per lot?
Question: What if the CPT encounters refusal or erratic readings within the treated depth?
Question: How do I reconcile differences between CPT qc and SPT N60 results?
Question: When is a plate load test most useful for ground improvement verification?
Related Articles
Broader reading and guidance connected to this checklist topic.


Related Checklists
Keep the workflow moving with nearby templates chosen from similar checklist content.