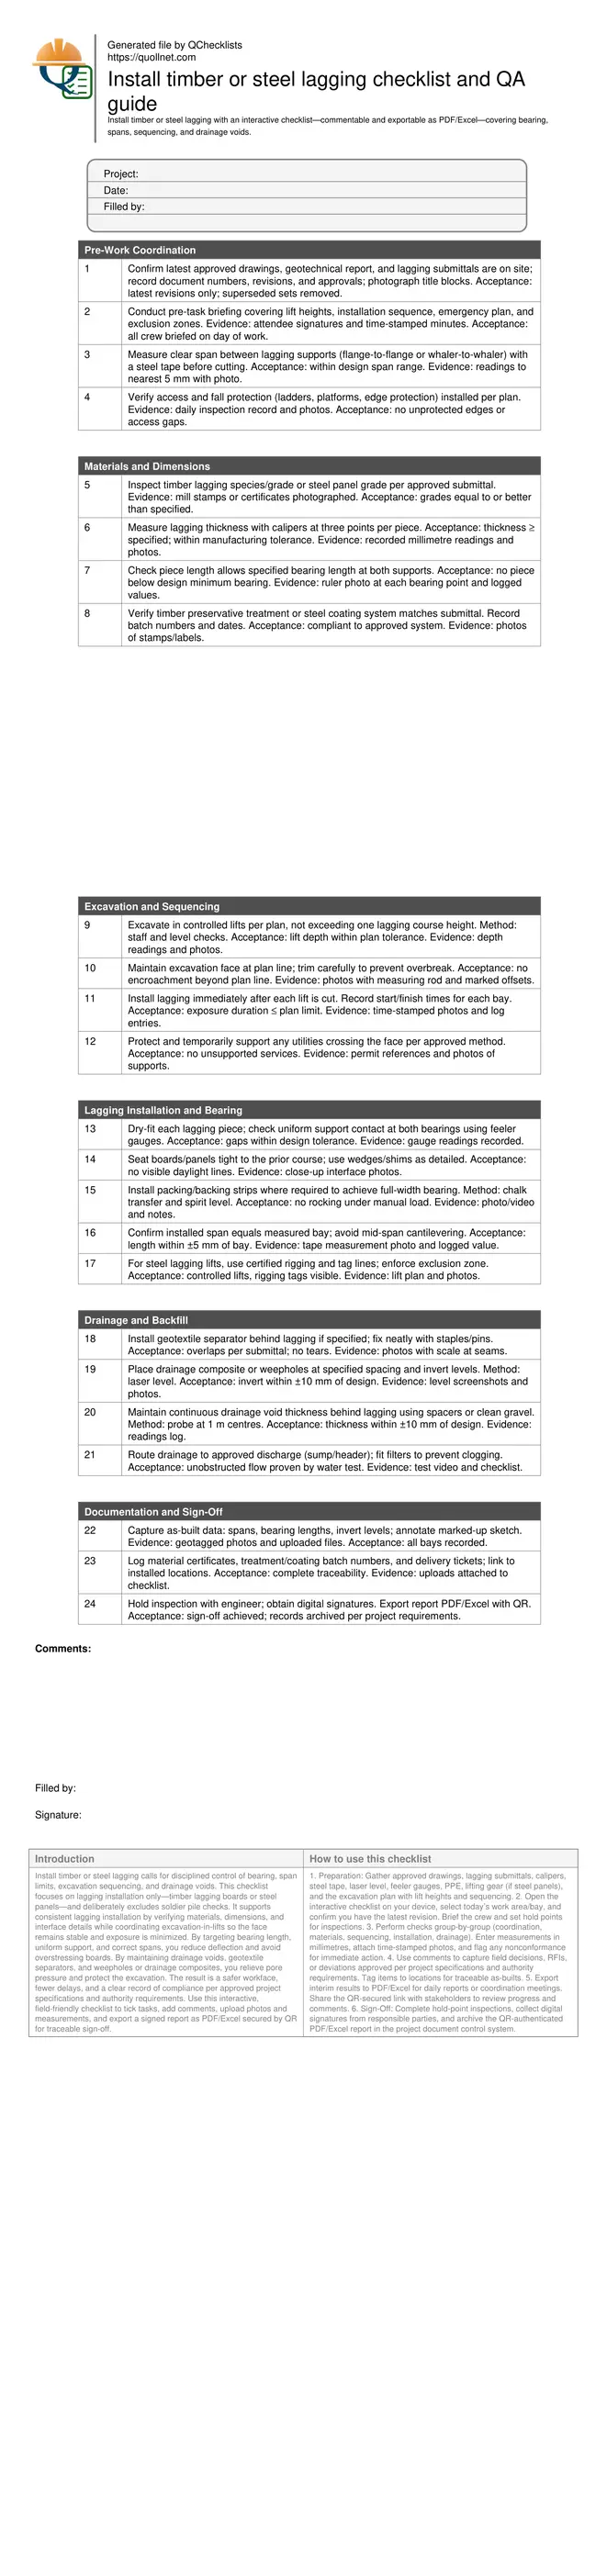
Install timber or steel lagging: field checklist and QA
Definition: Install timber or steel lagging checklist guides site engineers and supervisors to verify bearing, spans, excavation sequencing, and drainage voids, delivering safe, compliant installation with clear evidence trails.
- Confirm bearing and spans match design before placing each lagging course.
- Sequence excavation and installation safely to limit face exposure time.
- Maintain drainage voids and outlets to prevent hydrostatic pressure buildup.
- Interactive, commentable, export, QR code verification for field sign-off.
Install timber or steel lagging calls for disciplined control of bearing, span limits, excavation sequencing, and drainage voids. This checklist focuses on lagging installation only—timber lagging boards or steel panels—and deliberately excludes soldier pile checks. It supports consistent lagging installation by verifying materials, dimensions, and interface details while coordinating excavation-in-lifts so the face remains stable and exposure is minimized. By targeting bearing length, uniform support, and correct spans, you reduce deflection and avoid overstressing boards. By maintaining drainage voids, geotextile separators, and weepholes or drainage composites, you relieve pore pressure and protect the excavation. The result is a safer workface, fewer delays, and a clear record of compliance per approved project specifications and authority requirements. Use this interactive, field-friendly checklist to tick tasks, add comments, upload photos and measurements, and export a signed report as PDF/Excel secured by QR for traceable sign-off.
- Targeted lagging-only inspections verify bearing contact, span limits, and correct installation sequencing behind excavation. This avoids overstress, board deflection, and premature face deterioration while maintaining safe access and clear hold points for coordinated work.
- Drainage-focused checks ensure continuous voids, geotextile separation, correct invert elevations, and functional discharge paths. Proper detailing reduces hydrostatic pressure, mitigates clogging, and supports long-term stability of the retained excavation without water-related delays.
- Interactive online checklist with tick, comment, and export features secured by QR code. Field teams capture time-stamped photos, measurements, and approvals, producing traceable as-builts that simplify closeout, claims defense, and stakeholder communication.
- Materials verification confirms timber or steel grades, thicknesses, treatments or coatings, and traceability. Acceptance criteria and photo evidence remove ambiguity and align daily work with the approved drawings, submittals, and project specifications.
Pre-Work Coordination
Materials and Dimensions
Excavation and Sequencing
Lagging Installation and Bearing
Drainage and Backfill
Documentation and Sign-Off
What to verify before and during lagging installation
Lagging installation quality hinges on controlling a few fundamentals. Start with the correct documents on site and ensure everyone understands the excavation-in-lifts sequence. Verify materials: timber species and grade or steel grade and protective systems must match approved submittals. Measure thickness, length, and bearing allowances before you cut the next lift. Coordinate safe access and fall protection because crews often work at the face with limited room. During fitting, focus on full, uniform bearing at both supports and tight interfaces between courses to limit deflection and soil loss. Avoid rocking pieces by using backing strips or shims where shown. Capture measurements and photos as you go; it is faster than rework and creates defensible as-builts. This checklist intentionally excludes soldier pile checks; if you suspect a misalignment affecting lagging, raise an RFI and pause the affected bay while maintaining face stability.
- Use latest drawings and approved submittals only.
- Measure spans and bearing before cutting the lift.
- Ensure uniform contact; eliminate rocking with packing.
- Maintain safe access and fall protection at all times.
Sequencing behind excavation and controlling spans
Excavation and lagging must advance together to keep the face stable. Cut only the lift you can immediately lag, then place and seat the boards or panels. Record exposure durations to prove compliance with the plan’s time limits. Spans drive bending; measure bay widths and confirm the installed length matches the measured span to avoid mid-span cantilevering. Where steel lagging is craned, use certified rigging, tag lines, and a clear exclusion zone to prevent strikes in the confined corridor. Monitor interfaces between lifts; daylight lines indicate gaps or soil raveling that need tightening or packing. Maintain consistent sequencing across bays to prevent differential movements and to simplify inspections and sign-offs.
- Excavate only what you can lag immediately.
- Measure and record bay spans before installation.
- Track exposure time with time-stamped photos.
- Enforce rigging controls and exclusion zones.
Drainage voids, seepage control, and long-term performance
Hydrostatic pressure is a primary risk for temporary and semi-permanent lagging. Provide drainage paths using geotextiles, drainage composites, or weepholes as detailed, and maintain a continuous drainage void behind the lagging. Verify invert elevations with a laser or water level; small errors can pond water and overload the system. Keep filters clean and ensure discharge to an approved sump or header, protected from clogging by fines. Backfill and compaction should support, not crush, the drainage pathway. Document thickness checks of the void, overlap of geotextiles, and successful water tests. Good drainage practice reduces face sloughing, limits freeze–thaw damage, and shortens dewatering runs. This checklist treats soldier piles as given supports; if a support condition compromises drainage or bearing, escalate per site procedures.
- Maintain a continuous drainage void behind lagging.
- Confirm invert levels within specified tolerances.
- Prove flow with a simple water test.
- Protect discharges and filters from clogging.
How to use this lagging installation checklist
- Preparation: Gather approved drawings, lagging submittals, calipers, steel tape, laser level, feeler gauges, PPE, lifting gear (if steel panels), and the excavation plan with lift heights and sequencing.
- Open the interactive checklist on your device, select today’s work area/bay, and confirm you have the latest revision. Brief the crew and set hold points for inspections.
- Perform checks group-by-group (coordination, materials, sequencing, installation, drainage). Enter measurements in millimetres, attach time-stamped photos, and flag any nonconformance for immediate action.
- Use comments to capture field decisions, RFIs, or deviations approved per project specifications and authority requirements. Tag items to locations for traceable as-builts.
- Export interim results to PDF/Excel for daily reports or coordination meetings. Share the QR-secured link with stakeholders to review progress and comments.
- Sign-Off: Complete hold-point inspections, collect digital signatures from responsible parties, and archive the QR-authenticated PDF/Excel report in the project document control system.
Call to Action
- Start Checklist Tick off tasks, leave comments on items or the whole form, and export your completed report to PDF or Excel—with a built-in QR code for authenticity.
- Download Excel - Timber or Steel Lagging Installation
- Download PDF - Timber or Steel Lagging Installation
- View Image - Timber or Steel Lagging Installation
Cite & Embed
“Timber or Steel Lagging Installation by Quollnet”
with a link to
this source page.

FAQ
Question: What exactly does this checklist cover, and what does it exclude?
Question: How should I set lift heights and manage exposure time during excavation?
Question: How do I confirm adequate bearing without specific numeric tolerances?
Question: What drainage measures should I expect behind lagging?
Related Articles
Broader reading and guidance connected to this checklist topic.


Related Checklists
Keep the workflow moving with nearby templates chosen from similar checklist content.