Install settlement plates or markers: location, protection, first readings
Definition: Install settlement plates or markers for geotechnical and earthworks teams, verifying locations, datum ties, protective measures, and initial readings; excludes deformation analysis and long-term interpretation.
- Verify setout against drawings and datum for traceable baseline readings.
- Tie elevations to stable benchmarks using calibrated levels and closures.
- Protect risers with standpipes, caps, and bollards to prevent disturbance.
- Interactive, commentable checklist with export and QR code for traceability.
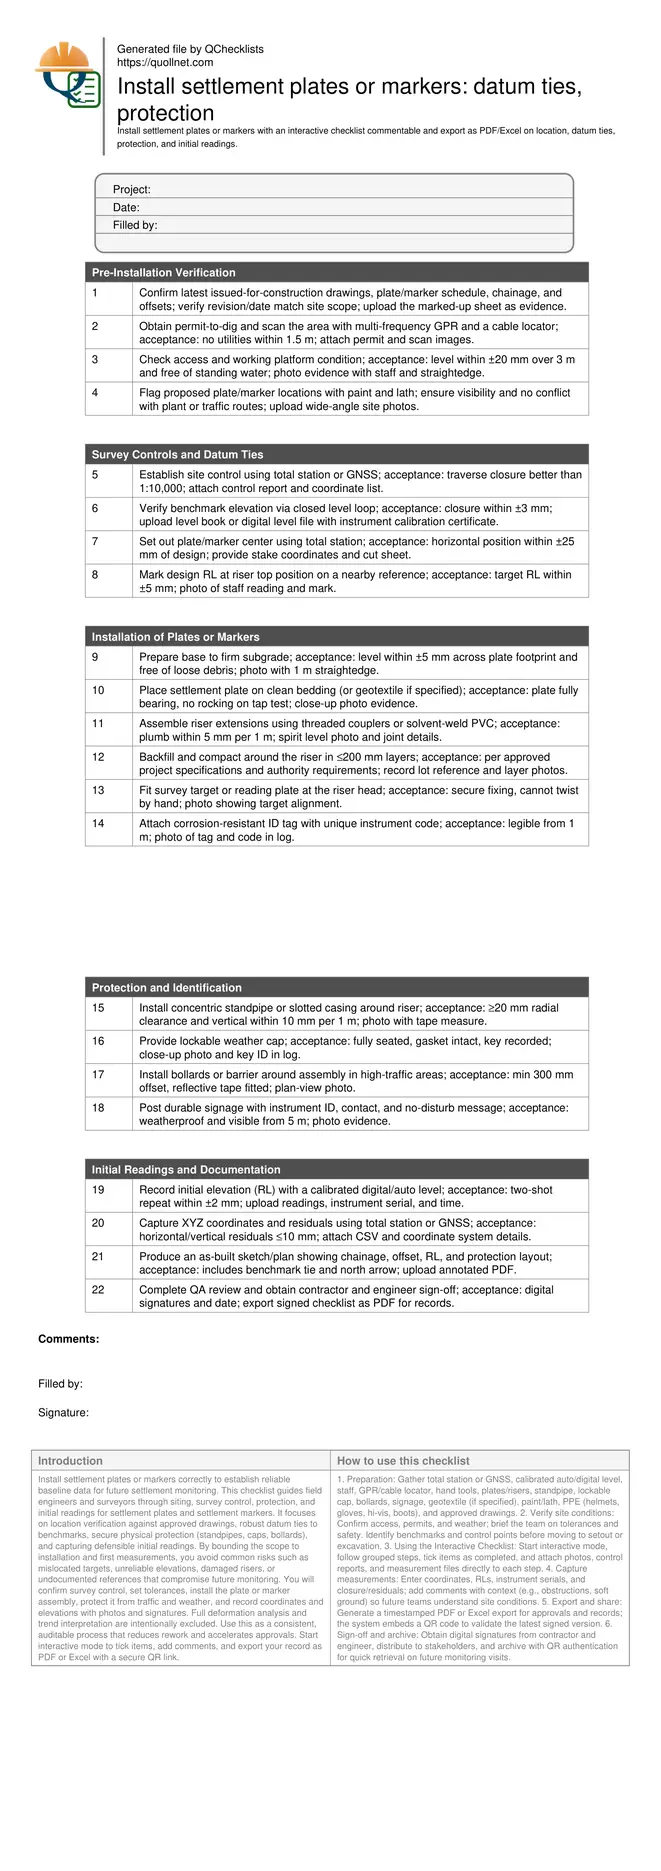
Install settlement plates or markers correctly to establish reliable baseline data for future settlement monitoring. This checklist guides field engineers and surveyors through siting, survey control, protection, and initial readings for settlement plates and settlement markers. It focuses on location verification against approved drawings, robust datum ties to benchmarks, secure physical protection (standpipes, caps, bollards), and capturing defensible initial readings. By bounding the scope to installation and first measurements, you avoid common risks such as mislocated targets, unreliable elevations, damaged risers, or undocumented references that compromise future monitoring. You will confirm survey control, set tolerances, install the plate or marker assembly, protect it from traffic and weather, and record coordinates and elevations with photos and signatures. Full deformation analysis and trend interpretation are intentionally excluded. Use this as a consistent, auditable process that reduces rework and accelerates approvals. Start interactive mode to tick items, add comments, and export your record as PDF or Excel with a secure QR link.
- Ensure each plate or marker is set out within defined horizontal and vertical tolerances relative to the project datum. Capture coordinates, benchmark references, and initial readings with repeat checks to validate reliability, minimizing future uncertainty and avoiding resurvey or relocation costs.
- Increase survivability and data integrity by installing standpipes, lockable caps, and perimeter protection such as bollards and signage. The checklist standardizes protective measures and identification so instruments remain accessible, visible, and undisturbed throughout construction and early monitoring stages.
- This workflow builds an auditable as-built record, linking photos, readings, and signatures to each instrument ID. Interactive online checklist with tick, comment, and export features secured by QR code. The combination of controls, evidence, and approvals accelerates handover and supports future monitoring without ambiguity.
Pre-Installation Verification
Survey Controls and Datum Ties
Installation of Plates or Markers
Protection and Identification
Initial Readings and Documentation
Location and Datum Control: Build a Trustworthy Baseline
Settlement monitoring succeeds or fails on day one. Accurate siting and a defensible datum link ensure every future reading is comparable and trusted. Start by confirming the latest drawings and a safe, accessible working area. Establish robust control using a total station or GNSS and verify a benchmark via a closed level loop. Set out the plate or marker within tight tolerances and mark a target RL. Many projects lose time because instruments are mislocated by a few centimetres or tied to an unstable reference. This checklist demands closure limits, residual checks, and photo evidence so your baseline is auditable. A typical example: an embankment plate set at chainage 420 with a ±25 mm horizontal tolerance and ±5 mm RL tie; the team captures control reports, staff photos, and the initial reading before any fill lifts proceed.
- Use a verified benchmark with a closed loop.
- Keep horizontal setout within ±25 mm.
- Tie elevations within ±5 mm to datum.
- Capture control reports and staff photos.
Installing Plates or Markers: Bedding, Verticality, and Assembly
A stable, level base prevents early movement and skewed readings. Prepare the subgrade to firm bearing and verify level across the plate footprint. Seat the plate on clean bedding—or geotextile if specified—so it does not rock. Build risers using threaded couplers or solvent-weld PVC, checking plumb as you go. Backfill in controlled layers to protect the assembly without imparting lateral loads. Fix the reading target securely so it cannot twist, and tag the instrument with a corrosion-resistant ID. Acceptance cues include a 1 m straightedge level check, spirit-level plumb limits, and secure fasteners. Real-world issues like soft spots, debris under the plate, or loose targets introduce errors that follow the asset’s life. This procedure eliminates those traps and produces consistent baseline data every time.
- Level base within ±5 mm across footprint.
- Riser vertical within 5 mm per metre.
- Compact backfill per approved specifications.
- Fix targets so they cannot twist.
Protection and First Readings: Keep Instruments Safe and Data Repeatable
Physical protection prevents accidental knocks, theft, or weather damage. Fit a concentric standpipe with adequate clearance, add a lockable cap, and protect the assembly with bollards in traffic zones. Use clear signage for visibility. Then capture initial readings that will anchor all future measurements. Use a calibrated level and repeat the shot; if repeatability is outside ±2 mm, troubleshoot instrument setup, staff footing, or sight lines. Record XYZ coordinates with the coordinate system and residuals. Finish with an as-built plan tying the instrument to chainage, offset, and benchmark. This combination of protection and documentation ensures that even months later, teams can return, identify the point instantly, and reproduce readings without confusion.
- Standpipe clearance ≥ 20 mm around riser.
- Cap must lock and seal against weather.
- Initial RL repeat within ±2 mm.
- As-built includes benchmark and chainage.
How to Use This Interactive Checklist for Settlement Plates/Markers
- Preparation: Gather total station or GNSS, calibrated auto/digital level, staff, GPR/cable locator, hand tools, plates/risers, standpipe, lockable cap, bollards, signage, geotextile (if specified), paint/lath, PPE (helmets, gloves, hi-vis, boots), and approved drawings.
- Verify site conditions: Confirm access, permits, and weather; brief the team on tolerances and safety. Identify benchmarks and control points before moving to setout or excavation.
- Using the Interactive Checklist: Start interactive mode, follow grouped steps, tick items as completed, and attach photos, control reports, and measurement files directly to each step.
- Capture measurements: Enter coordinates, RLs, instrument serials, and closure/residuals; add comments with context (e.g., obstructions, soft ground) so future teams understand site conditions.
- Export and share: Generate a timestamped PDF or Excel export for approvals and records; the system embeds a QR code to validate the latest signed version.
- Sign-off and archive: Obtain digital signatures from contractor and engineer, distribute to stakeholders, and archive with QR authentication for quick retrieval on future monitoring visits.
Call to Action
- Start Checklist Tick off tasks, leave comments on items or the whole form, and export your completed report to PDF or Excel—with a built-in QR code for authenticity.
- Download Excel - Settlement Plate and Marker Installation
- Download PDF - Settlement Plate and Marker Installation
- View Image - Settlement Plate and Marker Installation
Cite & Embed
“Settlement Plate and Marker Installation by Quollnet”
with a link to
this source page.
FAQ
Question: What tolerances are acceptable for settlement plate or marker location and level?
Question: How should I tie initial readings to the project datum reliably?
Question: What protection is recommended in high-traffic or plant-access areas?
Question: Do I need to perform settlement analysis during installation?
Question: What evidence should be captured to support approvals and future monitoring?
Related Articles
Broader reading and guidance connected to this checklist topic.


Backcharge Log Template - Excel, Pdf Free Downlaod
Download Excel Format Snag List

Improve Your Project Handover Process With Snag List Tracking App

Is It Important To Customize Your Qr Code And How To Do It?
Related Checklists
Keep the workflow moving with nearby templates chosen from similar checklist content.