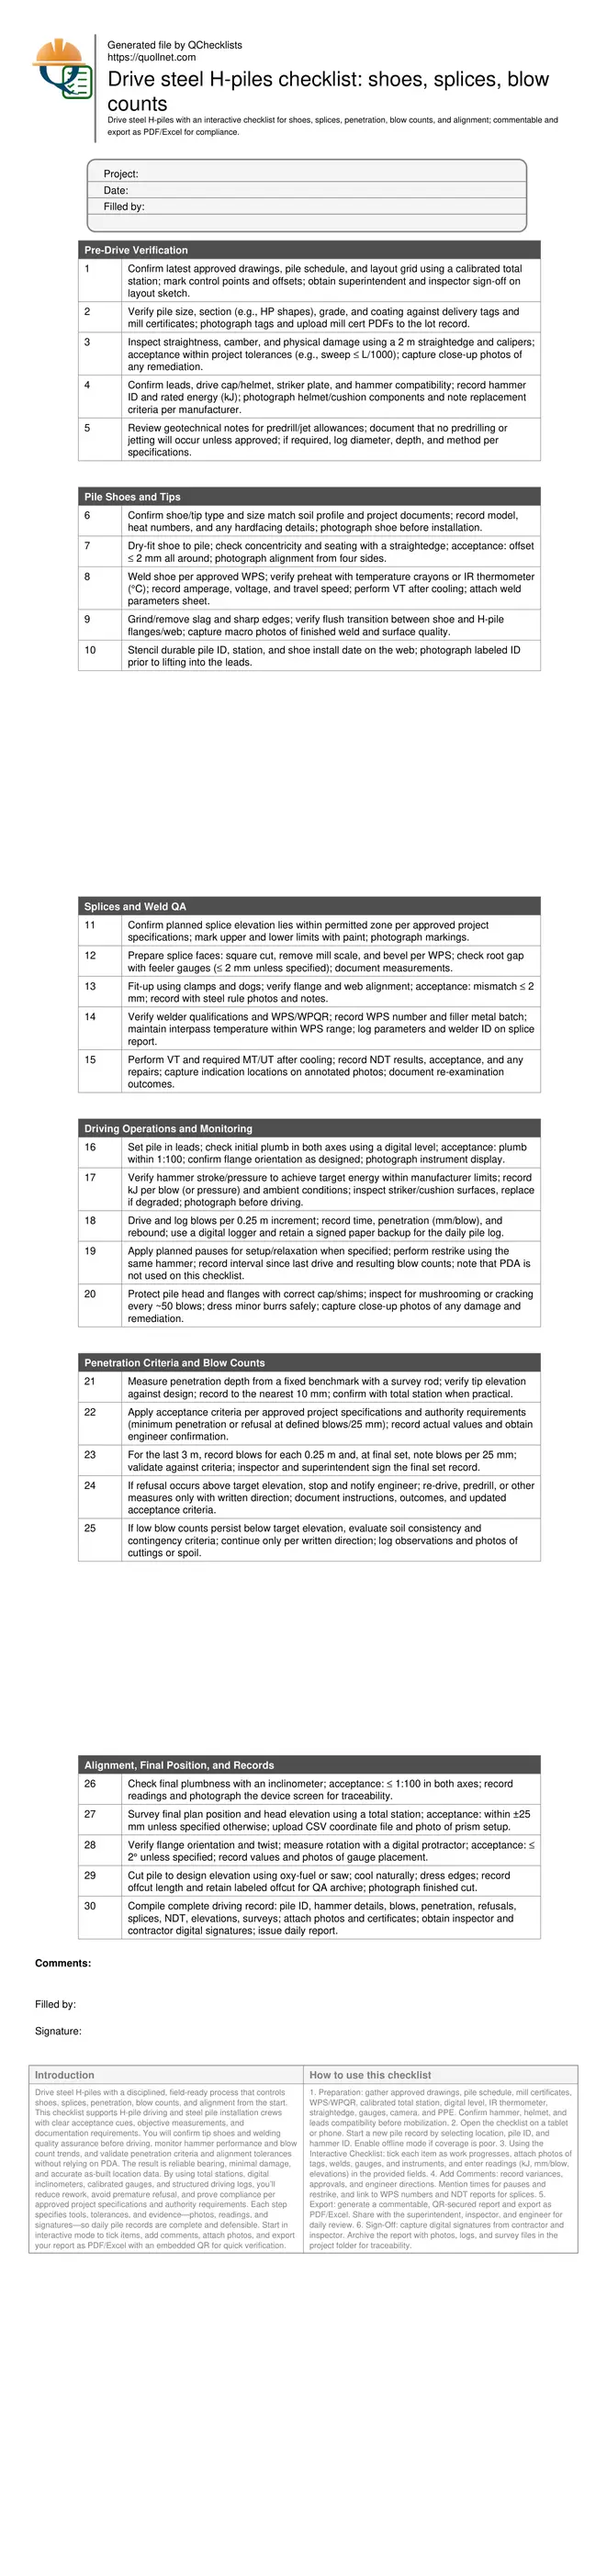
Drive steel H-piles checklist: shoes, splices, blow counts
Definition: Drive steel H-piles checklist for field engineers and inspectors covering shoes, splices, weld QA, penetration criteria, blow counts, and alignment to ensure compliant, traceable deep foundation installation.
- Verify shoes, splices, and welds meet approved project specifications.
- Track penetration and blow counts using calibrated gauges and logs.
- Maintain alignment tolerances with total station and inclinometer checks.
- Interactive, commentable, export options with QR code authentication.
Drive steel H-piles with a disciplined, field-ready process that controls shoes, splices, penetration, blow counts, and alignment from the start. This checklist supports H-pile driving and steel pile installation crews with clear acceptance cues, objective measurements, and documentation requirements. You will confirm tip shoes and welding quality assurance before driving, monitor hammer performance and blow count trends, and validate penetration criteria and alignment tolerances without relying on PDA. The result is reliable bearing, minimal damage, and accurate as-built location data. By using total stations, digital inclinometers, calibrated gauges, and structured driving logs, you’ll reduce rework, avoid premature refusal, and prove compliance per approved project specifications and authority requirements. Each step specifies tools, tolerances, and evidence—photos, readings, and signatures—so daily pile records are complete and defensible. Start in interactive mode to tick items, add comments, attach photos, and export your report as PDF/Excel with an embedded QR for quick verification.
- Control risks before the hammer starts: confirm pile metallurgy, straightness, and correct shoe selection, then verify weld procedures and welder qualifications are current. These steps reduce tip damage, crooked starts, and splice failures, and create traceability through mill certificates, WPS numbers, heat numbers, and photo evidence of fit-up and weld finishes.
- Drive with confidence by recording hammer energy settings, blows per 0.25 m, and final set while monitoring relaxation and restrike behavior. Combining objective blow count logs with precise depth and elevation measurements improves acceptance decisions, documents refusal or over-penetration, and helps resolve disputes without dynamic instrumentation.
- Interactive online checklist with tick, comment, and export features secured by QR code.
- Prove alignment and position with digital level and total station checks, then finalize cut-off, splice NDT results, and as-built coordinates. Comprehensive documentation—photos, readings, logs, signatures—delivers a clear, auditable record per approved project specifications and authority requirements.
Pre-Drive Verification
Pile Shoes and Tips
Splices and Weld QA
Driving Operations and Monitoring
Penetration Criteria and Blow Counts
Alignment, Final Position, and Records
Pre-drive readiness and shoe selection
A successful drive begins with material verification, equipment compatibility, and the right tip shoe. Confirm section size, grade, and coating against the pile schedule, then document mill certificates and delivery tags. Inspect straightness and edges to prevent crooked starts, which magnify with depth. Verify drive cap or helmet fit to the H-pile profile and confirm hammer energy settings are within manufacturer limits. For shoes, match the type and wear surface to anticipated strata; a misfit shoe can split soils, damage flanges, or cause off-axis penetration. Dry-fit the shoe to confirm concentricity, then weld per an approved WPS with appropriate preheat and interpass temperatures. Finish by grinding and photographing the weld. Stencil durable IDs before lifting into the leads. These steps provide traceability, reduce tip failures, and help keep the pile plumb from the first blows.
- Verify section size, grade, and coating against pile schedule.
- Check straightness; repair or reject damaged flanges and webs.
- Confirm helmet fit and hammer energy within limits.
- Match shoe type to soil and verify concentric fit.
- Weld per WPS; record parameters and photograph results.
Splicing and weld quality assurance in the field
Splices demand careful preparation and documented QA. Position splices only within approved zones and prepare faces by square cutting, beveling, and cleaning to achieve consistent root gaps. Control fit-up using clamps; measure and record flange and web mismatch. Welders must be qualified for the process, and the WPS should specify preheat, interpass, and parameters. Record WPS numbers, welder IDs, and filler batch details. After cooling, perform visual inspection to acceptance criteria and complete any required magnetic particle or ultrasonic testing. Capture indication locations with annotated photos and verify rework results. Thorough splice documentation protects structural capacity and limits driving interruptions, especially when splicing above water or in tight access where rework is costly.
- Keep splices within approved elevation zones.
- Control fit-up; mismatch and gaps within tolerances.
- Record WPS, welder ID, and filler batch details.
- Perform VT and required MT/UT after cooling.
- Document repairs and re-examination results.
Driving control: penetration, blow counts, and alignment
Driving control aligns field production with design intent. Measure hammer energy and monitor blows per 0.25 m to track set trends. When approaching design elevation, slow the pace and record final set in 25 mm increments as specified. Observe any setup or relaxation by pausing and restriking; document changes—without using PDA—in the driving log. Maintain alignment with digital levels and leader guides; correct drift early to avoid excessive bending stresses. If refusal occurs prematurely, stop, notify the engineer, and proceed only with written direction. After acceptance, verify plumbness, survey plan position and head elevation, and document cut-off. Comprehensive records—photos, logs, surveys, and signatures—form the project’s defensible as-built and acceptance file.
- Record blows per 0.25 m and final set data.
- Verify energy settings; stay within manufacturer limits.
- Manage pauses and restrike to assess setup.
- Maintain plumb; correct drift early during driving.
- Survey final position and elevation for as-builts.
How to Use the Interactive Steel H-Pile Driving Checklist
- Preparation: gather approved drawings, pile schedule, mill certificates, WPS/WPQR, calibrated total station, digital level, IR thermometer, straightedge, gauges, camera, and PPE. Confirm hammer, helmet, and leads compatibility before mobilization.
- Open the checklist on a tablet or phone. Start a new pile record by selecting location, pile ID, and hammer ID. Enable offline mode if coverage is poor.
- Using the Interactive Checklist: tick each item as work progresses, attach photos of tags, welds, gauges, and instruments, and enter readings (kJ, mm/blow, elevations) in the provided fields.
- Add Comments: record variances, approvals, and engineer directions. Mention times for pauses and restrike, and link to WPS numbers and NDT reports for splices.
- Export: generate a commentable, QR-secured report and export as PDF/Excel. Share with the superintendent, inspector, and engineer for daily review.
- Sign-Off: capture digital signatures from contractor and inspector. Archive the report with photos, logs, and survey files in the project folder for traceability.
Call to Action
- Start Checklist Tick off tasks, leave comments on items or the whole form, and export your completed report to PDF or Excel—with a built-in QR code for authenticity.
- Download Excel - Steel H-Pile Driving Inspection
- Download PDF - Steel H-Pile Driving Inspection
- View Image - Steel H-Pile Driving Inspection
Cite & Embed
“Steel H-Pile Driving Inspection by Quollnet”
with a link to
this source page.

FAQ
Question: What penetration and blow count criteria should I apply for acceptance?
Question: How should I manage splices and welding quality during pile driving?
Question: What alignment tolerances are acceptable for steel H-piles?
Question: Why is PDA testing not included in this checklist?
Related Articles
Broader reading and guidance connected to this checklist topic.


Improve Your Project Handover Process With Snag List Tracking App
Related Checklists
Keep the workflow moving with nearby templates chosen from similar checklist content.