Base-Grout Bored Piles Checklist: Pressure, Uplift, Acceptance
Definition: Base-grout bored piles checklist guides installing base ports, controlled pressure grouting, uplift monitoring, and acceptance documentation for foundation QA teams, explicitly excluding shaft grouting operations.
- Verify port installation, test integrity, and set calibrated pressure limits.
- Apply staged pressure grouting and monitor pile head uplift in millimetres.
- Capture pressure–volume–time data and acceptance records for traceable QA.
- Interactive, commentable, export options with QR code for secure sign-off.
Base-grout bored piles require disciplined preparation, accurate instrumentation, and rigorous documentation to deliver dependable load transfer at the pile toe. This checklist focuses on installing grout ports at the base, executing controlled pressure grouting, monitoring uplift, and recording volumes and acceptance outcomes. It covers pile base grouting (tip grouting) only; shaft grouting is explicitly excluded. You will verify port integrity, use calibrated pumps and gauges, run pressure stages per the approved grouting plan, and track uplift with dial gauges or laser sensors. By logging pressure–volume–time curves and correlating them to uplift response, you avoid risks such as port leaks, over-pressurisation, soft toe response, and undocumented acceptance. The result is a clear, auditable QA trail for bored pile foundations that supports handover and performance assurance per approved project specifications and authority requirements. Use this interactive checklist to tick items, add comments, and export your records as PDF/Excel with a secure QR link.
- Use this checklist to confirm base grout ports are installed, tested, and clearly identified; ensure pumps, gauges, and mixers are calibrated; and run staged pressure grouting while monitoring uplift. You will capture photos, pressure–volume logs, and sign-offs for traceable acceptance.
- The procedure minimises risks from leaks, blocked lines, excessive uplift, or exceeding design pressure. It aligns grouting stages with real-time measurements, establishes clear stop criteria, and preserves material traceability, producing defensible records per approved project specifications and authority requirements.
- Interactive online checklist with tick, comment, and export features secured by QR code.
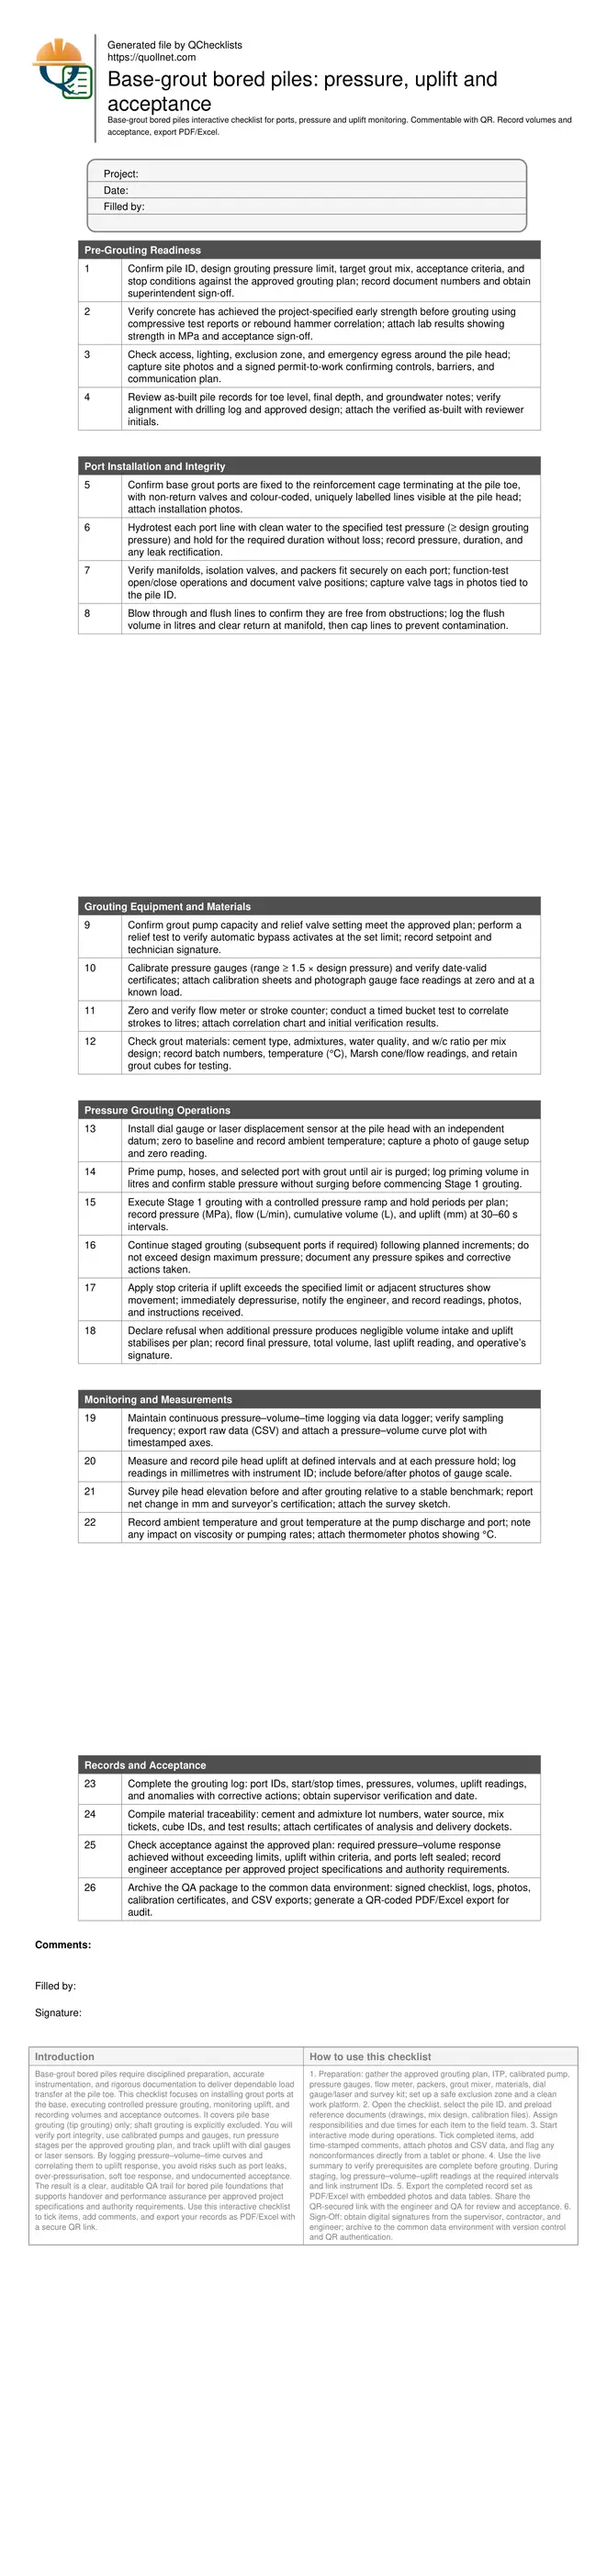
Pre-Grouting Readiness
Port Installation and Integrity
Grouting Equipment and Materials
Pressure Grouting Operations
Monitoring and Measurements
Records and Acceptance
Scope, boundaries, and why base grouting matters
This checklist covers base grouting of bored piles only: installing and testing grout ports at the pile toe, executing pressure grouting, monitoring uplift, and confirming acceptance. Shaft grouting is intentionally excluded to maintain clear scope and avoid mixing procedures. Effective base grouting densifies the bearing stratum, reduces toe settlement, and improves end-bearing reliability. The workflow begins with readiness checks—concrete strength, line integrity, calibrated instruments—and continues through staged pressure application while tracking millimetre-scale uplift at the pile head. Accurate, time-aligned pressure–volume–uplift data allows the team to judge when refusal is reached without over-pressurising or risking ground heave. By capturing photos, calibration records, and survey evidence, you produce a defensible QA trail per approved project specifications and authority requirements. The outcome is a safer, more predictable foundation with traceable acceptance and fewer post-construction disputes.
- Base grouting only; shaft grouting excluded by scope.
- Readiness checks prevent leaks and instrument drift.
- Staged pressure aligns with uplift observations.
- Evidence-driven acceptance avoids rework.
- QA trail supports audit and handover.
Executing pressure stages and controlling uplift response
Successful base grouting balances pressure increments against real-time uplift measurements. Begin with a clean, primed system to eliminate air compressibility, then ramp pressure in controlled steps per the approved plan. Hold at each step to observe stabilisation, logging pressure (MPa), incremental and total volume (L), and uplift (mm). If uplift rises quickly without proportionate volume intake, reassess pressure, verify datum stability, and confirm packer sealing. Conversely, large volume intake at low pressure may indicate leaks or a soft toe, requiring line checks or revised staging. Stop criteria should be clear: design pressure not exceeded, uplift within set limits, and refusal indicated by negligible additional volume. After grouting, survey the pile head and correlate elevation change with logged uplift to validate instrument readings. This measured approach protects adjacent assets, reduces the risk of ground heave, and produces a clear pressure–volume curve for acceptance.
- Prime lines to remove entrapped air.
- Use deliberate pressure ramps and holds.
- Correlate pressure, volume, and uplift.
- Apply stop criteria without delay.
- Survey to confirm gauge accuracy.
Documentation, traceability, and acceptance records
Documentation validates the technical work and enables transparent acceptance. Maintain a comprehensive grouting log capturing port IDs, start/stop times, pressure–volume–time data, and uplift readings tied to instrument IDs. Attach calibration certificates for pumps, gauges, and flow meters, along with grout mix tickets, temperature records, and cube test results. Material traceability—cement and admixture batches, water source—links performance to inputs. Photographs of port labelling, valve positions, gauge faces, and survey setups provide visual confirmation. Export raw data (CSV) and a pressure–volume curve plot for reviewer analysis. Acceptance should confirm the specified pressure–volume response, stable uplift within limits, and compliance with the plan, culminating in engineer approval per approved project specifications and authority requirements. Archive all records in the common data environment and issue a QR-secured PDF/Excel pack for audits and handover.
- Keep raw data with calibrated instrument IDs.
- Photograph key setups and readings.
- Trace materials by batch and certificate.
- Match acceptance to the approved plan.
- Archive to a controlled data environment.
How to Use This Interactive Base-Grouting Checklist
- Preparation: gather the approved grouting plan, ITP, calibrated pump, pressure gauges, flow meter, packers, grout mixer, materials, dial gauge/laser and survey kit; set up a safe exclusion zone and a clean work platform.
- Open the checklist, select the pile ID, and preload reference documents (drawings, mix design, calibration files). Assign responsibilities and due times for each item to the field team.
- Start interactive mode during operations. Tick completed items, add time-stamped comments, attach photos and CSV data, and flag any nonconformances directly from a tablet or phone.
- Use the live summary to verify prerequisites are complete before grouting. During staging, log pressure–volume–uplift readings at the required intervals and link instrument IDs.
- Export the completed record set as PDF/Excel with embedded photos and data tables. Share the QR-secured link with the engineer and QA for review and acceptance.
- Sign-Off: obtain digital signatures from the supervisor, contractor, and engineer; archive to the common data environment with version control and QR authentication.
Call to Action
- Start Checklist Tick off tasks, leave comments on items or the whole form, and export your completed report to PDF or Excel—with a built-in QR code for authenticity.
- Download Excel - Base-Grout Bored Piles Inspection
- Download PDF - Base-Grout Bored Piles Inspection
- View Image - Base-Grout Bored Piles Inspection
Cite & Embed
“Base-Grout Bored Piles Inspection by Quollnet”
with a link to
this source page.
FAQ
Question: What is the difference between base grouting and shaft grouting for bored piles?
Question: When can I start base grouting after casting the bored pile?
Question: How do I control and interpret uplift during grouting?
Question: What data must be logged for acceptance and audit?
Question: What should I do if pressure rises sharply but volume intake stops?
Related Articles
Broader reading and guidance connected to this checklist topic.

Download Excel Format Snag List

Master Construction Project Cashflow With Cashflowpot

How To Use Quollnet To Predict Construction Project Cashflow
Related Checklists
Keep the workflow moving with nearby templates chosen from similar checklist content.